I’ve often been asked to share a few of my teaching techniques. So here goes:
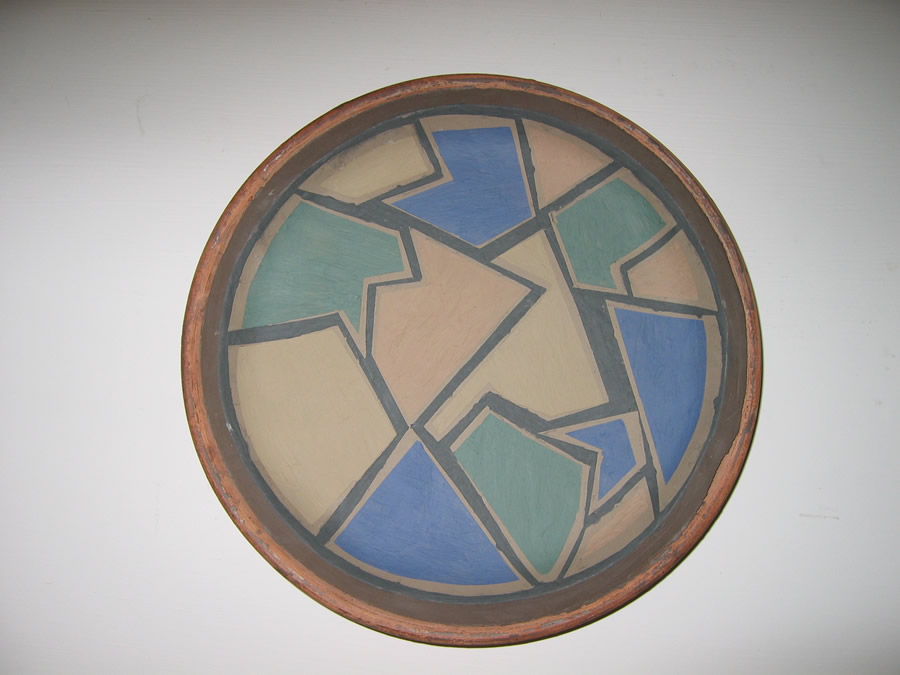
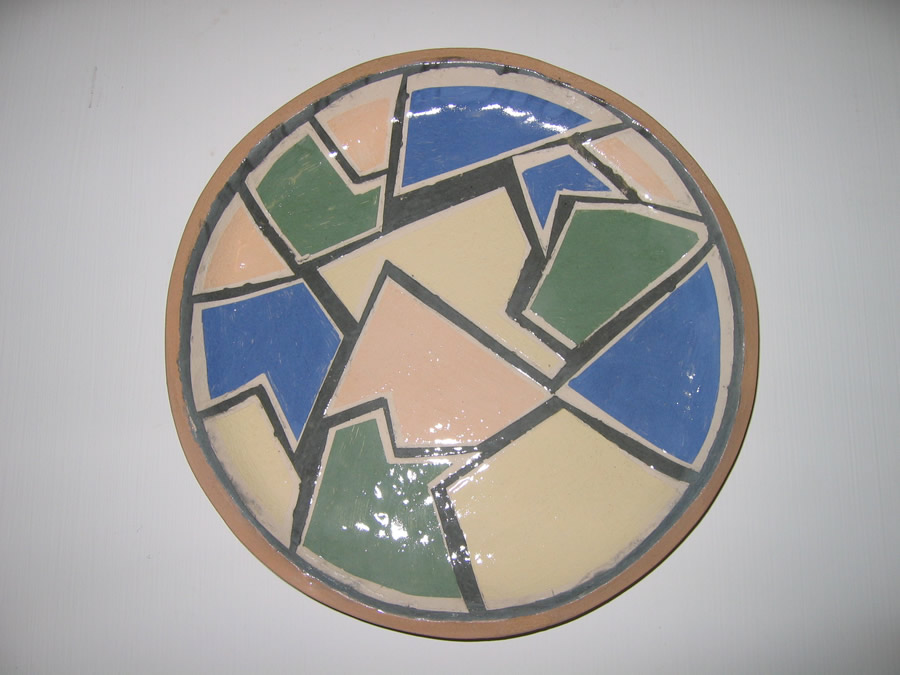
I have taught the following class many times. I have taught it to single students and to classes of 30 students. I have taught it to primary school children, degree students, girls at a pottery hen party and corporate team building events. If you teach ceramics then this is a really good class to have up your sleeve. It works at all levels of skill. It lasts from anything from 1.5 hours to 3 hours depending upon how you demonstrate it and the students’ level. Here is what you need:
Resources
Stoneware buff clay and a small amount of terracotta and white stoneware –Any contrasting clays work. If you haven’t got three types of clay then two types of clay will be fine. You can even create more unusual colours by adding 10 percent body stain to a white clay.
Press moulds – I always tend to use biscuit fired bowls as opposed to plaster moulds, as they store better, they are light (you can easily carry a box of 20) and there is no danger of plaster contamination. If you can’t throw then it is worth learning how to throw to make your own bowl moulds! The mould featured in this article was thrown from 1.5 lbs of clay.
Clay guns – Clay guns are basically small clay extruders. If you don’t have a clay gun then I have used hypodermic syringes in the past without the needle and a bigger hole drilled into the end.
Knives –Ideally potters’ knives.
Tile cutting tool – Okay you don’t actually need this, but I love gadgets!
Rolling pins and cloths –You could use slats as well if you want an even thickness.
Grog – Grog is just fired clay grit, which is good for texture. You can manage without it, but I like to have it
Rulers and pencils and paper –For doing the initial design work
Kidney tools – For smoothing.
The Class
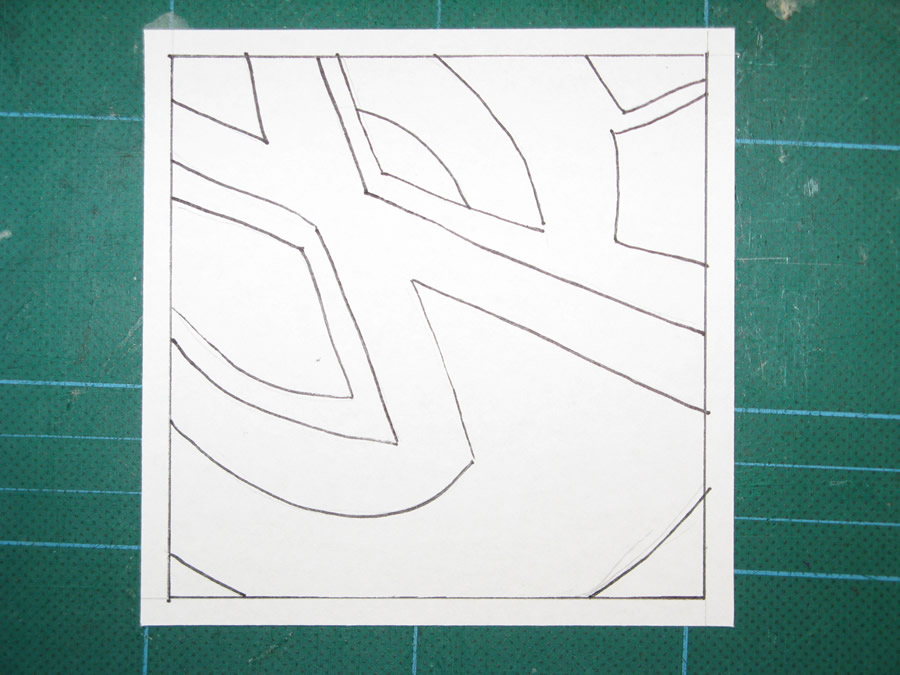
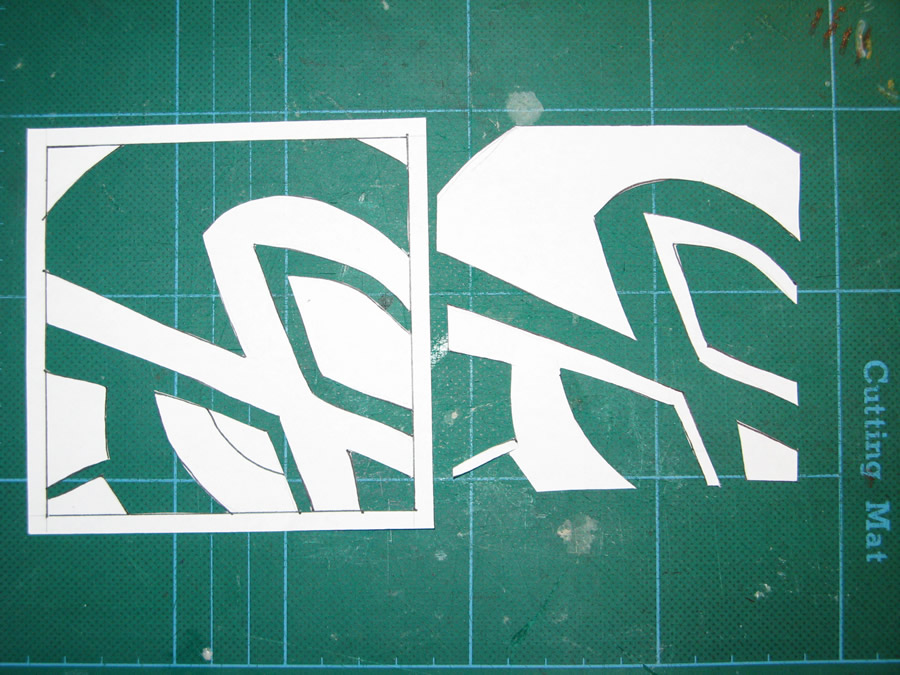
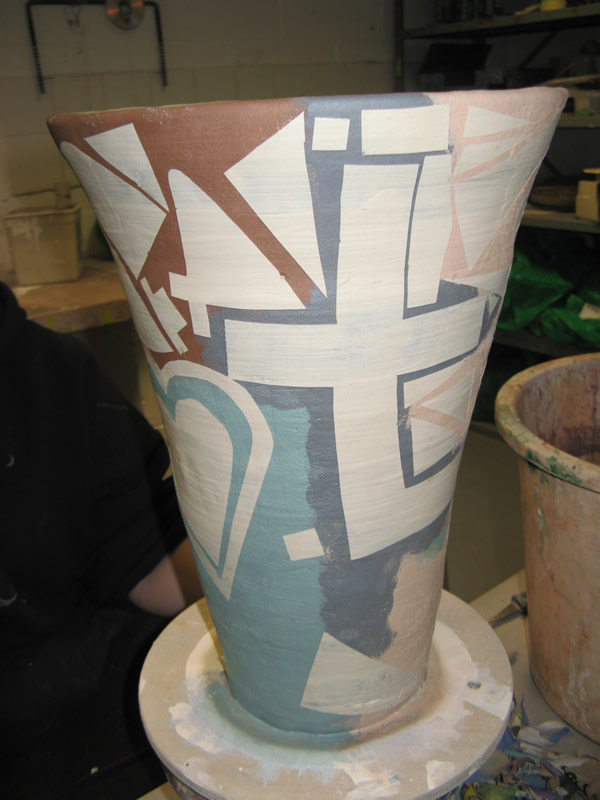
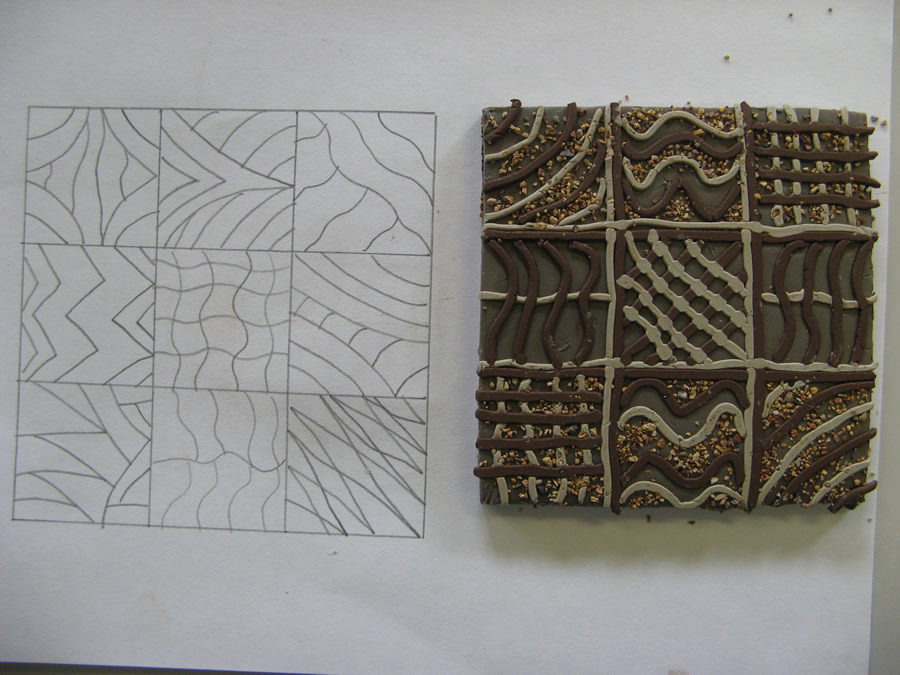
Begin by getting the students to draw a 12cm square on a piece of paper and then get them to sub-divide the square into 9 smaller squares. In each smaller square get the students to do some simple line drawing. Don’t spend too much time doing this. It is really just to get the students some ideas to begin with. Here are a couple of examples:
2. Next get the students to roll out a small ball of clay and cut it either with a knife or a tile cutter into a square (tile sized).
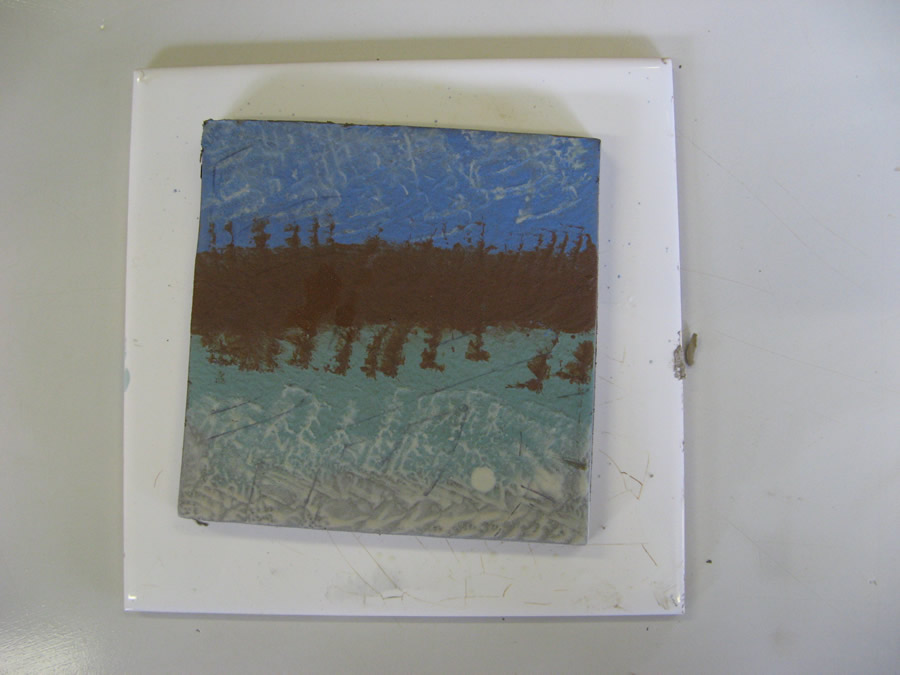
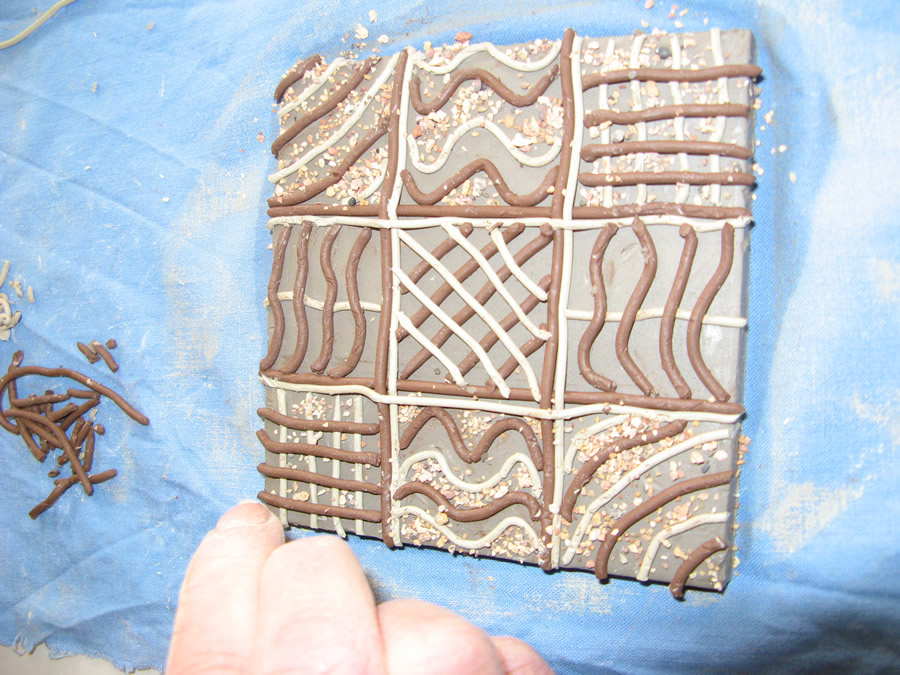
3. Fill the clay guns, one with terracotta and one with white stoneware and get the students to reproduce their design by laying the clay gun extrusions onto the tile. Don’t press the extrusions into the tile! I also get the students to add grog into parts of their decoration to add texture. You can just pick up the grog between your finger and thumb and drop it where you want it.
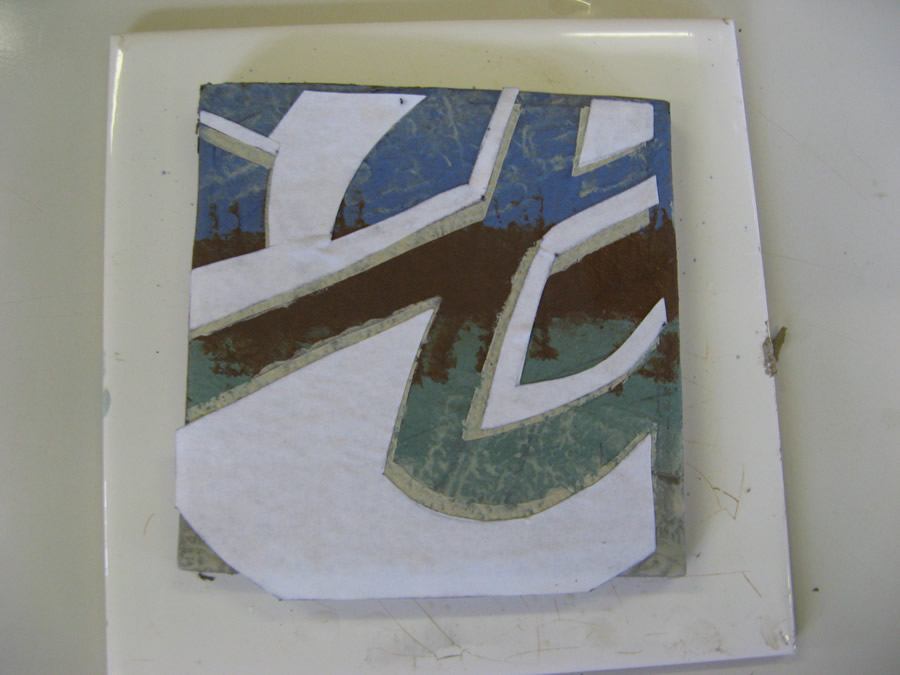
4.Now get the students to place a piece of paper over their tiles and lightly roll over the paper with the rolling pin, so that the extrusions inlay into the tile. Make sure the students don’t press too hard as you don’t want a massive tile, you just want to press down hard enough to inlay the extrusions.
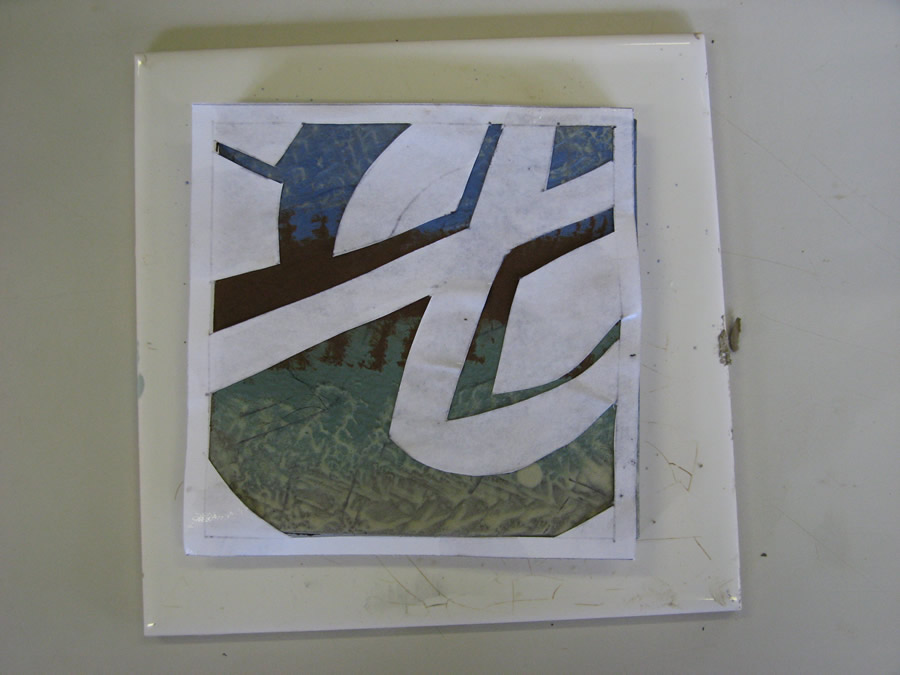
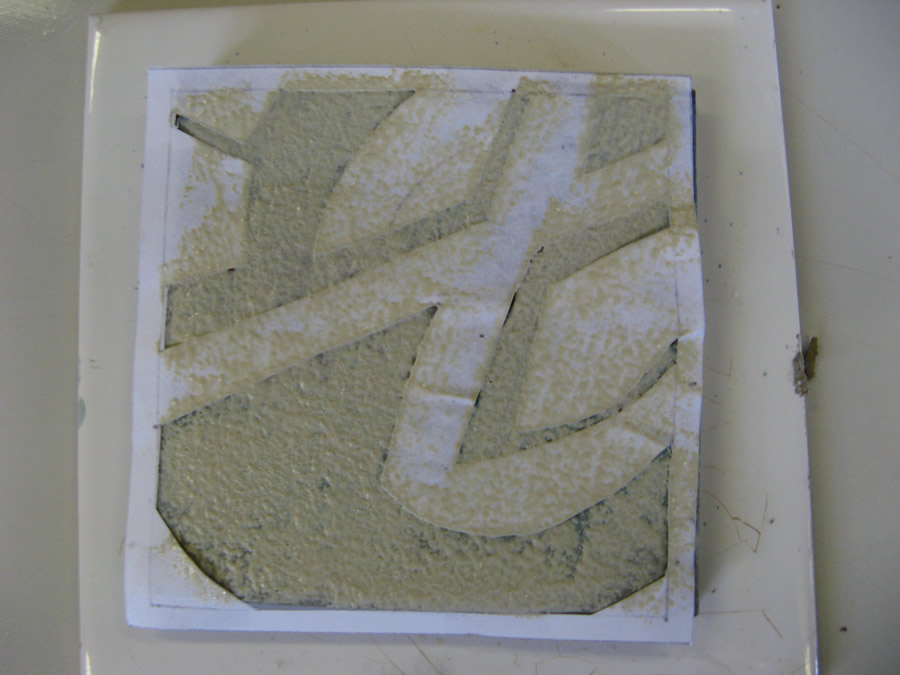
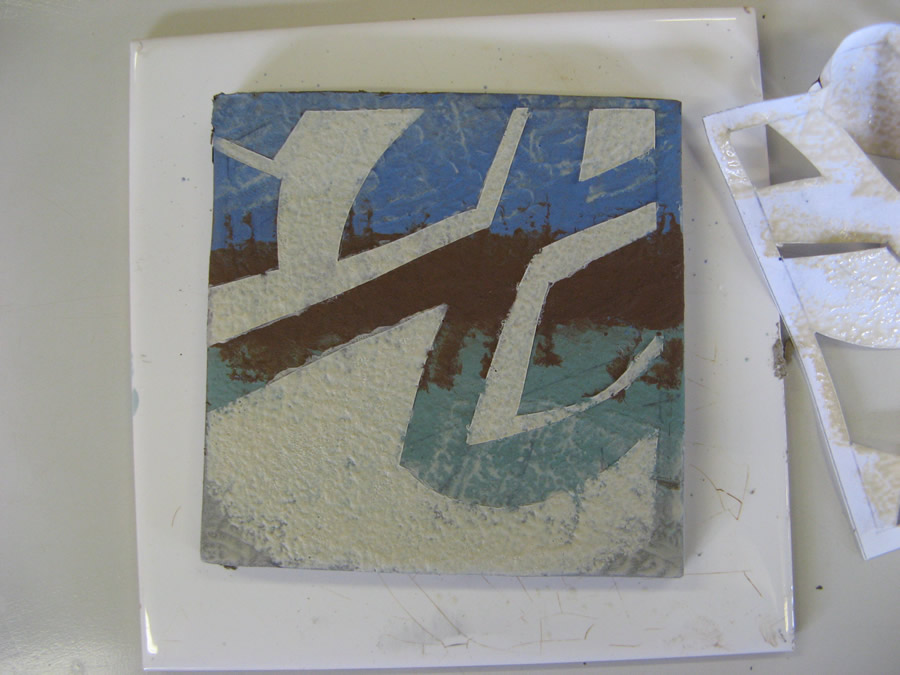
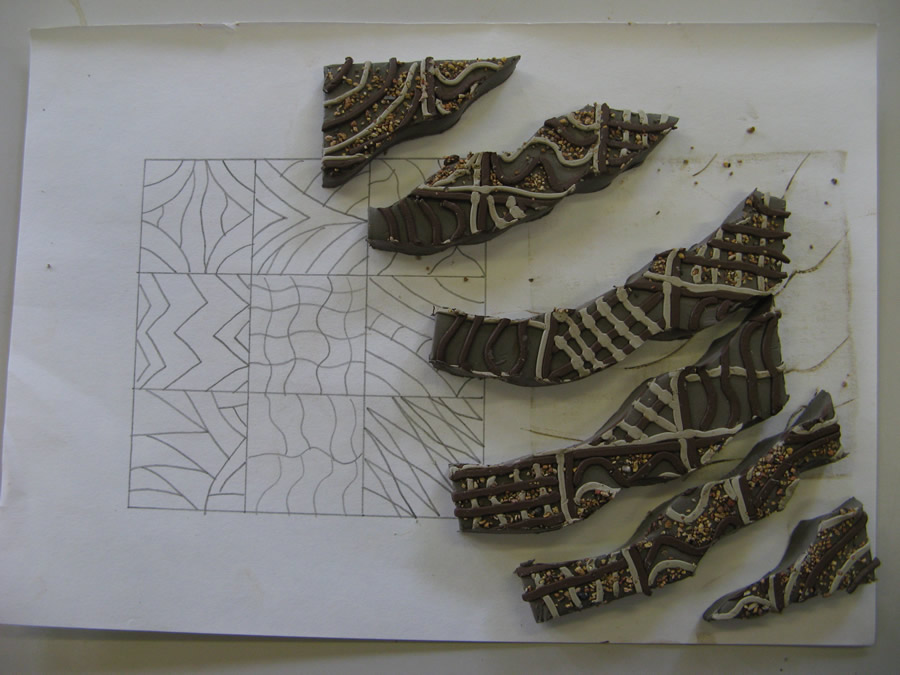
5. Now get the students to cut their tile in 6 to 9 pieces. If they complain about this then tell them that you want to make the design more abstract. If they still persist in complaining then allow them to cut the tile into 9 squares, so that they keep all their decoration intact!
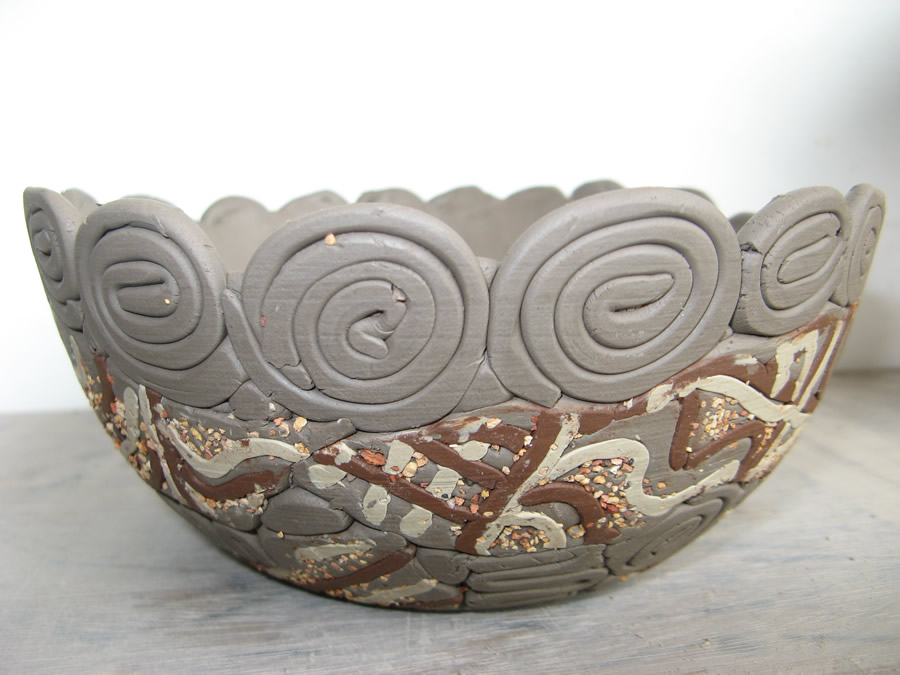
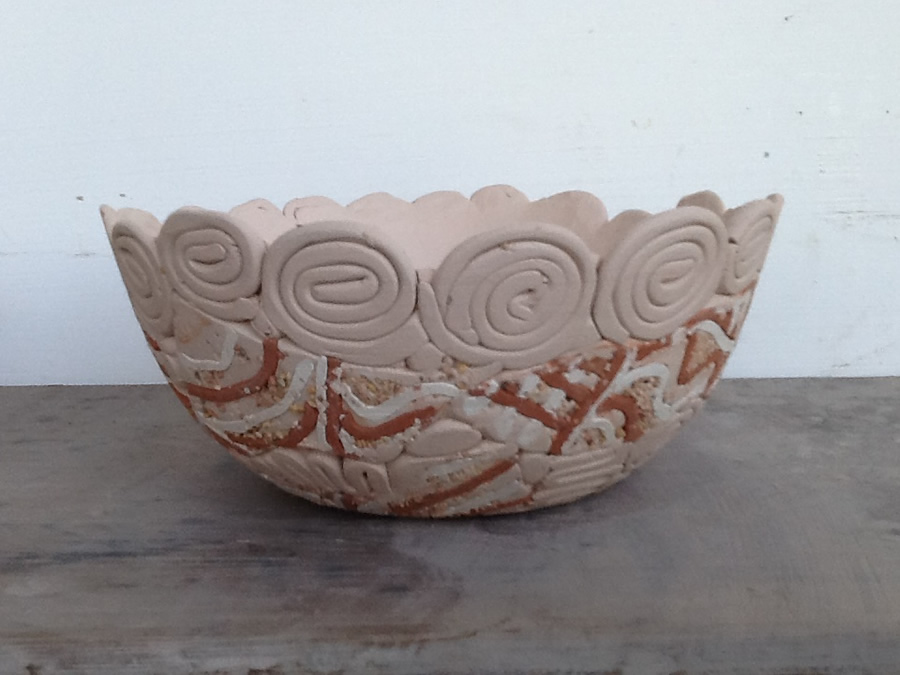
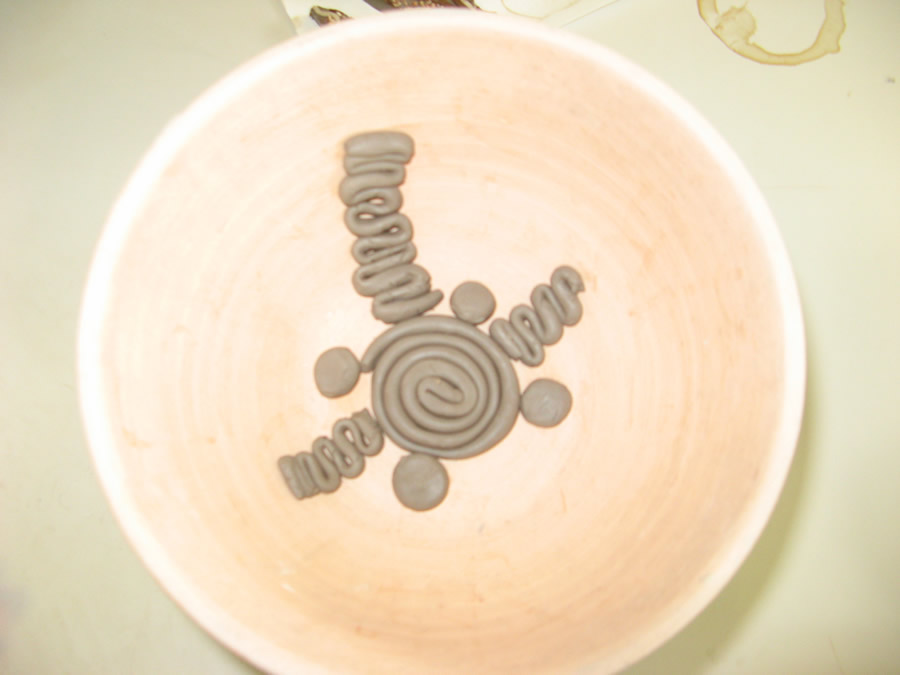
6. Take a press mould and get the students to begin filling it with hand rolled coils of clay and balls of clay, lightly pressing the pieces together. Start from the base of the bowl and slowly get them to work their way up. Make sure they are creative with the coils. Show them how to make spirals and zig zags.
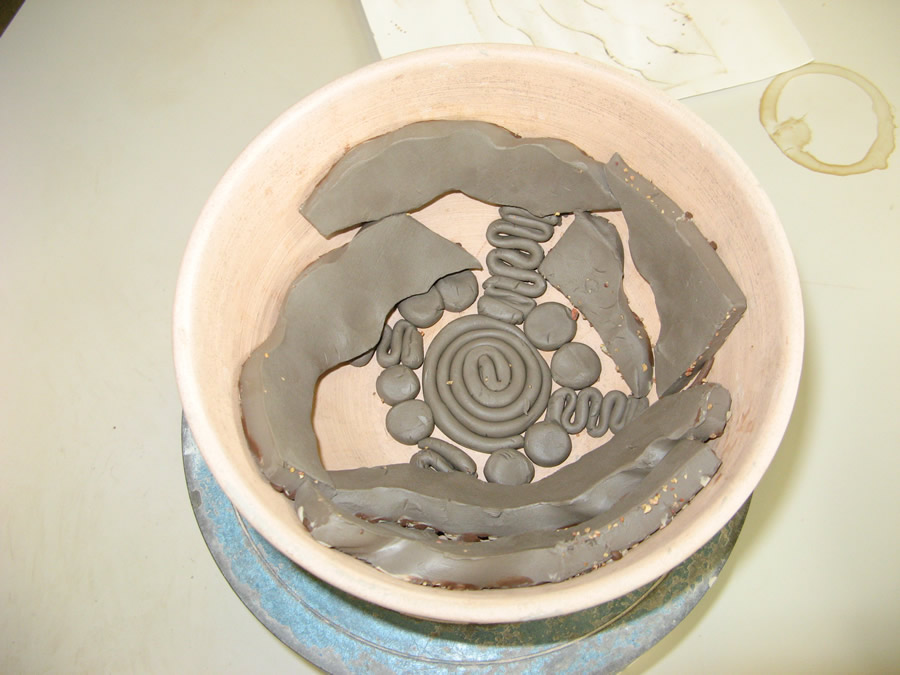
7. Next get the students to start adding their bits of tile with the decoration facing outwards.
8. Encourage the students to produce an attractive rim. A series of balls or spirals seems to work well.
9. Now smooth over everything with a kidney tool.
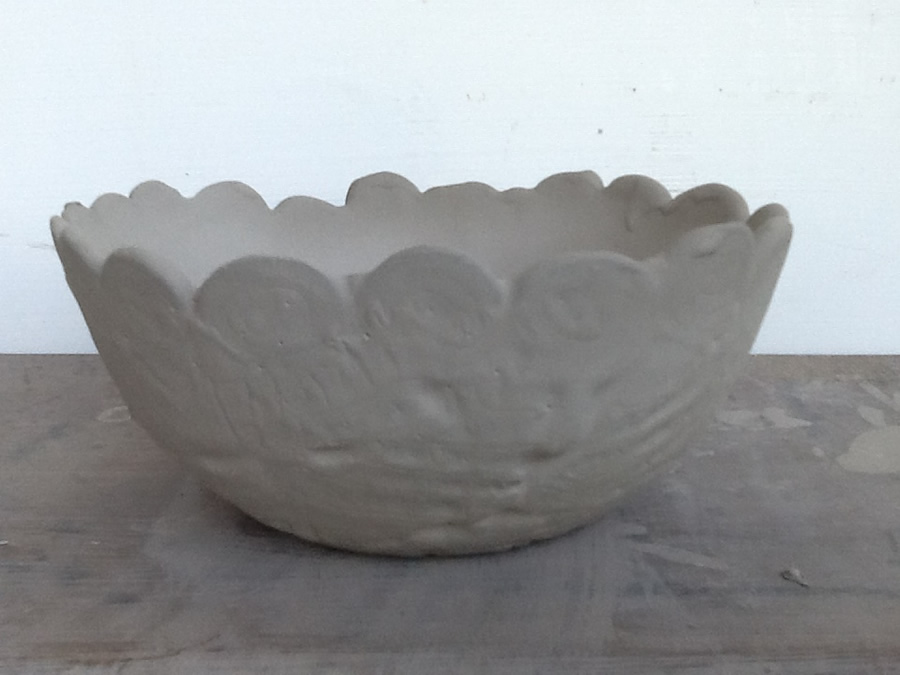
10. Empty the bowl out of the press mould by turning the mould upside down and catching the bowl in your hand.
11. Biscuit fire the bowl.
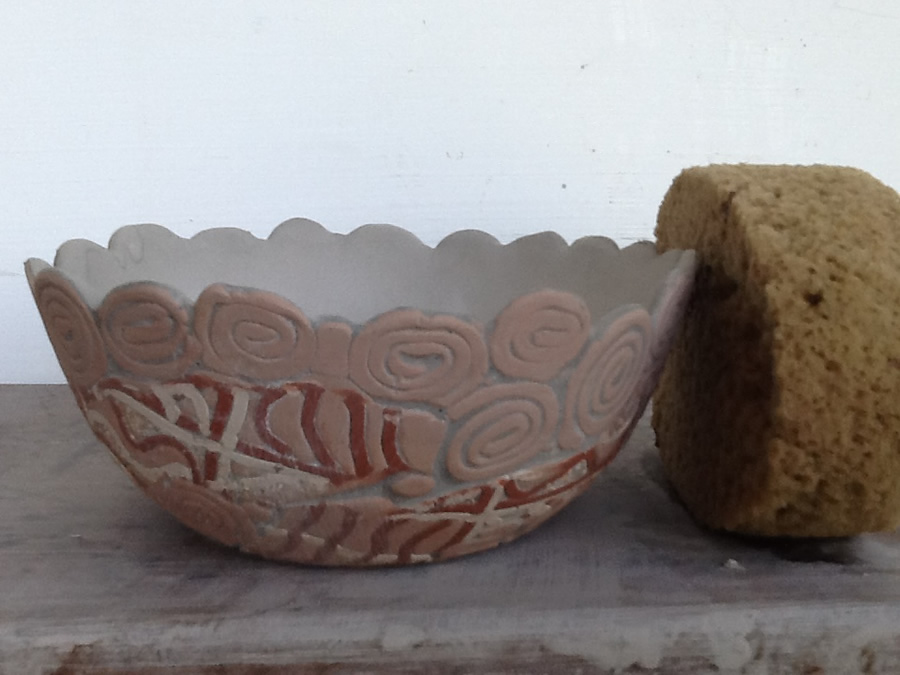
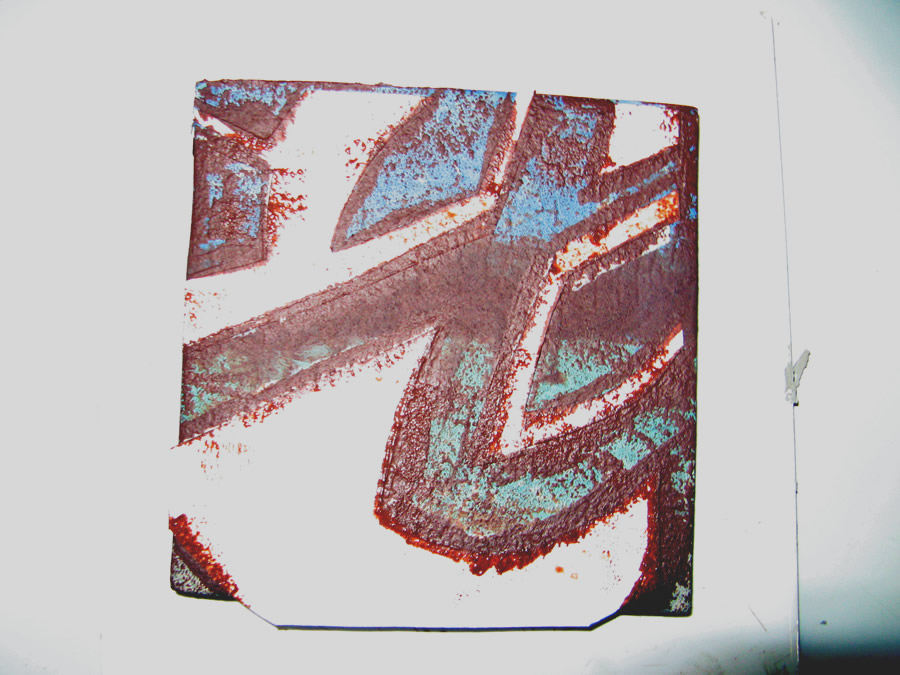
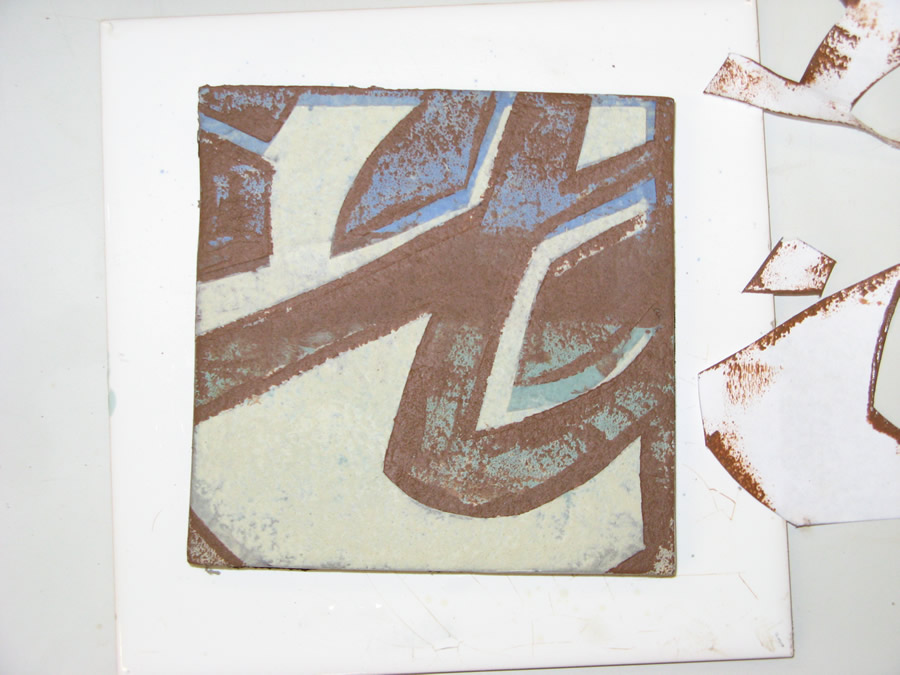
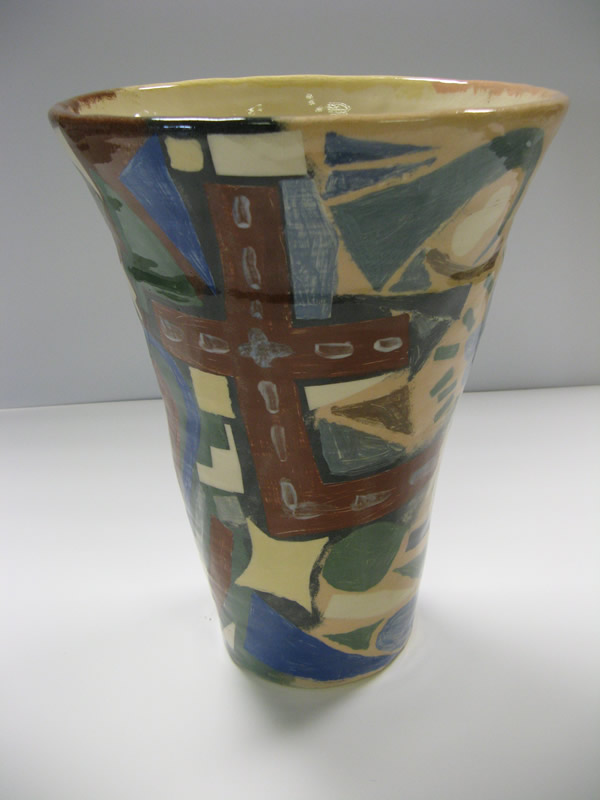
12. Cover the whole bowl with glaze. In this case i’m using blue.
12. Wipe the glaze off the outside using a large sponge.
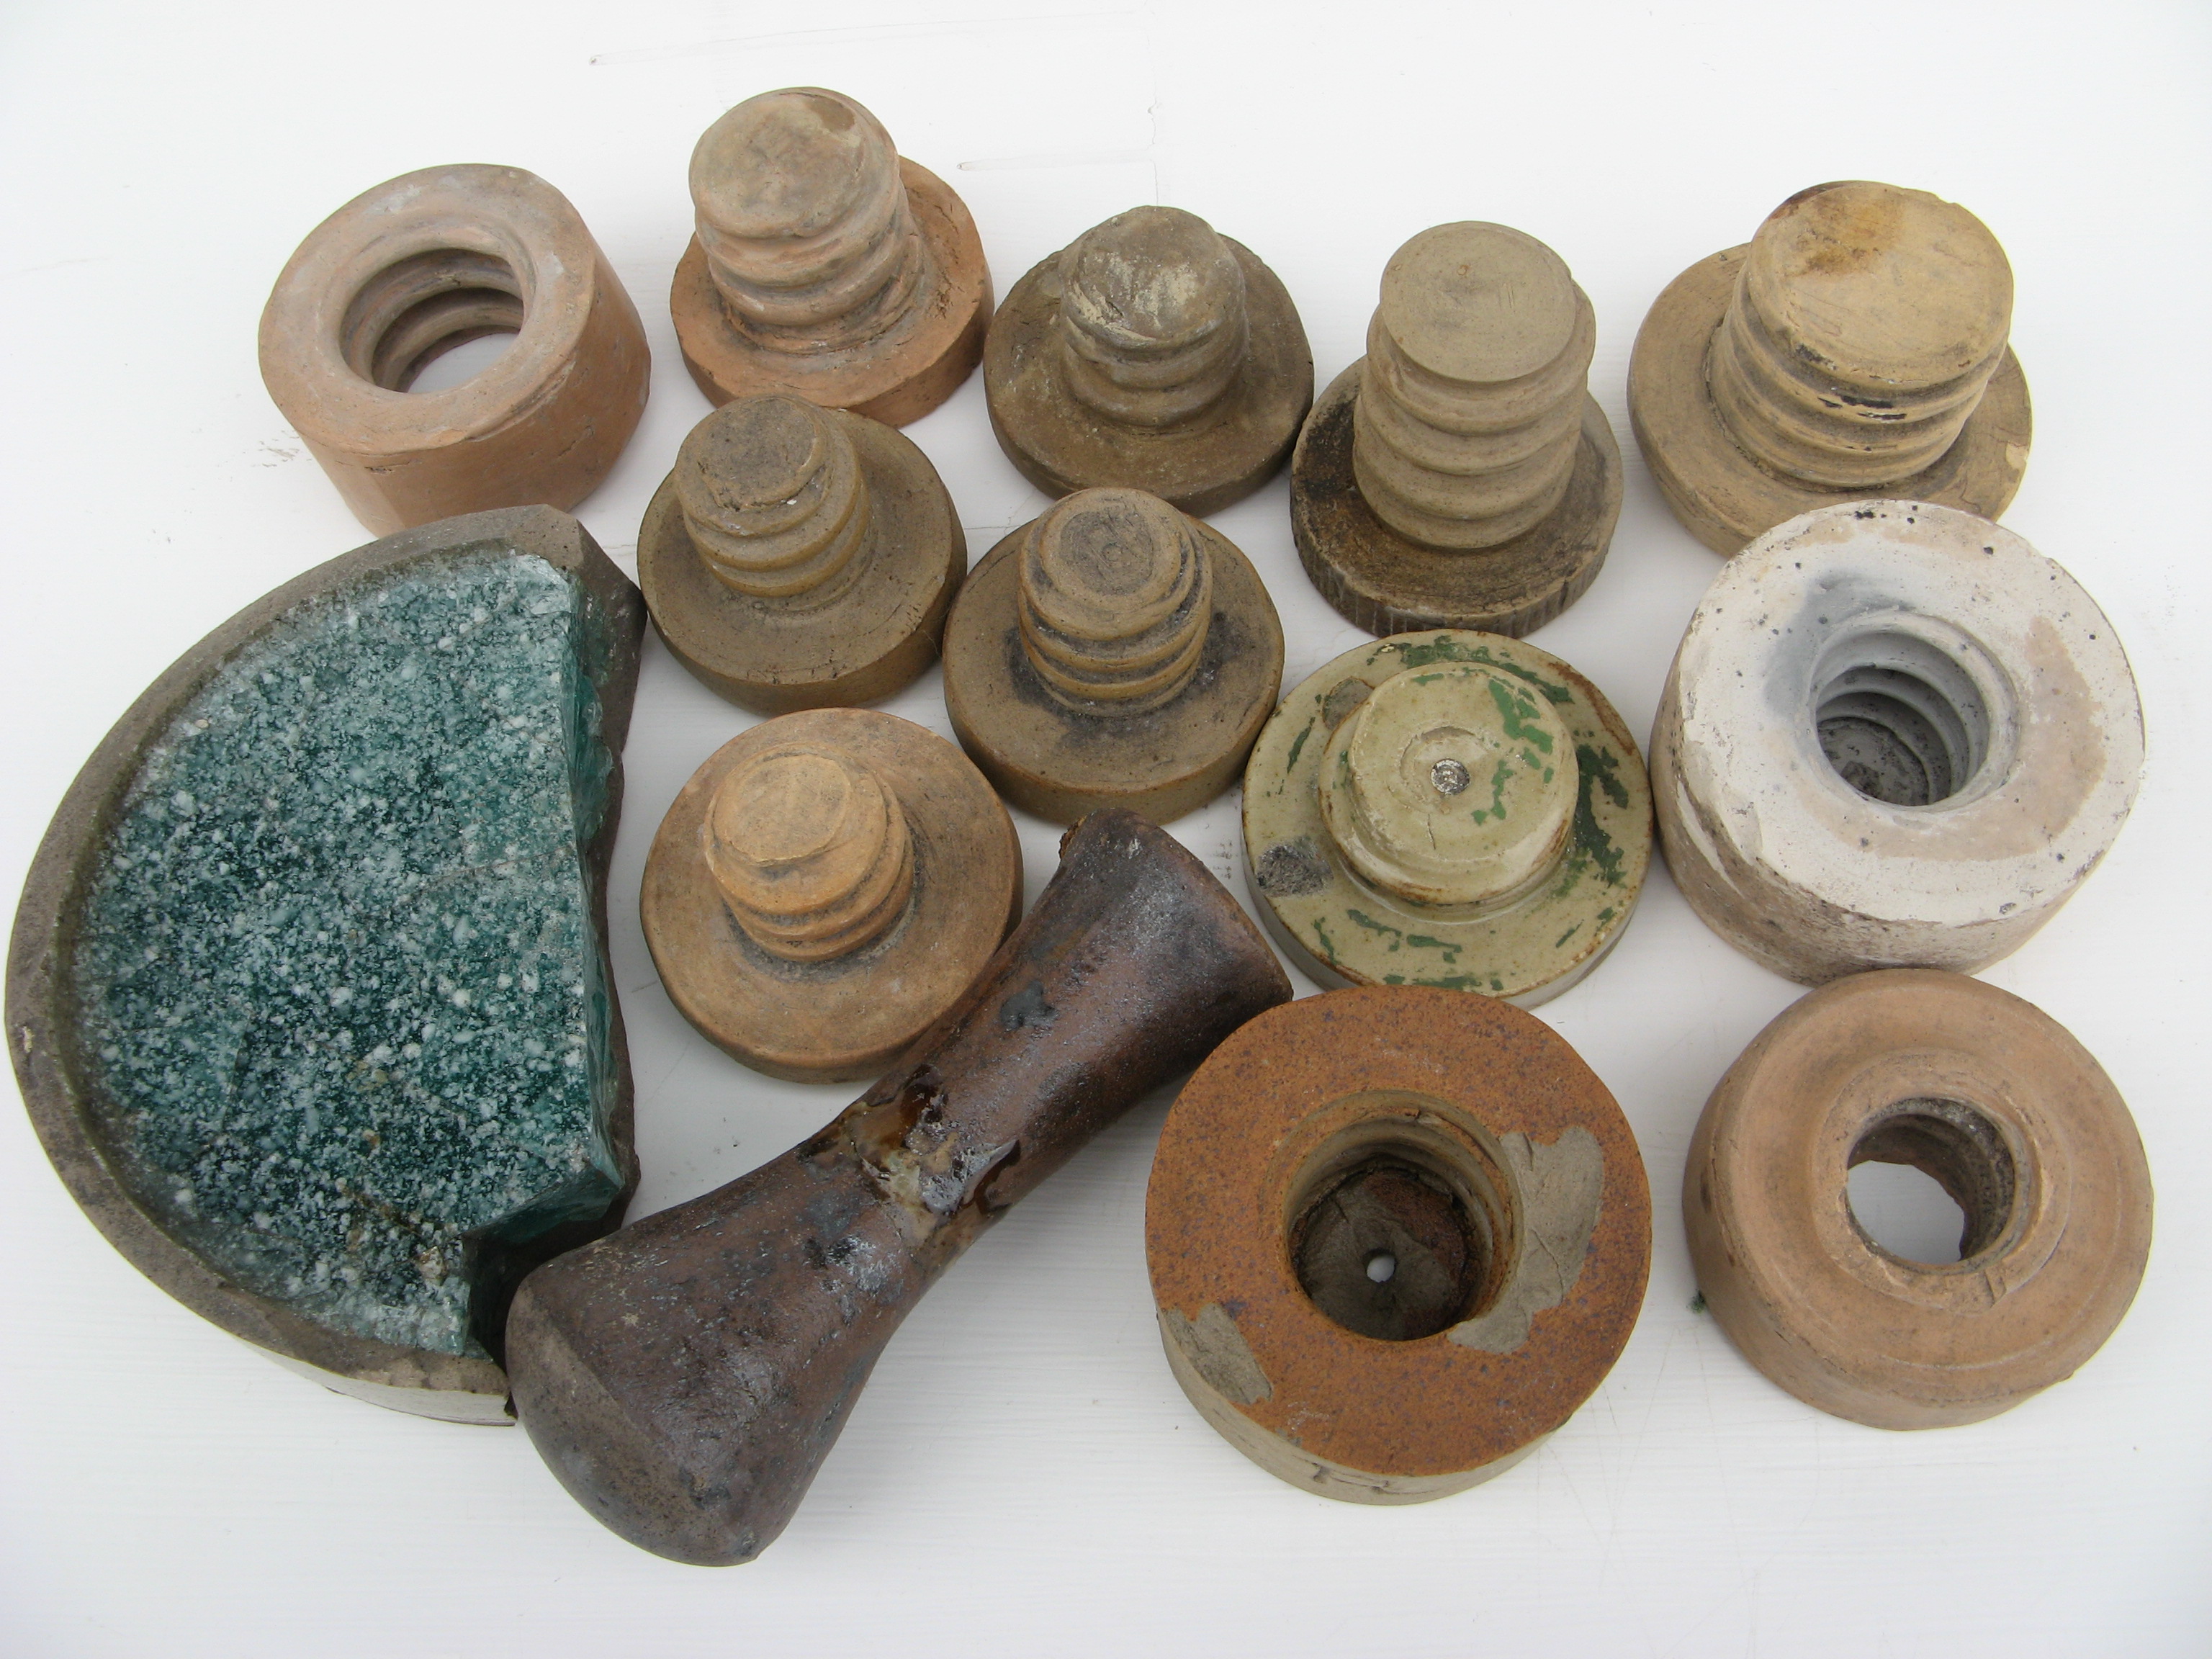
Earlier this year I had an email from a chap from Burton- in-Lonsdale called Peter who claimed to have found some old pottery equipment in a cellar that he didn’t know was there. He sent me the following photograph of a selection of the items and asked me if I would like him to call around to the pottery with the collection of things he had uncovered. I was delighted for him to call into the pottery and look at this treasure.
It turned out the cellar had been discovered when Peter was having his central heating plumbed in. The plumber had removed some floorboards to locate and install new pipework when he discovered a void. I guess it would have made the plumber’s life a lot easier, as he would have been able to go into the cellar and work on the pipes standing up. An entrance to the cellar was discovered from the inside which leads to the front garden via a buried doorway (hence he didn’t know he had the cellar, as the entrance was covered!)
The cellar is stone built with a fireplace and recessed stone shelving and strangely had a large pile of rubble against one of the walls. Peter made plans to extend his house downwards and it was whilst the builders were extracting the rubble from the cellar floor that they came across the old pottery equipment. How and why it ended up in the pile of rubble is a mystery.
Burton-in-Lonsdale has a long history of pottery industries, particularly the manufacture of stoneware bottles. Some of these bottles had screw lids with leather washers that sealed the contents. It is my guess that what Peter had found among other things are some moulds for the manufacture of the screw part of the bottle. One mould makes the stopper (male screw) and the other mould makes the screw in the bottle (female screw). Now being a potter myself I was keen to attempt to make a screw top bottle of my own using these old moulds. Here is a photo sequence of me doing this:
Here I have pressed clay into the mould and then stuck a clay disc onto the top. The mould was first lubricated with oil, so the clay won’t stick to it. It was then left overnight to dry and then unscrewed the next morning.
The stopper is unscrewed from the mould.
I threw a bottle shape and then enclosed the mould inside the neck of the bottle. The mould was first coated with oil to act as a resist.
The mould was left in the stopper overnight and unscrewed the next morning.
Mould unscrewed from bottle.
The thread on the inside of the bottle.
Adding the stopper to the bottle.
The finished bottle!
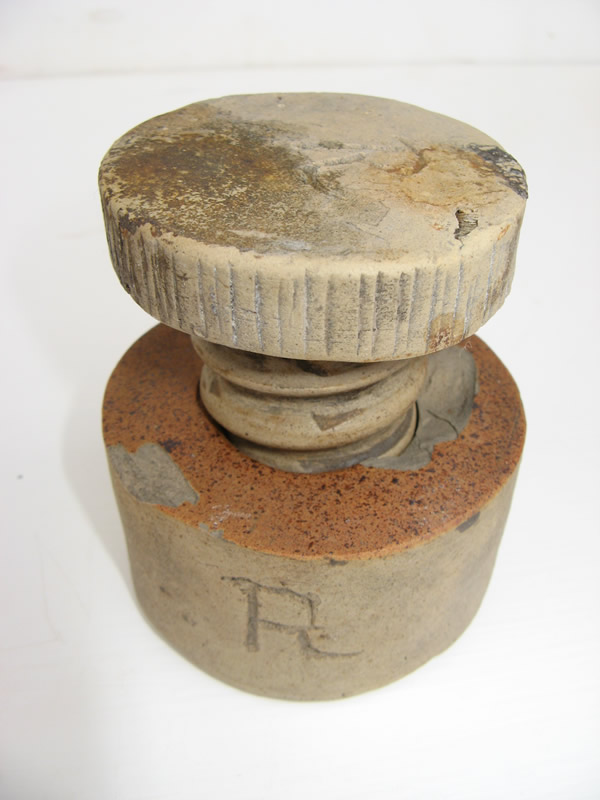
I’m fairly convinced that the stoppers were made as in the photographs. I’m not as convinced that the screws were put into the bottles using the method I have shown (any views on this would be appreciated), however the method I used did work. I did wonder if the moulds for making the screw in the bottle were in fact bottle stoppers? One of the female moulds and one of the male moulds had the letter “R” carved into the side as if they were a matching pair for creating the thread in the bottle and the bottle stopper (they did screw into each other).
Notice the “R” scratched into both moulds. All the moulds appeared to have been made from clay. Some have been high fired and some have been low fired.
Besides the screw moulds, a number of other objects were found:
There was a pestle that looked as though it had been broken and fixed again by applying glaze to act as glue and then re-firing (only a potter would do this!). It is possible that the pestle could have been used for grinding glaze ingredients?
Pestle, broken and repaired by glaze.
What looks like the broken bottom of a stoneware bottle filled with an inch of glass. This is another mystery. The only way I can think that this could have been made is by filling the pot with broken glass prior to firing, so that during the firing the glass melts and forms a pool or by mixing dry glaze ingredients into the bottom of the pot and then firing so the pot acts like a crucible for the molten glaze ingredients? Could this have been glass frit manufactured at Burton for adding to glaze? I am totally confused by this.
Stoneware vessel filled with glass.
A stoneware bottle stamped with a “W” and marked close to the base with “Bateson’s 1914”. Now the name Bateson was a common name in the Burton potteries. Does the “Bateson’s” refer to one of the Bateson’s potteries e.g Waterside Pottery which was run by William Bateson and sons, or did the “Bateson’s “ refer to the company that sold their product in the bottle? It was uncommon for the Burton potters to put their name on a pot and when they did it was usually on the base of a pot and not on the side?
Stoneware Bottle. Notice the “Bateson’s 1914” stamped on the side.
A metal wheel with a shaft coming out and a wooden top. Could this have been a pottery wheel, or a banding wheel, or is this just wishful thinking on my part? The wheel has a ring of lead attached to it. Could this have been to aid momentum? I struggle to see what else this object could be.
Could this be a pottery wheel head. Notice the ring of lead.
Top view of wheel head.
Could the cellar have been used as a small scale pottery workshop? This is a possibility, there is no evidence of a kiln in the building, but there were certainly several kilns in the neighbourhood. Perhaps the person that lived here produced work at home and had some arrangement with a local potter whereby he could fire his pots in their kiln? Perhaps the cellar was for manufacturing stoppers. In my discussions with the Bateson family I remember talk of a chap who I think was called Richard Bateson, who was known locally as “screw Dick” because his job was to make the screws and stoppers for the bottles at Waterside Pottery. Could this have been Screw Dick’s screw making cellar? Could this have been a small workshop for making the screw moulds? Perhaps the cellar had nothing to do with the pottery industry and the moulds were just accidentally included in the rubble?
How did the rubble end up in the cellar? Why was the only entrance blocked up? The house was once attached to a larger house next door. At some stage in the past they must have decided to make it a separate house. Maybe they just didn’t like the look of a doorway leading down steps into a cellar and just decide to bury it?
View of cellar looking towards original entrance.
View of excavated doorway into cellar. The stone arch was only discovered when the pebble dashing was knocked off.
Unfortunately I have no picture of the rubble in the cellar. This is what it looked like once it had been taken out of the cellar!
Perhaps the owner of the house prior to it being split in two owned one of the Burton potteries and simply stored some pottery related items in the cellar?
This find has certainly proved interesting and seems to have raised more questions than answers. Unfortunately most of the people that could provide the answers are no longer around. If anyone can shed any light on these findings, I would be very grateful to hear from them.
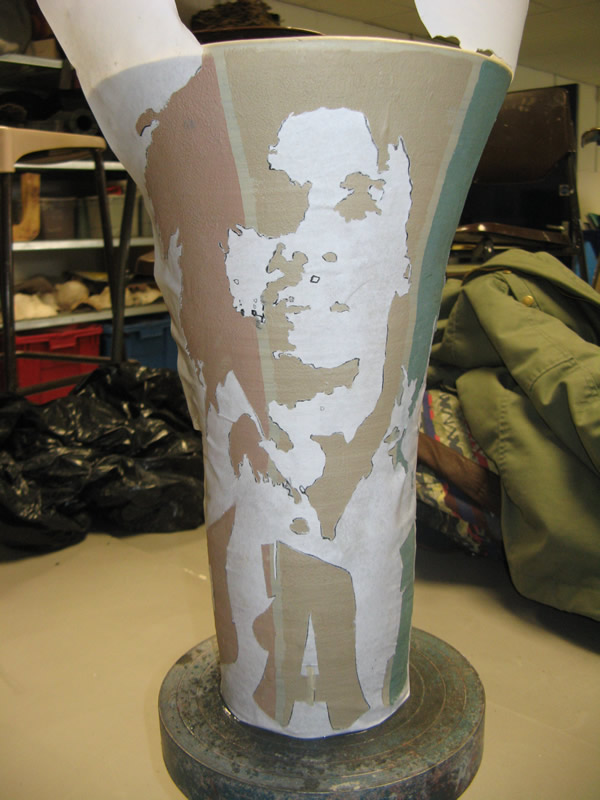
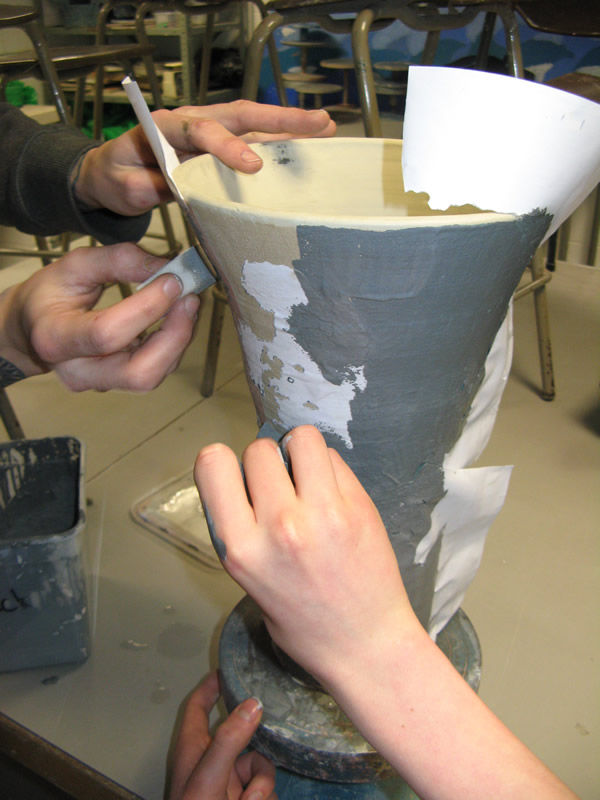
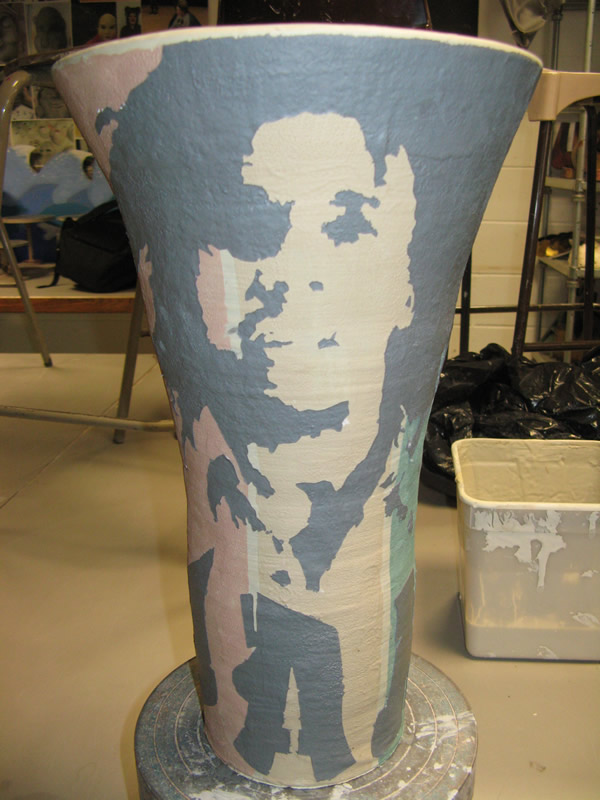
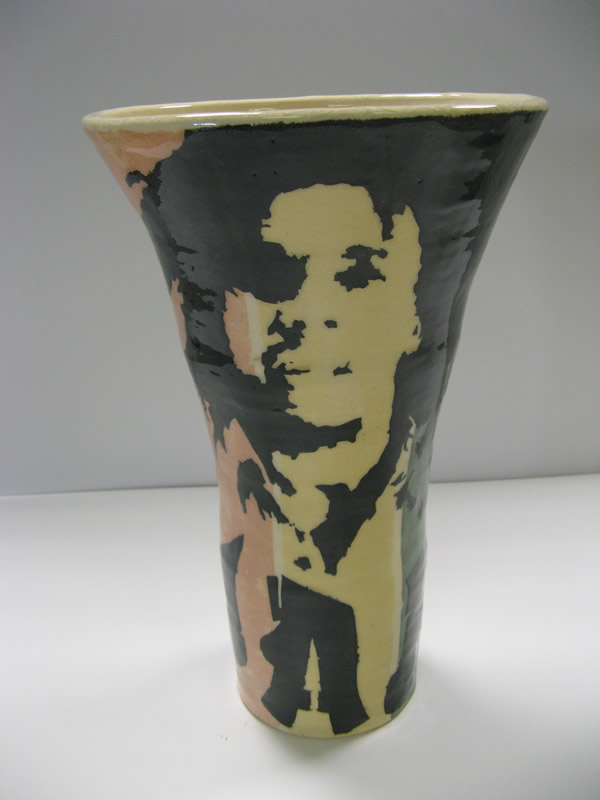
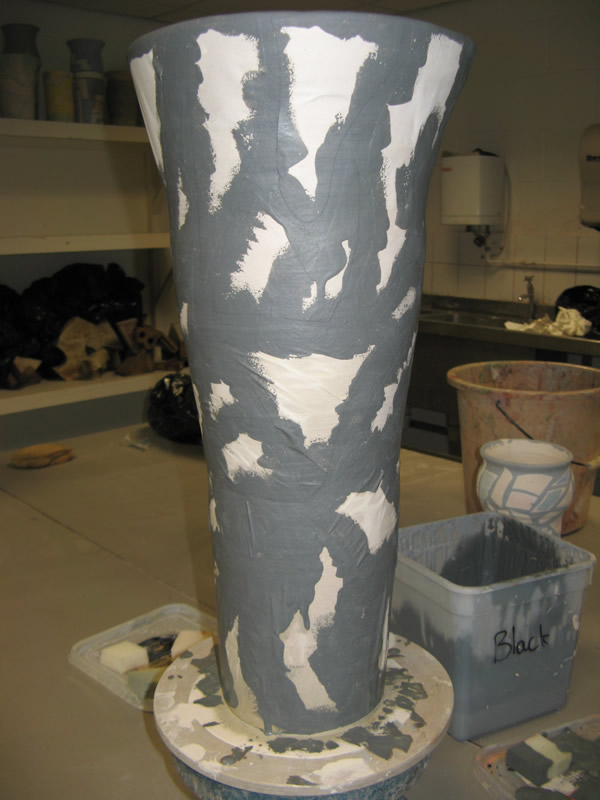
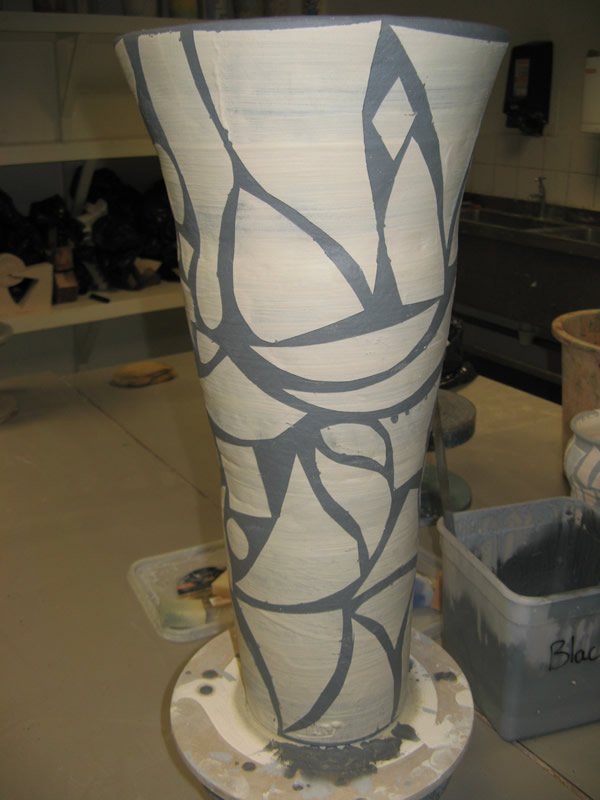
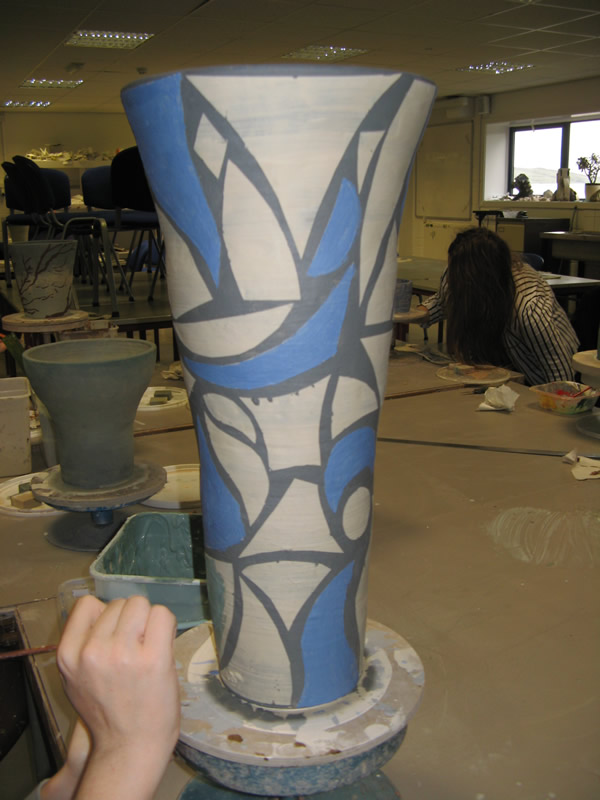
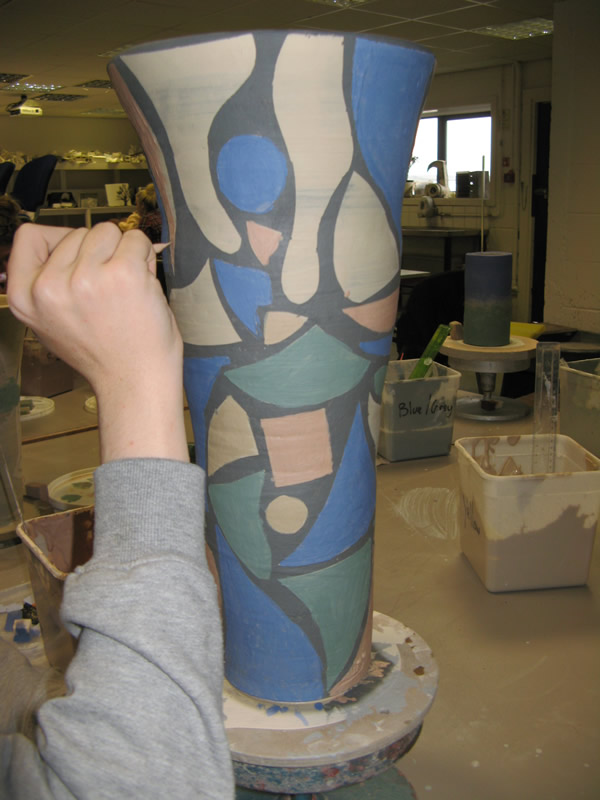
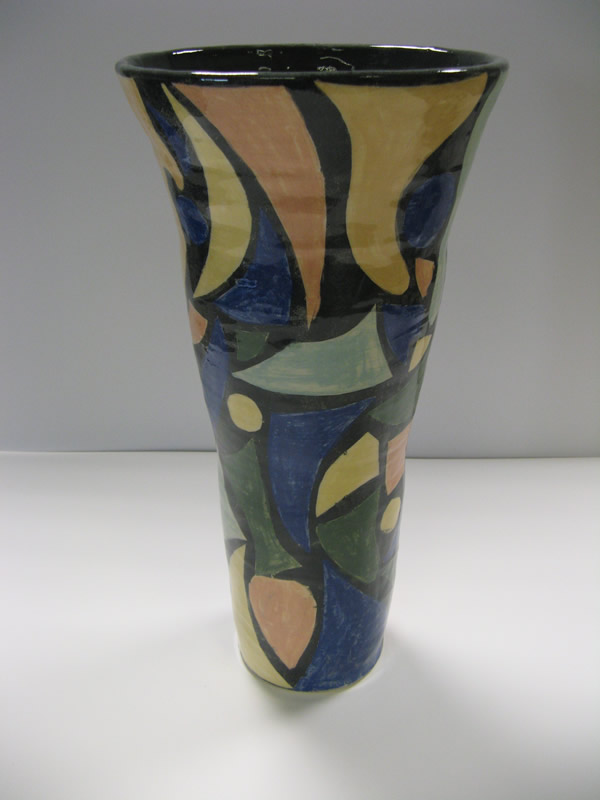
I use the newspaper resist method a lot with my students, so I thought I’d share some of the techniques.
I use slips mainly because they are cheaper than under-glazes. I mix up a white slip using roughly 50 percent china clay and 50 percent ball clay. I achieve the colours using 10 percent body stains that I buy from Potclays. I sometimes mix up a blue slip by adding 2 percent cobalt. I always put the slip through an 80s mesh prior to use.
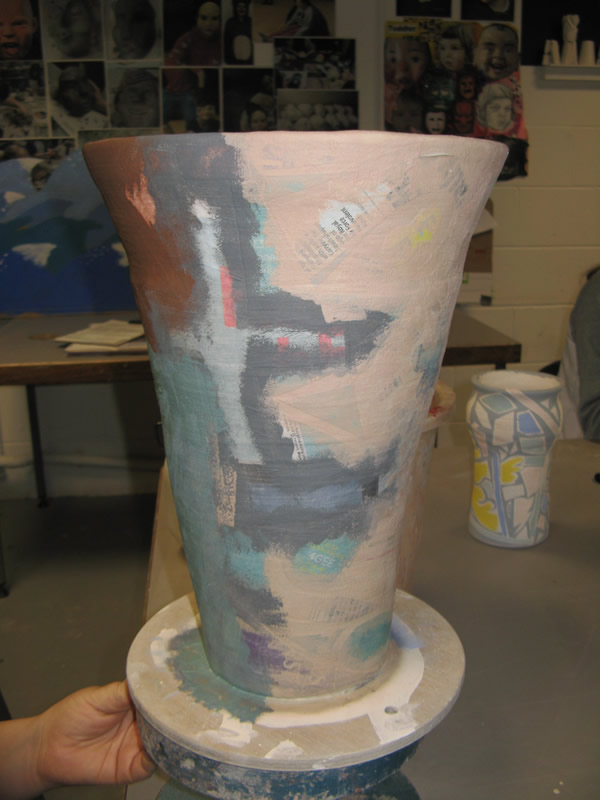
Before applying any colour I always cover the pots to be decorated with a white slip. If the pot is a plate then I will pour the slip inside and pour it out again. If the pot is, say, a large coiled vase shape then I will pour the slip inside the pot and pour it out again then leave the pot to dry overnight and then paint 4 layers of white slip onto the outside allowing the slip to dry between layers.
The pot is now ready for decorating. You may want to add colour to the pot before applying any newspaper, for instance if you are trying to create a landscape then you may want to add greens and browns for the land and blue for a sky.
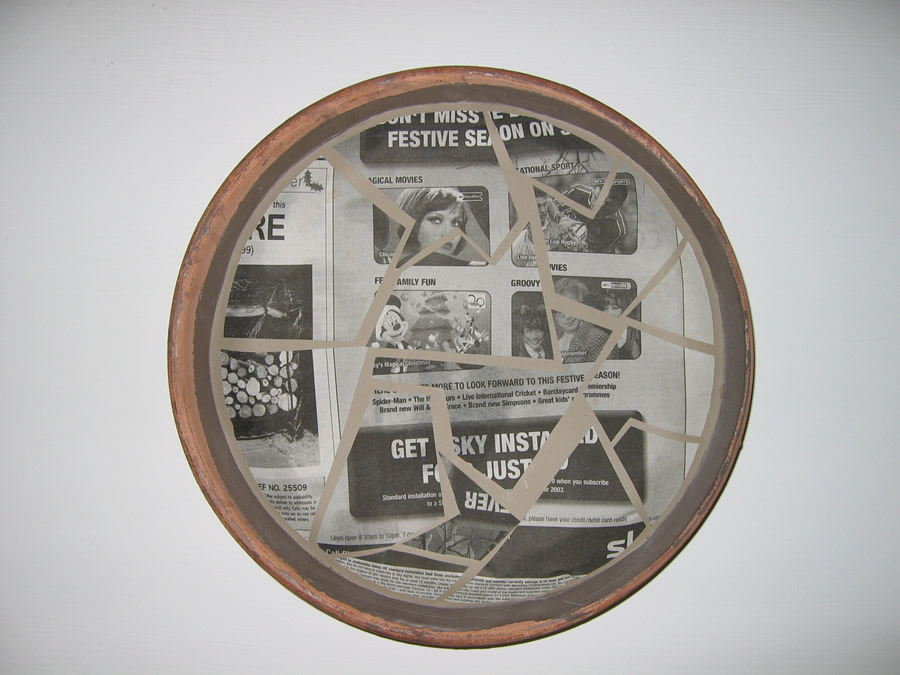
The newspaper is cut with scissors for simple shapes and using craft knives and cutting mats for more complex shapes. Because printed newspaper can be quite distracting for cutting complex shapes, I sometimes use blank newspaper print. Colour is applied using sponges.
Method of applying newspaper resist to a tile:
Pattern drawn onto paper
Pattern cut out creating essentially two stencils.
Background colours sponged onto tile
Stencil applied to tile
Coloured slip applied with small sponge
Stencil removed
Second stencil applied
Slip applied with sponge
Second stencil removed.
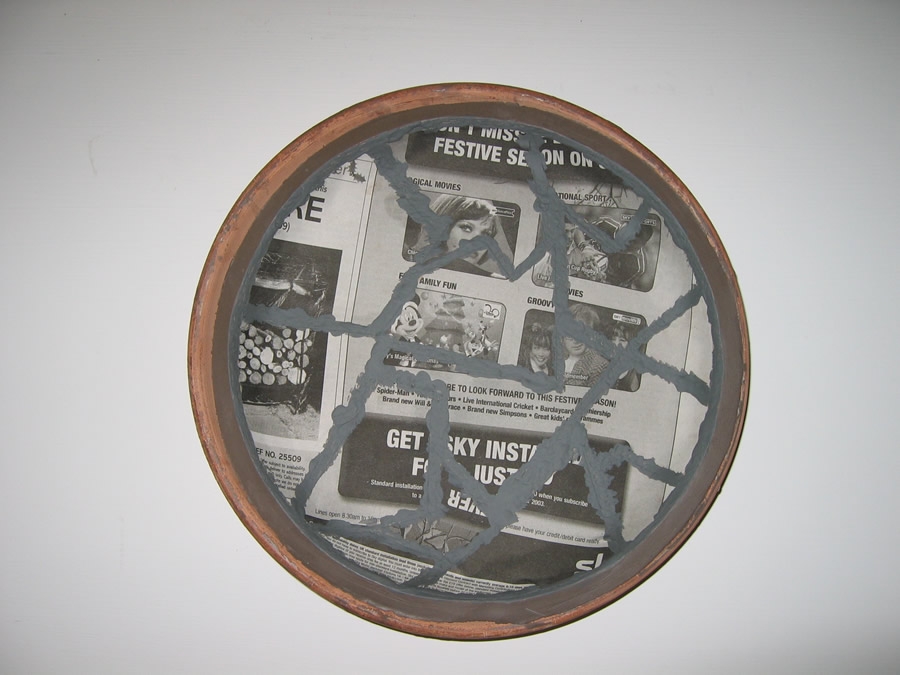
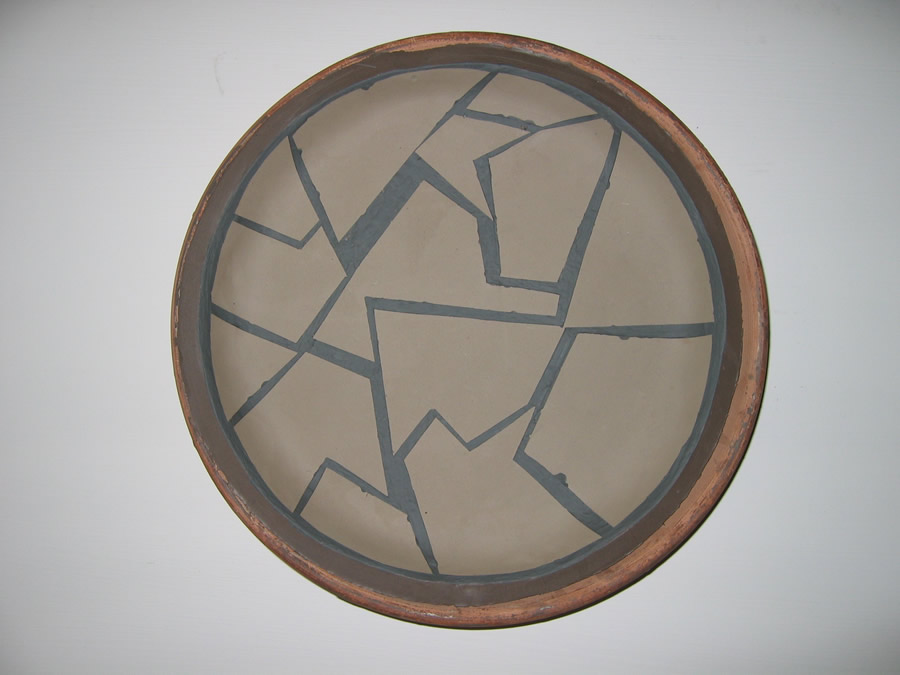
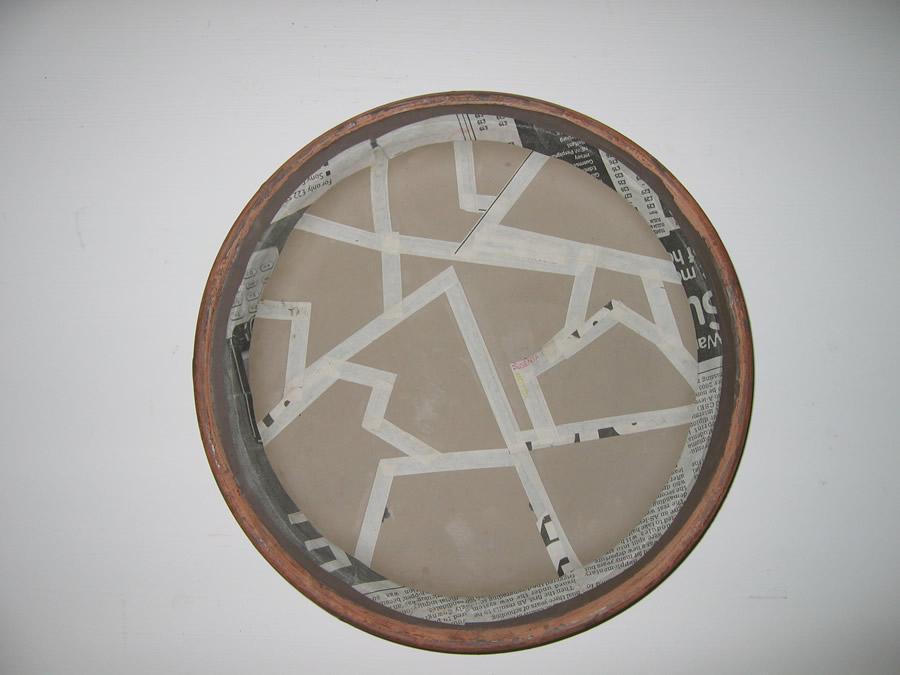
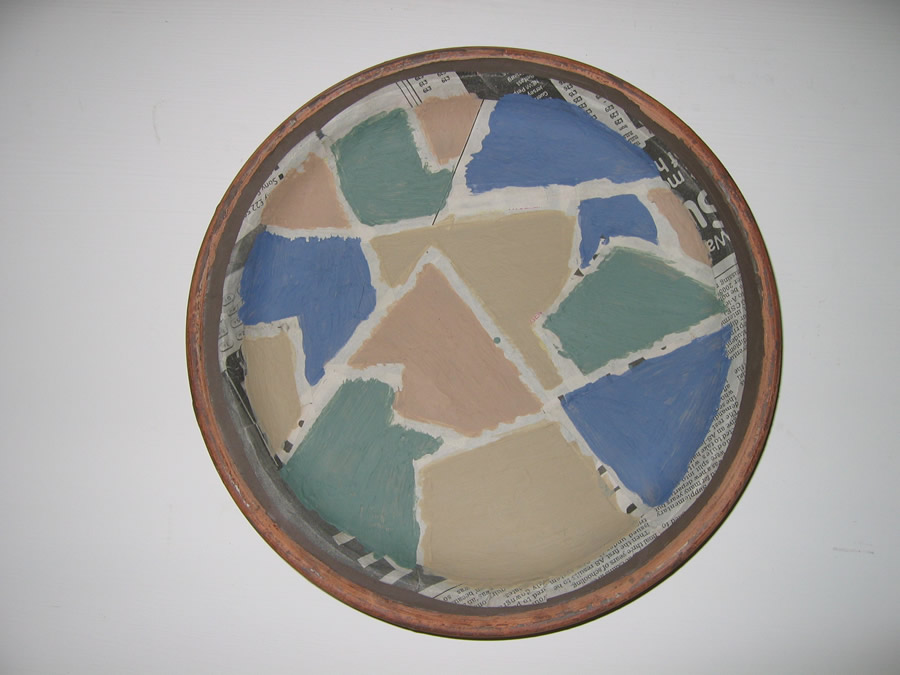
Here is a method of using newspaper resist to create a stain glass effect;
The plate still in the press mould with a newspaper decoration applied
Black slip is now stippled onto the spaces between the newspaper using a sponge.
The newspaper is now removed
Strips of newspaper are now applied over the black lines overlapping them slightly.
Colour is now sponged on.
The newspaper is now removed!
Finished plate.
The following is a more complex stencil;
A blank newspaper stencil is applied to the pot.
Black slip is now applied using sponges.
The newspaper stencil is removed.
The finished pot!
Here is a “stain glass” window style pot. The stencil was just a series of random shapes:
The following pot is made with multiple simple stencils:
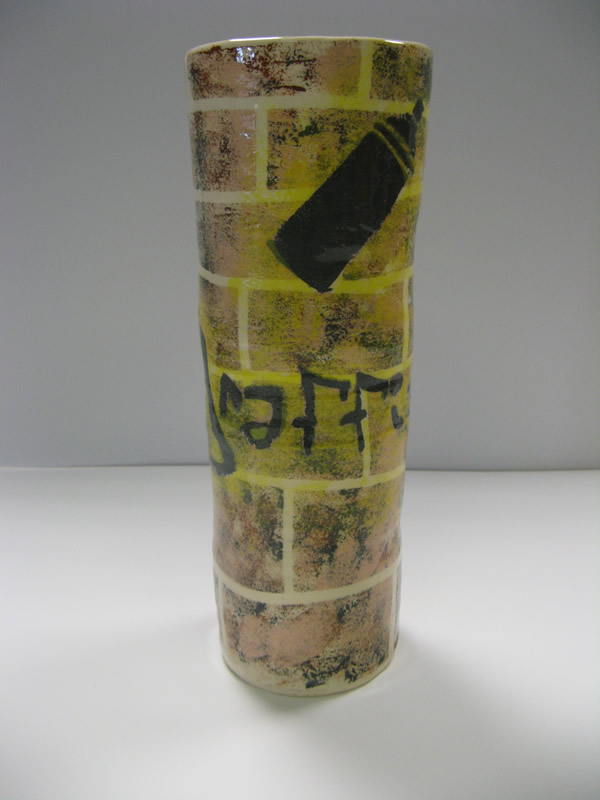
This pot uses a more complex “graffitti” style stencil:
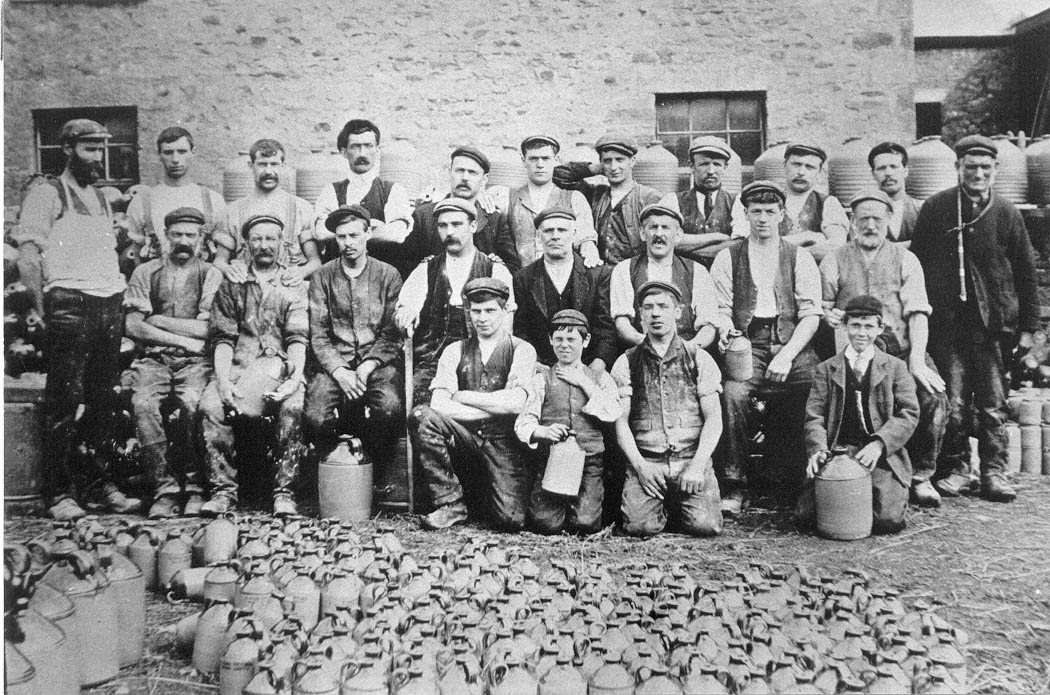
Workers of Waterside Pottery, Burton in Lonsdale in 1910. Richard Bateson is pictured at the front in the middle with his hand over his kneck (He’d broken a button on his shirt collar and didn’t want his Mum to know)
I wrote the following essay in 2001. I have since done a lot more research and expanded the story into a book. Details of the book can be found here.
Burton-In- Lonsdale, in North Yorkshire, once had a thriving pottery industry. At its peak in the 1850s, there were 11 working potteries. Today there are no potteries left, the last having ceased production in 1944. This article is the story of the last of the Burton potters and how he struggled to retain the industry in Burton-in-Lonsdale.
Richard T Bateson began work at the age of 13 in 1907 for William Bateson and Sons Ltd at Waterside Pottery, his father Henry Bateson being joint owner with his Uncle Frank Bateson.
Richard quickly progressed through some of the worst pottery jobs, such as using the jigger jolly machines to produce jam jars to become a very capable thrower. By the age of 17 Richard was capable of throwing every ware that Waterside produced.
Richard took a break from the pottery in 1914 for the First World War. He served in the 5th Manchester. He fought in Gallipolli where he took a bullet in his wrist. He also got injured from a piece of shrapnel in the groin, this meant he was back at Burton recovering when peace was declared in 1918.
Richards’s father died in 1922. Frank Bateson bought out Henry Bateson’s share of William Bateson and Sons and continued producing pots until 1933, when the pottery closed. Frank however continued the basket making side of the business, buying in bottles and casing them as well as recasing old bottles. Squire Taylor was employed as basket maker (or wander as the job was called in Burton). Basket making continued until Squire’s death shortly after the Second World War.
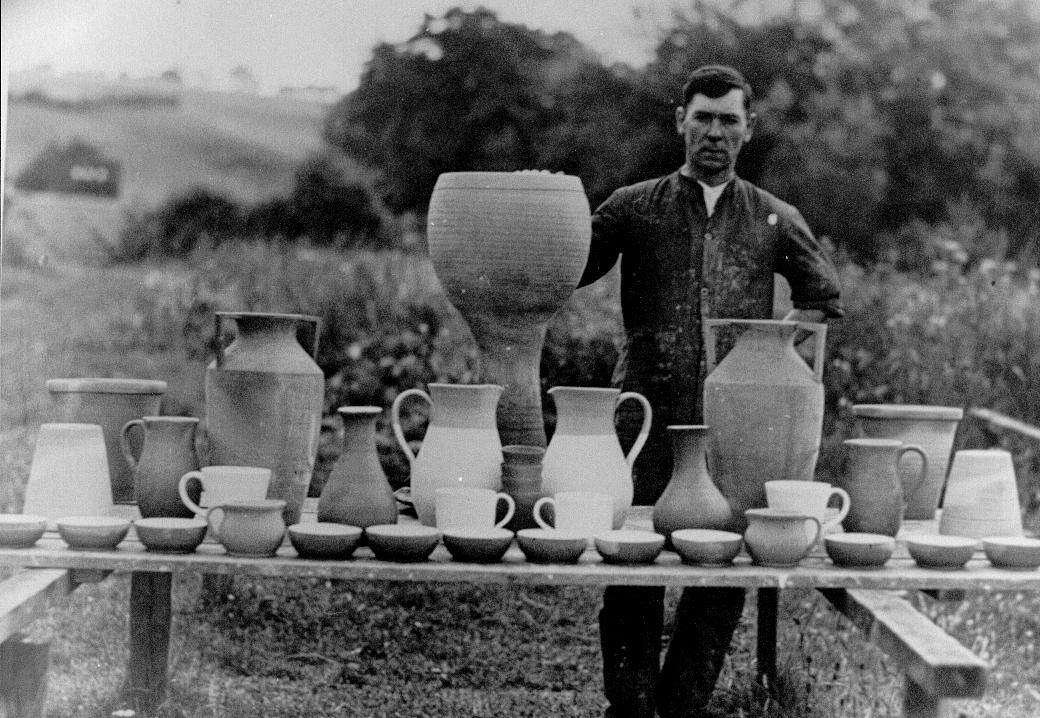
Richard Bateson at the Baggaley Pottery in 1937, with a selection of his pots.
When Waterside closed Richard then bought Bridge End Pottery (Baggaley Pottery) from Jack Coates. Bridge End Pottery had stood idle for 10 years. The building had suffered neglect during this period. The kiln was in such a bad state that it was deemed unusable. Richard took it upon himself to build a new kiln. This was no mean feet. The kiln he built had an internal cubic capacity of about 10ft square and had four fire mouths.
Richard worked Bridge End for 6 years, producing a full range of earthenware pots, these included various sized plant pots (2.5” to 15”), jugs (1,2,.5 pint), large milk bowls (mixing bowls) 24” wide, posy rings of various sizes, drinking mugs, teapots, vases. These pots were all produced using Mill Hill clay. Some of the pots were decorated with slips (ball clay based) and covered in a lead glaze. Sprigged wares were also made. A sprigged blue & white mug and jug made at Bridge End is on display at Lancaster museum to celebrate the 1935 Silver Jubilee.
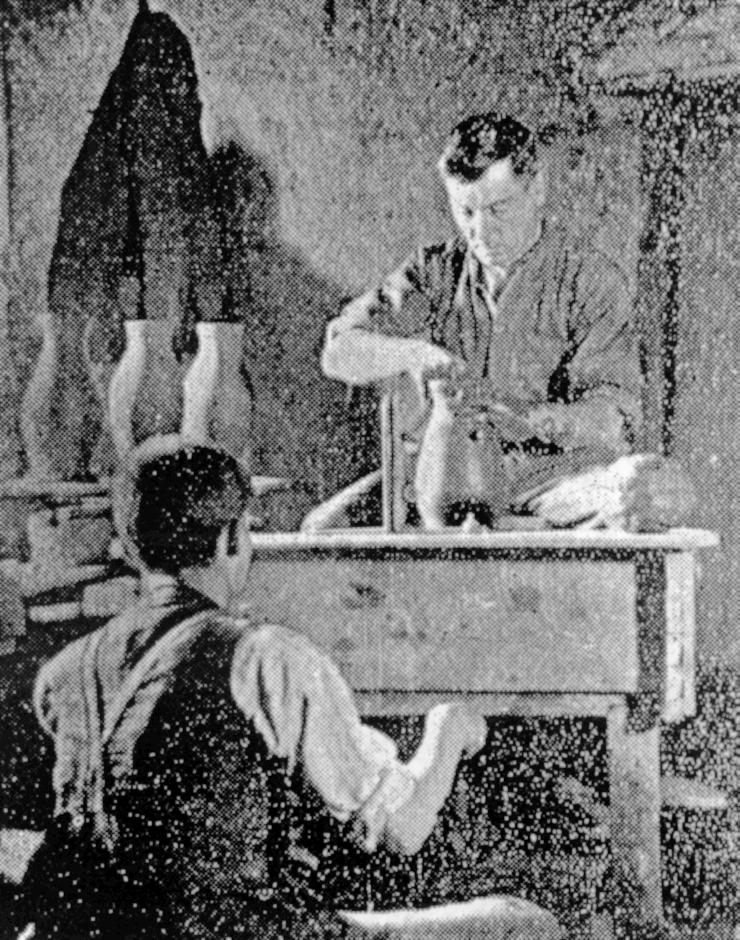
Richard Bateson throwing pots. The wheel is powered by the boy rotating a crank!
Richard sold his wares himself. He travelled about to the larger towns and cities such as Manchester, Liverpool, Lancaster, Preston and Leeds looking for possible outlets for his work. Customers would also turn up at Bridge End and do business with him direct.
During this period Richard only employed a boy to help him. Gordon Booth, and Albert Oversby did this job. One of the jobs required of these boys, on days when it was considered not worth powering up the steam engine, was to manually power a throwing wheel via a small crank situated low down at the front of the wheel. This was not one of the favourite jobs. When John Bateson (Richards’s son) was a child he avoided playing near the pottery in case his dad pulled him in to the Pottery to crank the wheel.
Richard was struggling to make a living during this time however in 1939 Harold Parkinson of Hornby Castle, a customer of the pottery, approached Richard about an idea for making plant pots for Woolworth’s and other similar outlets. The scheme required a larger pottery, so Waterside was leased (from William Bateson and sons) and renamed Stockbridge Pottery (Stockbridge was the name of a mill Harold already owned) with Richard as its Manager. Bridge End pottery was given to Harold Parkinson as part of this agreement. Stockbridge Pottery also employed Robert Standing (thrower), Jack Coates (formally of Bridge End. Part time thrower), Charles Brashaw (main taker off for Richard), John Bateson (main taker off for Robert Standing), James Singleton (clay miner), Bill Harrison (General worker and miner), Jack Telford (worker), Charlie Armour (Kiln loader/unloader), Harry Capstick (worker), Tommy Chapels (taker off).
The first major stumbling block encountered was the stoneware glaze recipe used at Waterside for the last 100 years was lost. The man that had mixed the glaze had died and nobody had thought to write it down. The materials to formulate the glaze were known, but not the quantities. In the end a glaze expert from Podmores in Stoke on Trent had to be brought in to sort out the problem.
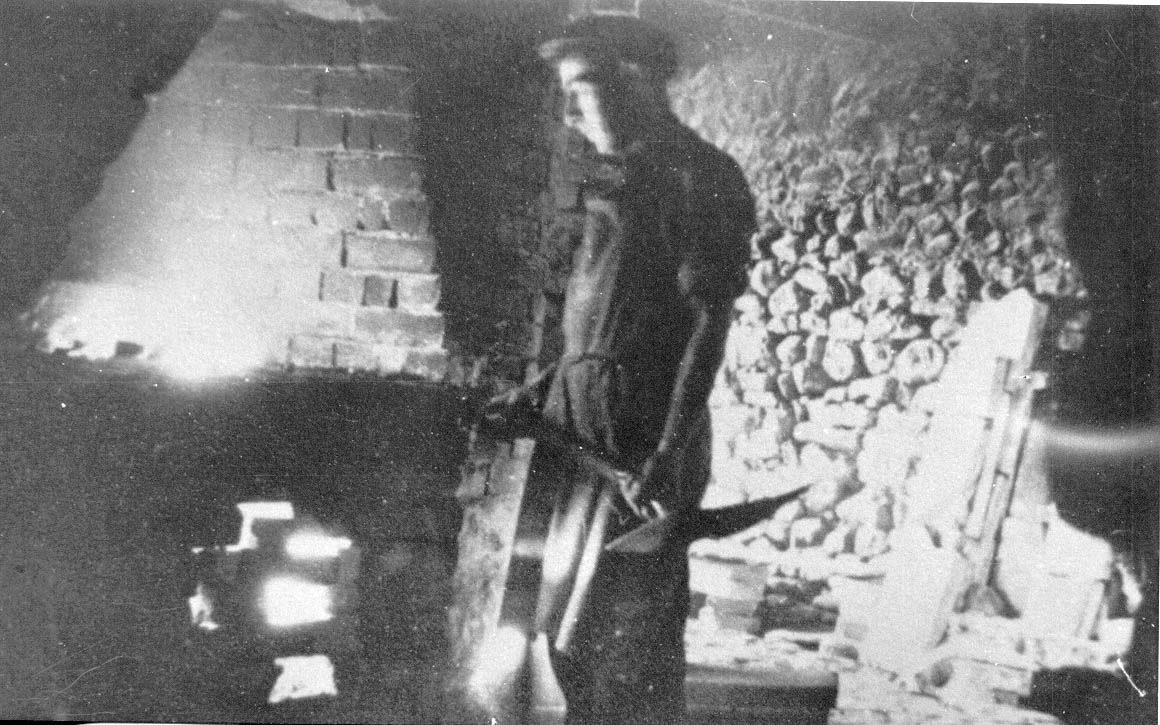
Harry Capstick firing the kiln at Waterside Pottery in 1940.
John Bateson, Richards’s son, began work in the Pottery in 1941 at the age of 14. He would have started later, but Tommy Chappels left and Richard needed a replacement quickly, so John was pulled out of Bentham Grammar School. John’s main job was as a taker off for Bob standing. He also pugged clay and helped with the loading and unloading of the kiln. Occasionally John would do the night firing of the kiln. During the winter a kiln firing at night would attract waifs and strays from around the neighbourhood to take advantage of the “free” heat. John was always apprehensive of these vagabonds and would always make sure he had his 12 bore with him. On one occasion John fell asleep and missed charging the firemouths. When he woke up the kiln had dropped in temperature. He spent a very worried few hours waiting to hear what his Dad would say in the morning. Fortunately the pots were not damaged due to this misdemeanor. The worst job John did was picking up wet clay from the clay pans and placing it on the clay pan wall to dry in the winter months when the clay had a layer of ice.
Stoneware bottles were the main stay of production for the purpose of spirits and Ink (Stevens Ink were a big customer). Basket casing of bottles was contracted out to William Bateson and Sons now run by Gladdis Steele, Frank Bateson’s daughter. Wares similar to those made at Bridge End were also produced although the difference being they were all made in stoneware. Richard would still produce one off pots such as puzzle jugs, log like vases, he experimented combining the Mill Hill earthenware with the Waterside stoneware to produce agate pots (these pots were fired at the bottom of the kiln as it was cooler so the earthenware wouldn’t bloat). John Bateson can recall and still can make cuckoo whistles (I’ve seen him) from 2 pinch pots. He remembers selling these to a shop in Morecambe along with posse pots and other fancy wares.
The biggest pot made at Stockbridge was the dreaded 6-gallon bottle. This beast of a pot required a ball of clay weighing 112lbs. Just picking up a 66lb lump of clay is hard work. John can remember Richard’s whole arm and shoulder disappearing into the pot with the rim touching his armpit. Richard threw the whole pot in one; he used a rib on the outside and did no turning. It took two people to lift the pot of the wheel. Once made these big bottles would go into the kiln room to dry. The 6 gallon bottles were moved about by picking them up by the neck this worked fine provided there was no moisture in the clay. If the clay was still even slightly wet the unfortunate person would be left holding a bottleless neck and be in very grave danger from an irate thrower. John Bateson can remember this happening to him on a number of occasions. If nobody had seen him he would quickly wet the neck and do a quick bodge repair job so the next person to lift the bottle would get the blame. All the workers probably did this bodging until some one was caught red handed. Glazing the 6-gallon bottle was also back aching work.
An interesting aspect of this period was job experience visits by students and teachers from the Royal College in London. John Bateson can recall a teacher called Miss Pinquem, who was a good sculptor. Miss Pinquem produced some 2 piece moulds for the production of salt and pepper pots (in the shapes of owls and cockerels), and also for cuckoo whistles. These moulds were slip casted. She also worked on sprig moulds carving the blanks from Plaster of Paris.
Stoneware clay mine at Waterside pottery.
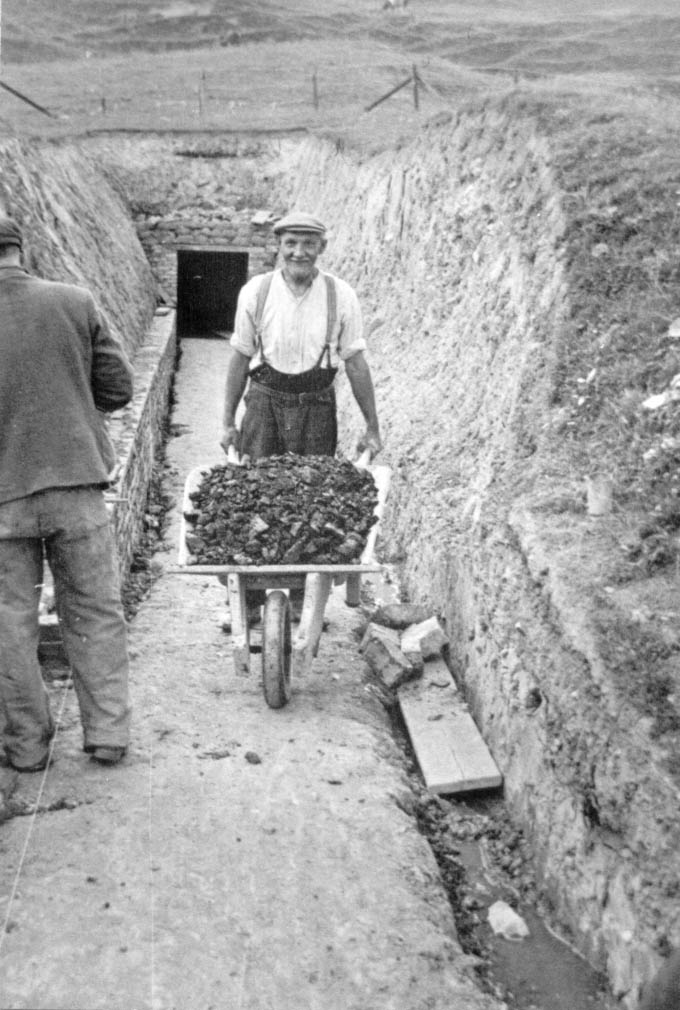
The original clay mine at Waterside had become very unstable, so a new drift mine was opened. Law required that a qualified miner had to be employed to do this. James Singleton took this job. James had worked at Ingleton Colliery. He had also spent time in the Klondike mining for gold. After going into the hill for 50 yards the mine collapsed. Fortunately nobody was down at the time. The collapse was turned into an air vent, which was just as well, as when James was working down there one time the mine collapsed badly near the entrance. James was able to escape through the air vent. The railway line from the old mine was dismantled and installed in the new mine, this meant James could transport the clay from the mine face to the Blundger with relative ease.
Business unfortunately wasn’t going very well. The war probably didn’t help this. To top it all Richard came down with pneumonia which at the time was a life threatening illness. This meant he couldn’t work for several months. Harold Parkinson in a last ditch attempt put plant in for the manufacture of sewage pipes. These machines ate the clay quicker than they could dig and process it. Worst of all, after the first firing of the pipes it was very apparent that the waterside clay was the wrong mixture for pipe manufacture as the pipes buckled and warped in the kilns. This could have been rectified by additions such as grog. This would have required time and experiment. Richard would surely have sorted it out, but unfortunately he was off work ill. Specialists from Stoke could have been brought in. John Bateson thinks that at this time Harold Parkinson felt he’d thrown away enough of his money into the pottery and so declared the venture bankrupt. Stockbridge Pottery ceased trading in 1944 and was the last of the Burton potteries.
Richard thankfully recovered from pneumonia and got a job throwing with his son John taking off for him at Carders Pottery in Brockmoor in the Midlands. It was here that Richard proved his skill by being able to throw 1 gallon bottles faster than a worker (Bill Pots) could make them using a jigger jolly machine. He was however beginning to find the work harder. In 1946 Richard got a job teaching pottery at the Royal College of Art, the Central School of Art and Wimbledon College of Art.
In the 1950s a picture of Richard’s hands taken by ???? Entitled “The Potters Hands” won an international award and was exhibited around the world.
Richard remained in London until 1973 when he moved to Assington near Ipswich and set up a small studio pottery, mainly for the purpose of teaching .He must have been missing Yorkshire as he moved back to within 2 miles of Burton (Masongill) in 1978 and finally back to Burton itself in ????
It was during the time when Richard moved back to Burton that I first met him, although I would have only been 10 years old or so. He used to come and throw pots occasionally at my parent’s pottery (Bentham Pottery). Unfortunately I was too young and also not really interested in pottery at the time. My mother though picked up a good deal of tips from him. He showed her a good method of making narrow necks in bottle shapes. My mother has since past this knowledge on to me and I in turn have passed it on to students and other potters, so a bit of the Burton Pottery legacy survives. In 1987 I wrote my thesis on the Burton Potteries. This was done largely with the help of Henry Bateson (Richards’s son). I did also talk with Richard during this time, but he was an old man of 95 years by then. Richard Bateson died at the age of 98 in 1991.
When Henry Bateson tragically died earlier this year, i had the privilege of meeting John Bateson (Henry’s brother). I didn’t actually realise that John had worked with his father during the Stockbridge days. This article has been produced as a result of detailed discussions with John during 2001. To the best of John’s knowledge all the details are as correct as we can get them.
Lee Cartledge, July 2001.
I have uploaded an old cassette tape of Richard Bateson talking with William Skeates in the 1970s here;
 I have taught the following class many times. I have taught it to single students and to classes of 30 students. I have taught it to primary school children, degree students, girls at a pottery hen party and corporate team building events. If you teach ceramics then this is a really good class to have up your sleeve. It works at all levels of skill. It lasts from anything from 1.5 hours to 3 hours depending upon how you demonstrate it and the students’ level. Here is what you need:
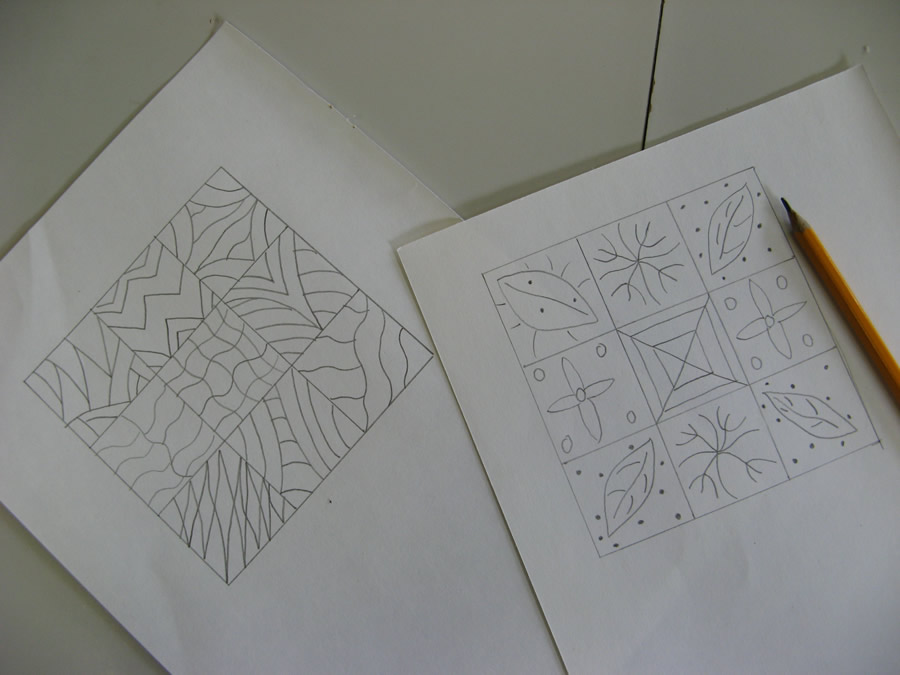 2. Next get the students to roll out a small ball of clay and cut it either with a knife or a tile cutter into a square (tile sized).
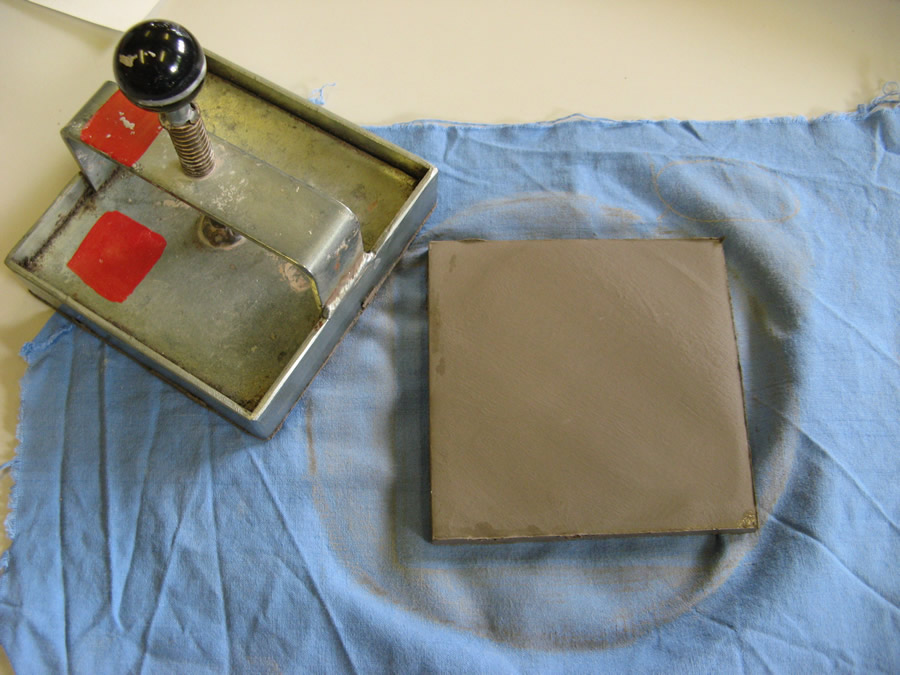 3. Fill the clay guns, one with terracotta and one with white stoneware and get the students to reproduce their design by laying the clay gun extrusions onto the tile. Don’t press the extrusions into the tile! I also get the students to add grog into parts of their decoration to add texture. You can just pick up the grog between your finger and thumb and drop it where you want it.
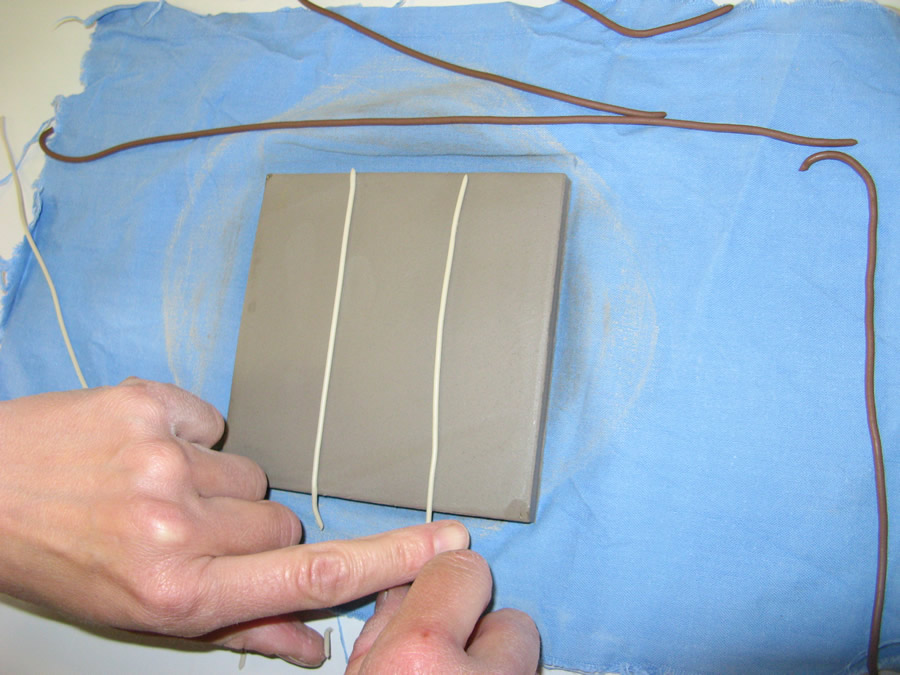
 8. Encourage the students to produce an attractive rim. A series of balls or spirals seems to work well.
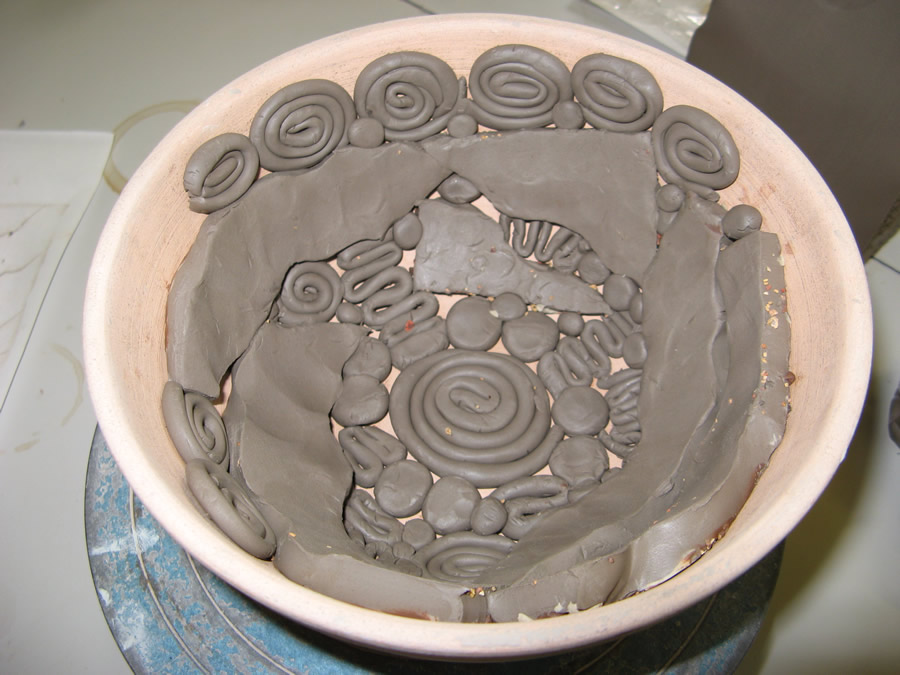 9. Now smooth over everything with a kidney tool.
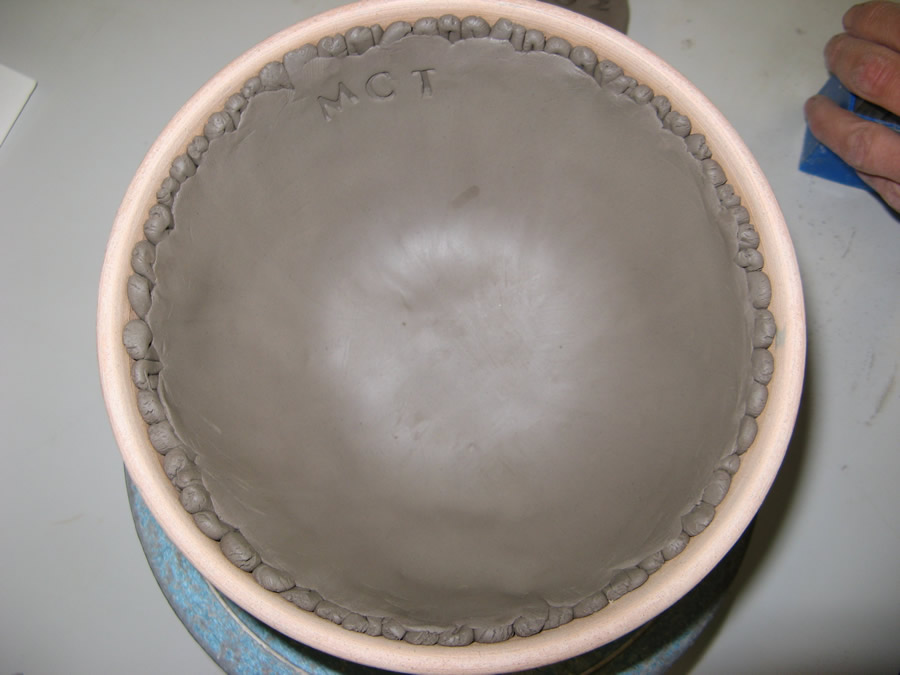 10. Empty the bowl out of the press mould by turning the mould upside down and catching the bowl in your hand.