I have known about the Giffin Grip for a long time. They have after all been manufactured since 1978. I’ve always been put off them though, because they are expensive and always look a bit fragile and “plasticky” and I guess I’m also guilty of subconsciously thinking that “Real Potters” centre pots with a delicate tap tapping and then placement of clay around the pot to hold it in place and, indeed, we have been using this exact method for over 40 years at Bentham Pottery.
Whilst visiting a student of mine recently I noticed that she had a Giffin Grip. I asked her to demonstrate it for me by turning one of her pots and I must have been suitably impressed with it, because I went ahead and ordered one for myself the next day. I didn’t really pick up on the two main problems with the Giffin Grip during this demo. I will come back to these later.
The Giffin Grip costs £230 from Potclays (U.K). Be careful when choosing, as there is a left hand version (for wheels spinning Clockwise) and a right hand version (for wheels spinning anti-clockwise).
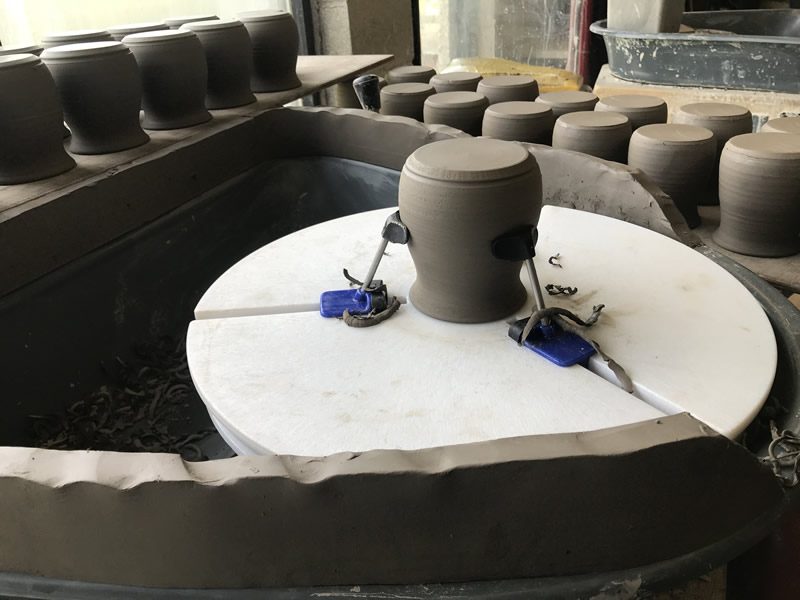
I was suitably impressed by the manufacture of the Giffin Grip. All previous thoughts about it being fragile were very quickly dispelled, as I assembled it with the easy to follow instructions. The Grip can be mounted on any wheel diameter by simply moving the three arms under the Giffin Grip to give a very accurate fit. The grip comes with four different sizes of pot support arms that can be used depending upon the size and shape of the pot requiring turning. For bowl and plate shapes no support arms are required as the Grip clamps them on their rim.
Clamping a pot into the grip is very easy. You just place the pot roughly in the centre and rotate the Giffin Grip clockwise (with a right handed Grip). There is a slight skill to this, but you master it very quickly and the pot is held very firmly in place. It is an absolute joy to do, as providing the pot was thrown on centre a quick twist of the grip will centre it and hold it in an instant. It is definitely far quicker than centre-ing the pot yourself and holding it in place with pieces of clay!
It was only on turning a pot that I noticed the two problems with the Giffin Grip. The first problem is that the Grip raises the wheel height by 4 cm, which means it is higher than the wall of the wheel basin, with the effect that ninety percent of the turnings from the pot end up on the floor and not in the basin. The second problem is I tend to use the basin wall as a rest for my arms whilst holding the turning tool. This is no longer possible with the wheel effectively being 4cm higher. I came to the conclusion that I had made a mistake buying it. We tend to throw between 60 and 120 mugs (or equivalent pots) per day at Bentham Pottery. The thought of all the turnings from these pots going on the floor is really something I am not prepared to put up with, as you will end up treading the clay all around the pottery and creating a good deal of unhealthy dust.
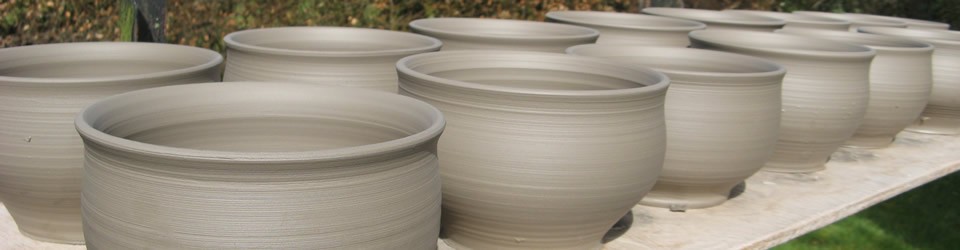
However, before putting my recently purchased Giffin Grip on ebay, I decided to try an experiment with it. I rolled out a long coil and wrapped it around the top of my wheel basin to create a 4cm wall (effectively raising my wheel basin wall by 4cm). I then took the 60 mugs I had thrown the day before and proceeded to turn them all using the Giffin Grip.
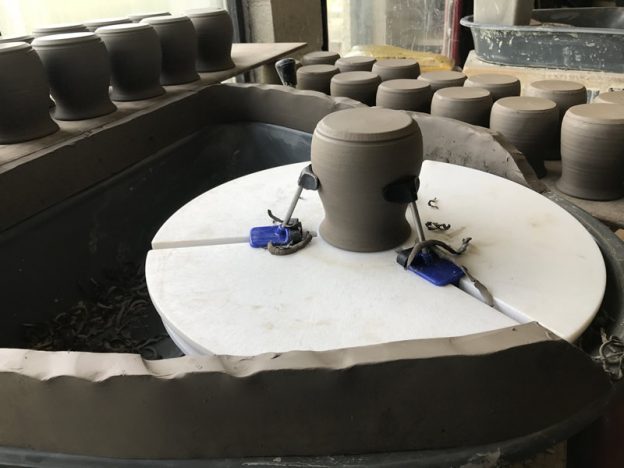
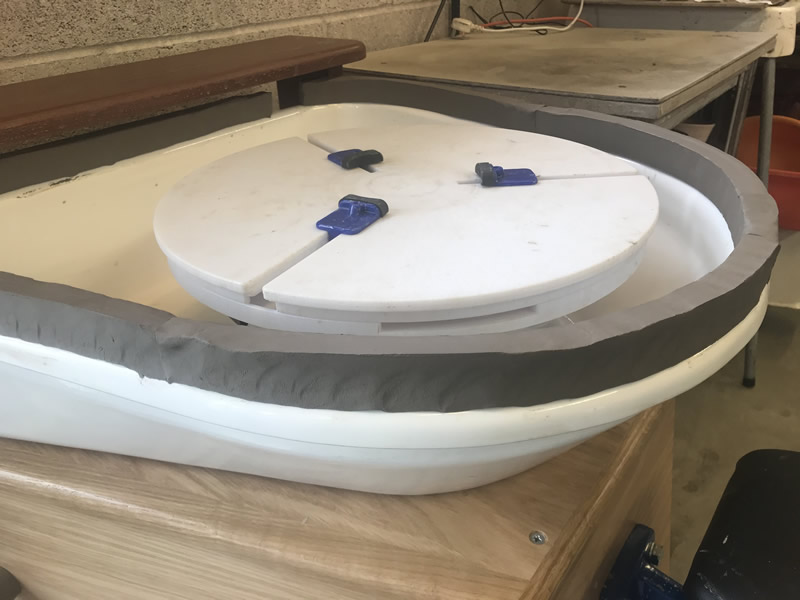
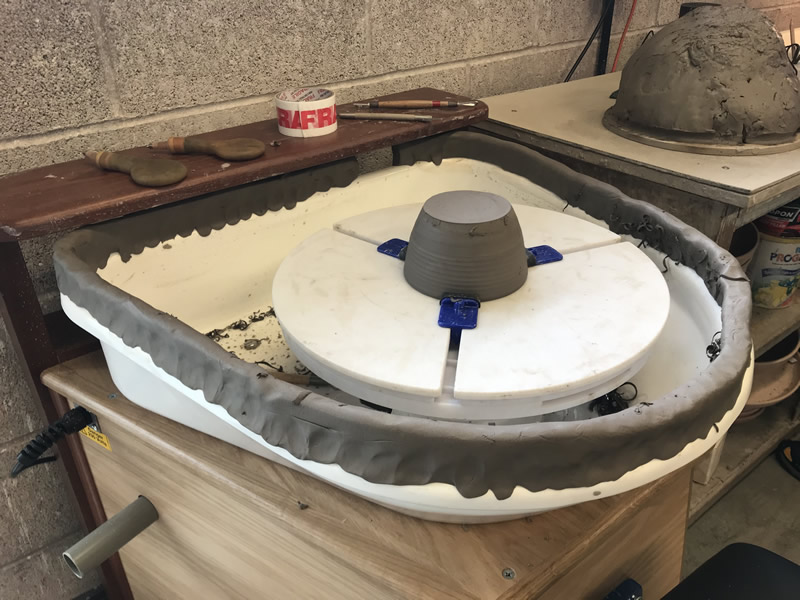
Giffin Grip review – The clay wallGiffin Grip review – Bowl about to be turnedGiffin Grip review – Turning 60 mugs
The clay wall immediately solved the two problems with the Giffin Grip. All the turnings went into the wheel basin and I was able to lightly rest my arms against the clay wall. Turning was an absolute joy and I confess to smiling every time I clamped a pot onto the Giffin Grip. The realisation of how much time I could have saved over the years by not having to tap pots on centre and then stick clay around them slowly dawned on me. I finished turning the mugs in record time. I guess you can say I was hooked.
I have discovered that a clay wall around the wheel basin can be made on a Monday and wrapped with plastic when not in use, meaning it will last all week. It actually improves with age as you can lean on it more when it is leather hard. This though is only a temporary solution to the problem. I really need an actual solid wall that can be lifted on and off the wheel as required. With this in mind I make the following plea to all wheel manufacturers. Can you please manufacture a wheel basin extender for use with a Giffin Grip? Such an item would give you another product to sell and it may encourage more customers to buy your wheels, knowing that this is something they can purchase at a later date. To be honest considering that the Giffin Grip has been manufactured since 1978, it is hard to believe that no wheel manufacturer has yet made a wheel basin extender (maybe I am wrong about this, please email me if you know different). The problem could well be that potters are not vocal enough about telling the manufacturers of pottery equipment what they really want from it. With this in mind I will send this review to Gladstone Engineering in Stoke, who manufacture the wheels that we use. Hopefully it will give them some food for thought. In the meantime I will attempt to make my own basin extender (possibly carving from foam board). I have noticed looking through some of my Facebook groups that many potters have attempted to increase their basin wheel heights to solve this problem, although none of their solutions look brilliant to me.
So two months after purchasing my Giffin Grip and I’m still lining my wheel basin with a clay wall and doing all my turning using the Grip. I’ll update this review when I manage to manufacture a better wheel basin wall solution. Would I recommend it as a product, even with the two problems? Yes definitely.
I hope you have enjoyed reading my Giffin Grip review. Please feel free to email me if you want to ask any questions.
Burton-in-Lonsdale Pottery Walking Tour (Or if you are a kid “The boring pottery walk that my parents forced me to do”)
To celebrate the release of my recent book “The Last Potter of Black Burton”, I’ve decided to produce a walking guide tour of the some of the potteries of Burton-in-Lonsdale, so you can see the sites that are mentioned in the book. The walk lasts about 4.5 miles in total. “The Last Potter of Black Burton” is the story of Richard Bateson, who began work at his father’s pottery at the age of 13 in 1907 and went on to run the very last of the Burton potteries, Waterside Pottery, which finally closed its doors in 1944. Richard’s career didn’t end there though, as due to a strange twist of fate caused in no small part by the Second World War, he went on at the age of 53 to teach pottery at the Royal College of Art in London. “The Last Potter of Black Burton” is available for purchase at Bentham Pottery (I’ll even sign it for you if you visit me there.) Unfortunately little remains of the pottery buildings, kilns and clay processing equipment of Burton, so I’m going to provide plenty of photos and you might have to use a little imagination. Initially I was going to release this as a printable A4 sheet, but I quickly realised I would need way too many photos and descriptions, so the best way to do this walk is with a mobile phone or ideally a tablet computer with this webpage saved. (Alternatively you can email me on lee@benthampottery.com and I can send you a pdf file of the walk.) The walk begins at the bridge over the River Greta in Burton. There is a small space for parking on the Low Bentham side of the bridge but if that is full then take the right (if facing Burton) and park on the left, just beyond the riverside picnic area opposite the bowling green.
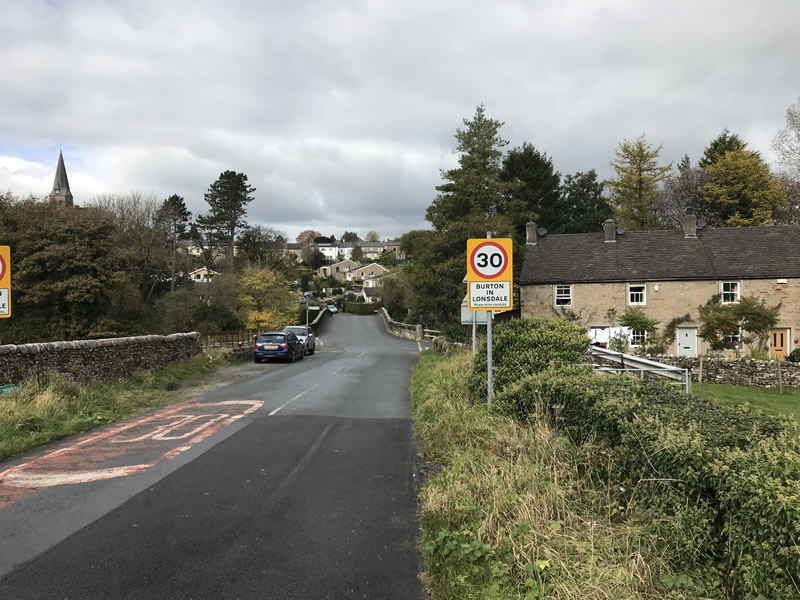
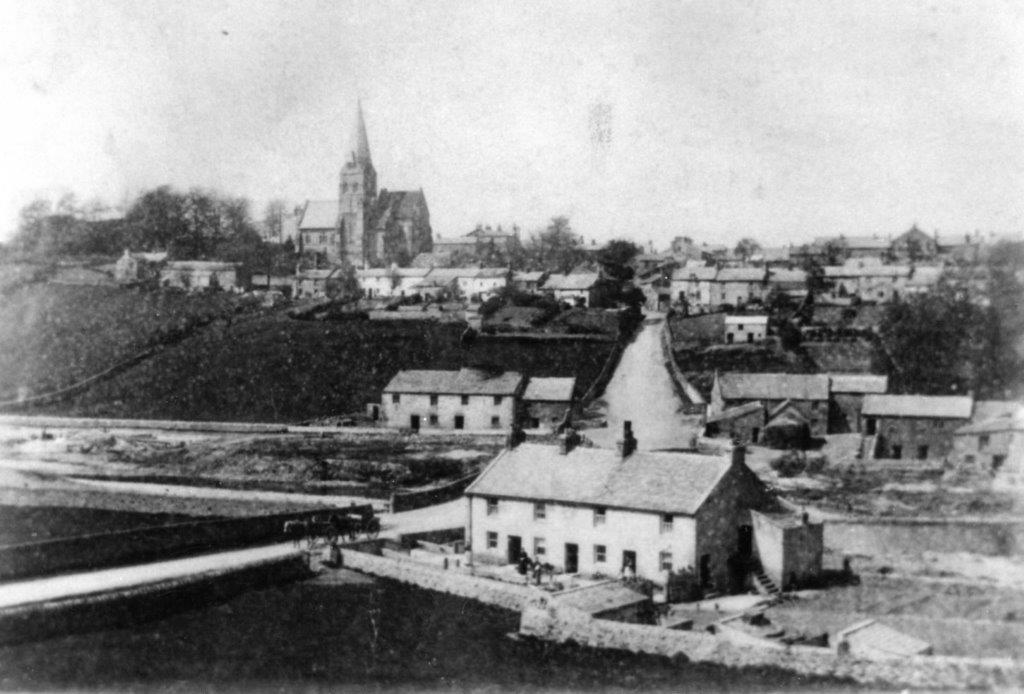
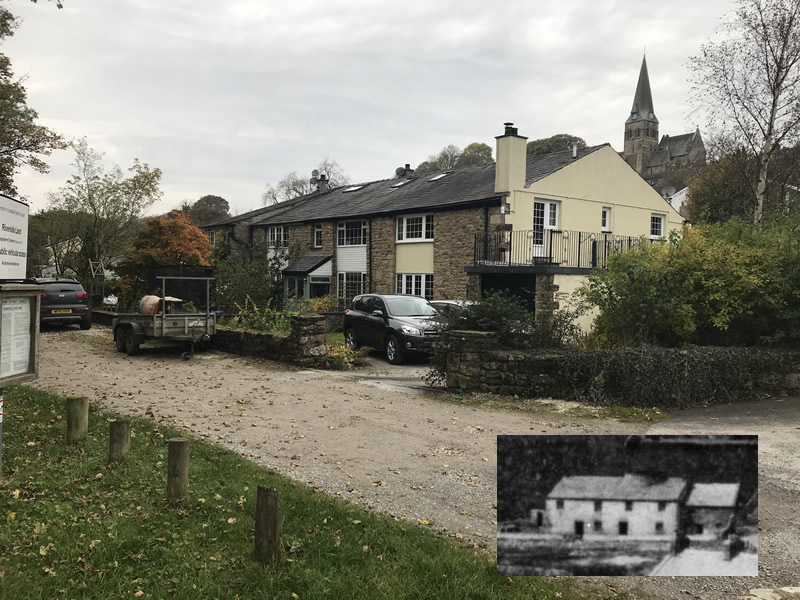
Potteries around the bridge Okay here we go… Starting from Burton bridge: If you stay on the Low Bentham side of the Greta and walk back up the hill a bit and look back at Burton, you should get the following view:
Burton-in-Lonsdale today
The following photos and one drawing are of the same view, but on different dates;
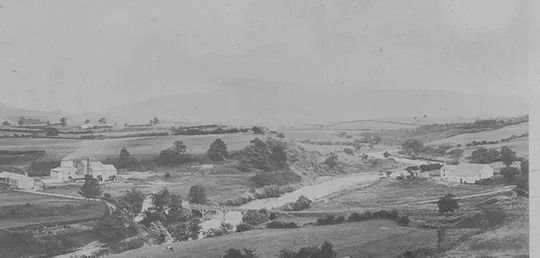
Burton sometime after 1837 (as Stonebowers is built). Greta Pottery (left, far side of river), Bridge End Pottery (right, far side of river) and the Bradshaw Pottery (right, this side of river) are visible in the foreground. The bottle kiln of Town End Pottery is just visible at the top right hand side. Note the Church has not been built yet.Burton in 1870. Picture taken just after the Church had been built. The Bradshaw pottery is clearly visible in the foreground with Greta Pottery (Left far side of river) and Bridge End Pottery (Left far side of river, with two kilns)Burton in 1890. The Bradshaw Pottery has been converted into cottages. Greta Pottery and Bridge End Pottery are still there. This is the Burton that Richard Bateson would have known.
The Burton “Blackware” Next, we are going to visit the main source of terracotta clay, used by all the Burton potteries. Walk back down the hill and before the bridge, turn left onto the lane to follow the river. After a short distance turn right onto a footpath signposted “Greta Wood”. The banking that forms on the left of the path was the original source of terracotta for the potteries and was affectionately known as “the good stuff”. Digging of “the good stuff” had to stop though, as a boundary wall was encountered and also further digging was in danger of undermining the road. Continue following the path past Greeta House. Greeta House was once the site of Greeta Cotton Mill. I realise that this isn’t pottery related, but Greeta Cotton Mill does feature in a tale later in the walk. After you have passed Greeta House, it is worth looking at your feet as you walk because the potters made this track in order to access the clay that lay further on; and they used broken terracotta pots, as hard-core. You can find potters’ fingerprints in coils of clay that they would have used for separating pots in the kilns (look for the terracotta dots on the ground). A few minutes after Greeta House you will come to a small stone bridge over a stream. Do not go over the bridge, instead turn sharp left here. Continue along the track where you may notice a steep shale bank on your left hand side. This banking is the Burton terracotta clay. The shale looks and feels nothing like clay. It only gains the properties of clay when it is processed. The Burton clay is jet black after being prepared for throwing, which is an unusual colour for clay. The Burton Potters referred to it as “blackware”. I have been told that it is black because it has a high oil content, which possibly provides “free” fuel during the firing process? I have wondered if the old name for Burton,” Black Burton”, originated because of the colour of the clay? The clay throws well on a pottery wheel. You can throw it really thin and produce complex overhanging shapes with ease. The clay fires terracotta colour. Apparently, below the shale and separated by a band of rock, is a seam of fireclay, which was used by the potters for repairing kilns and making firebricks. Walk about half way up the hill where you may notice a small rockface. This is the last place where clay digging took place within the Wood.
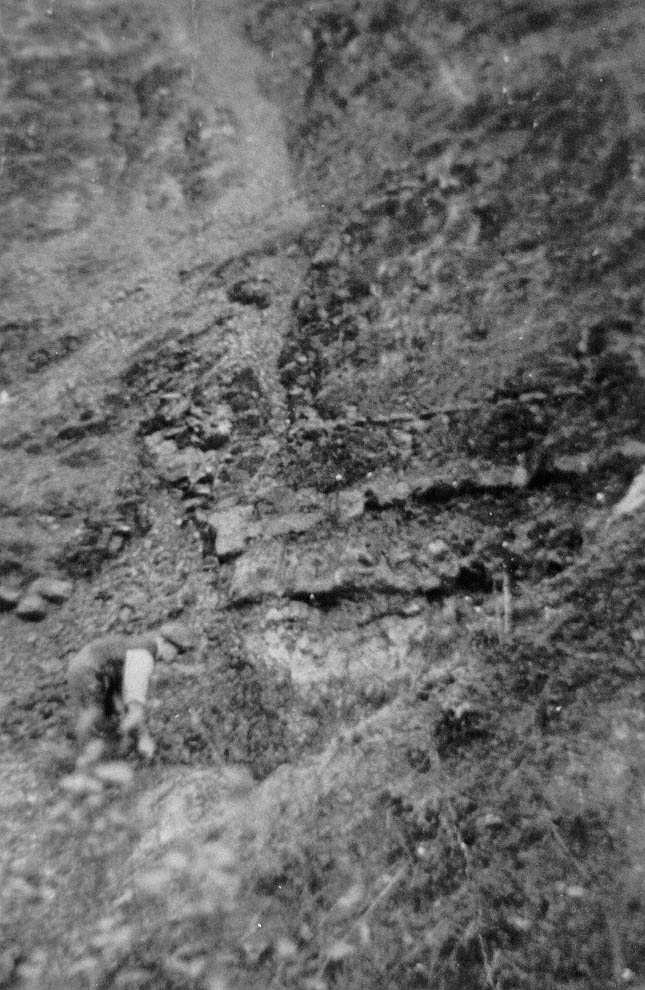
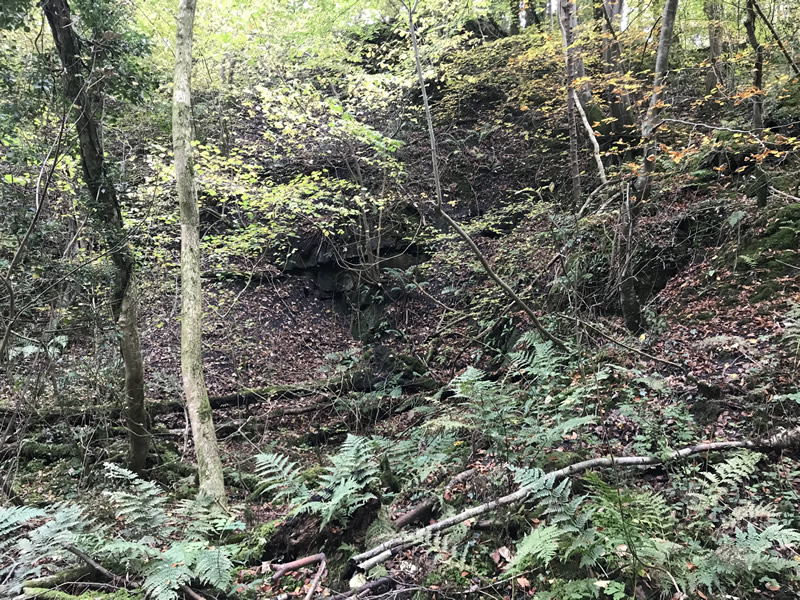
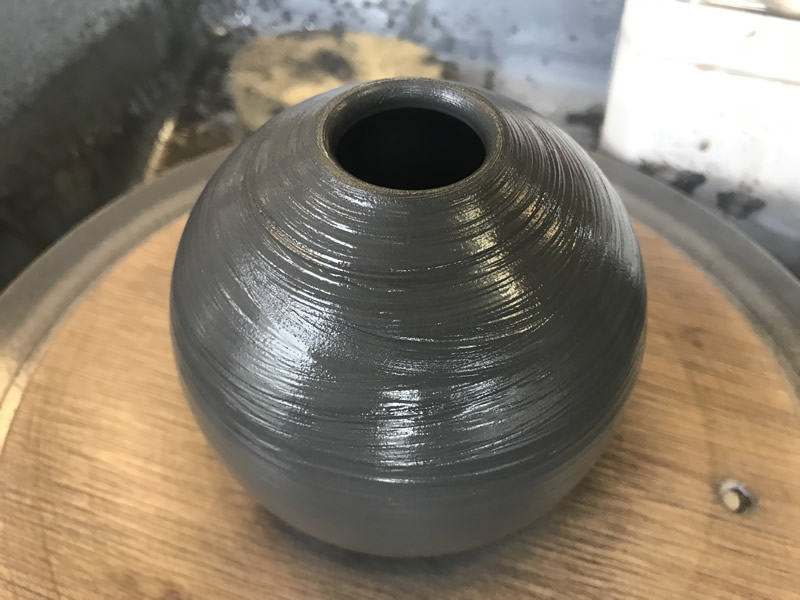
Richard Bateson digging the “blackware” in the 1930sThe same view in 2020Freshly thrown “blackware” at Bentham Pottery
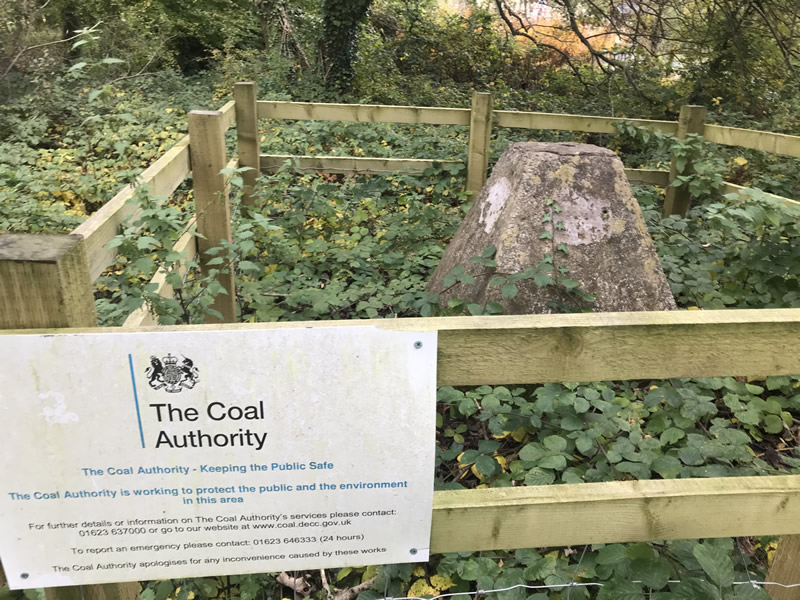
Waterside Pottery and the disappearing river tale Now retrace your steps back to the start of the walk. Cross the road to take the lane signposted to High Bentham and Ingleton keeping the river on your left hand side. We are now going to walk to the entrance of the former site of Waterside Pottery, where Richard spent much of his working life. After a short distance on the left hand side in-between the road and the river just after the picnic area and orchard, you may notice the following:
The concrete cap covers a mine ventilation shaft, a number of these shafts were sunk in the vicinity. One of these mine shafts (possibly this one? Henry Bateson (Richard Bateson’s son), thought it was this one) features in the following tale which has been taken from Richard’s own memoir written sometime in the 1970s:
In the late 1860s, workmen on their way to their jobs at the Waterside Pottery and the hands who worked at the Greta Cotton Mill found that there was little or no water running from above Burton Bridge. The water which drove the large mill wheel and machinery ceased to flow. Imagine the consternation of the fifty or sixty workers from Burton, Bentham and district. “T’ beck‘s dry!” would go round the whole district. I think it was the Towlers, who had taken over from the Smitties, who were working the mill at that time, and of course were mainly responsible for the upkeep of the weir which used to be some fifty yards below the bridge. After investigation, it was found that a large hole had formed in the river bed, about three hundred yards upstream, into which practically all the water was disappearing. Now as to the hole appearing in the river-bed – the explanation was very simple. In the early eighteenth and nineteenth centuries, the Hodgsons and Sargentsons who owned the mineral rights had decided to sink a new coal shaft at Wilson Wood (just below Ingleton), but they were afraid of water that might enter from old workings. They decided to drain these old workings. To do this, and to arrive at an adequate lead to drain the water, they had to start over a mile downstream, in the entrance to Clifford Woods. Part of the level had to be run beneath the river – and it was here, at George Hole, that the water was disappearing. Tom Baggaley Coates, who owned the Baggaley Pottery (Bridge End Pottery), came to the rescue. He blocked up the level by ramming down into one of the level-shaft some bales of cotton from the mill. At approximately every two to three hundred yards, a shaft was sunk into the level, partly for air, and also to wind out spare soil or clay. The first air hole was in the field beyond Greta Pottery. This was the one that was blocked by T.B.Coates to enable water to flow into its proper course and bank up at the weir to turn the wheel at Greta Cotton Mill.
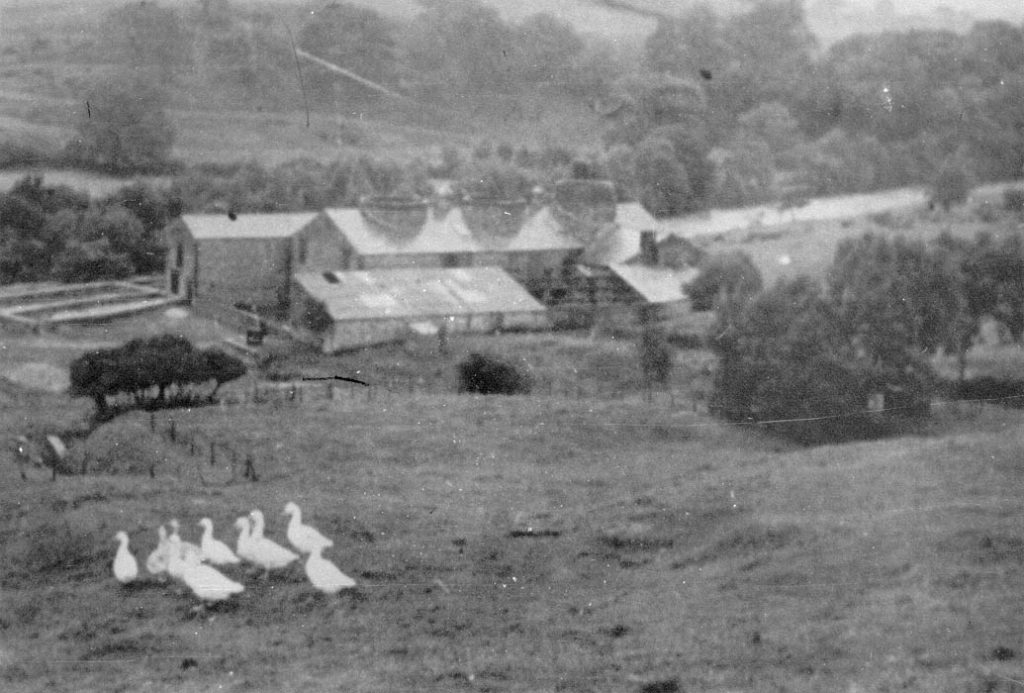
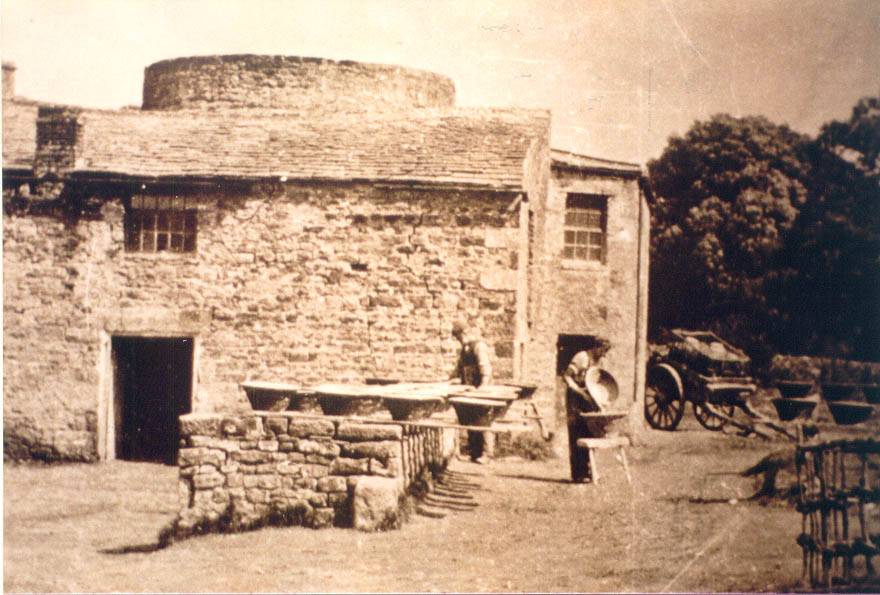
Keep walking along the road, past the playing field on your right hand side and a little after the children’s play area you will come to a drive way on your left hand side. This was the driveway to Waterside Pottery. Unfortunately you can go no further than this, as the driveway is on private land. The row of houses that was once Waterside Pottery is at the end of the drive, although not visible from here. The reason for the location of Waterside Pottery is because it originally had opencast stoneware clay and coal in the field adjacent to the pottery. I’m not sure when the coal ran out, but the clay ran out in 1905. This forced the potters to dig a drift mine into the side of the hill to access more clay. Here are some photos of Waterside Pottery as it was:
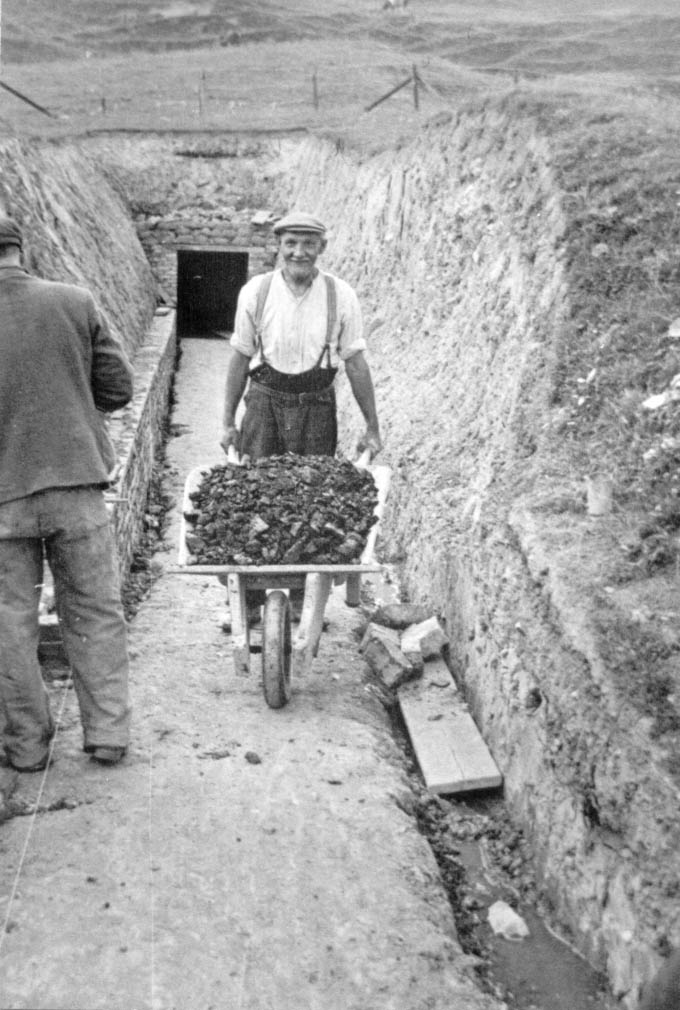
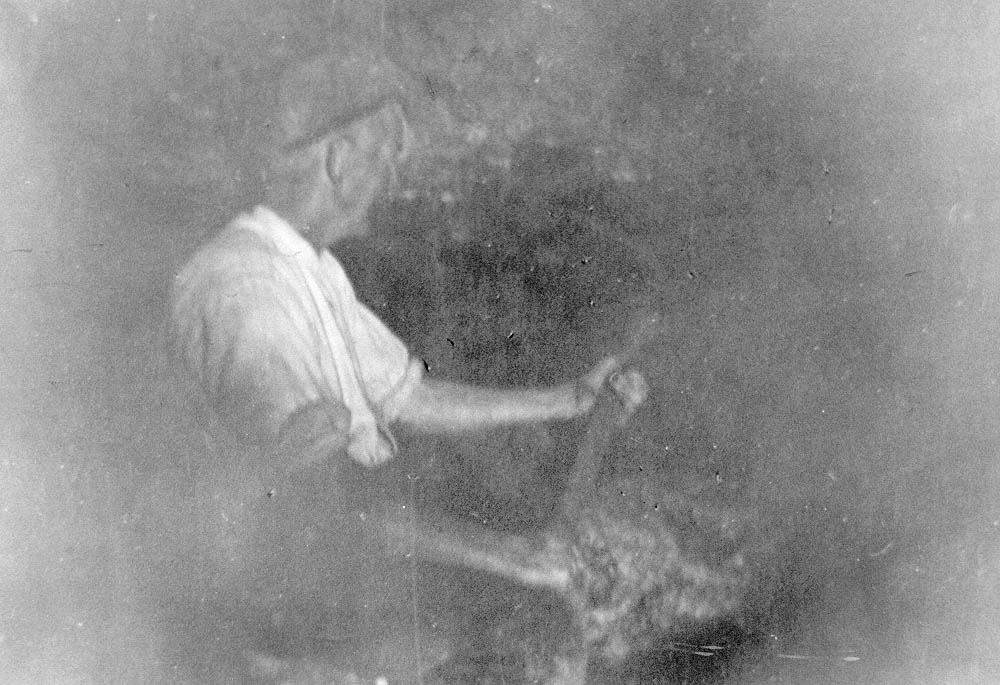
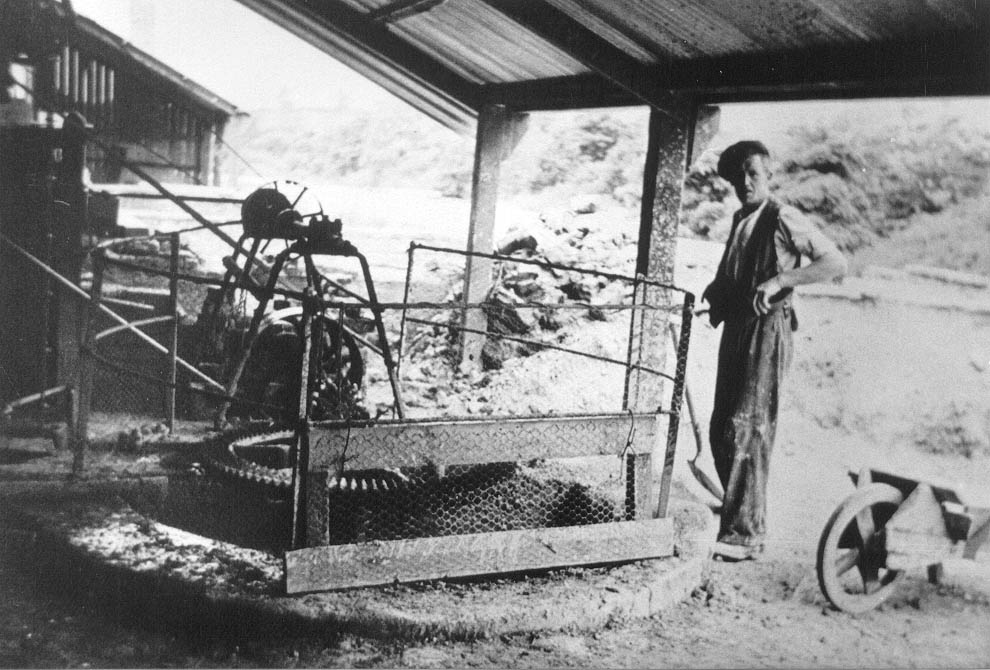
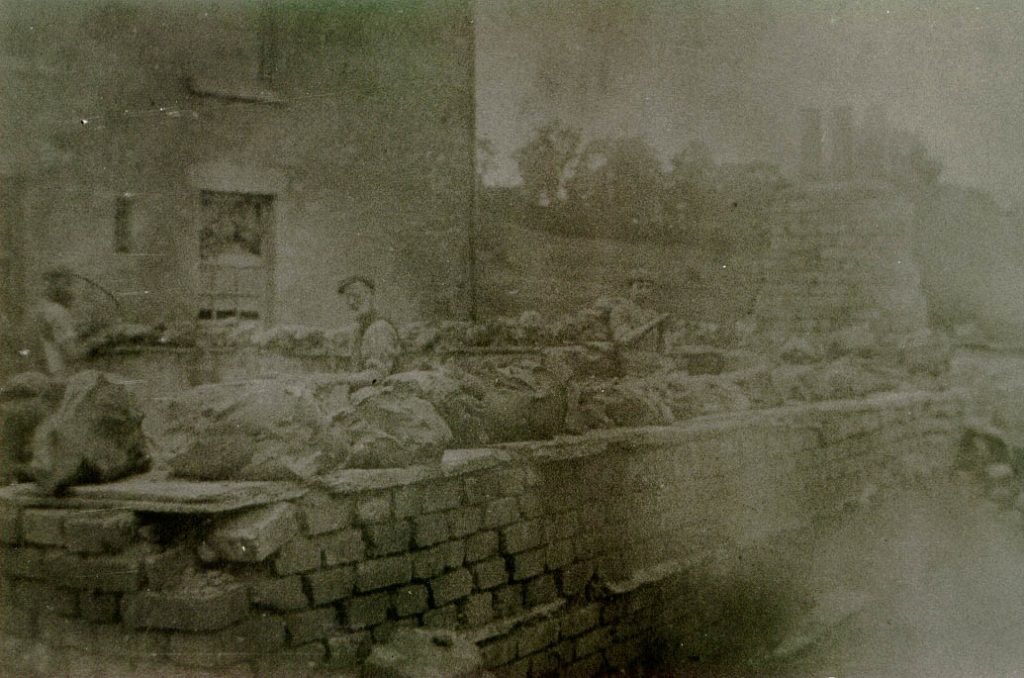
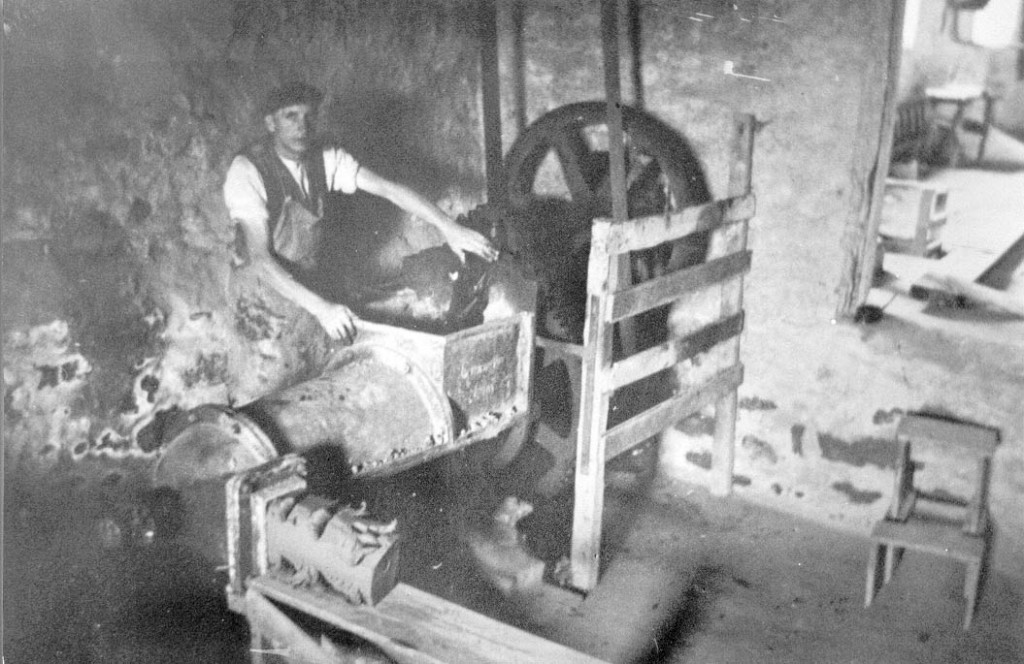
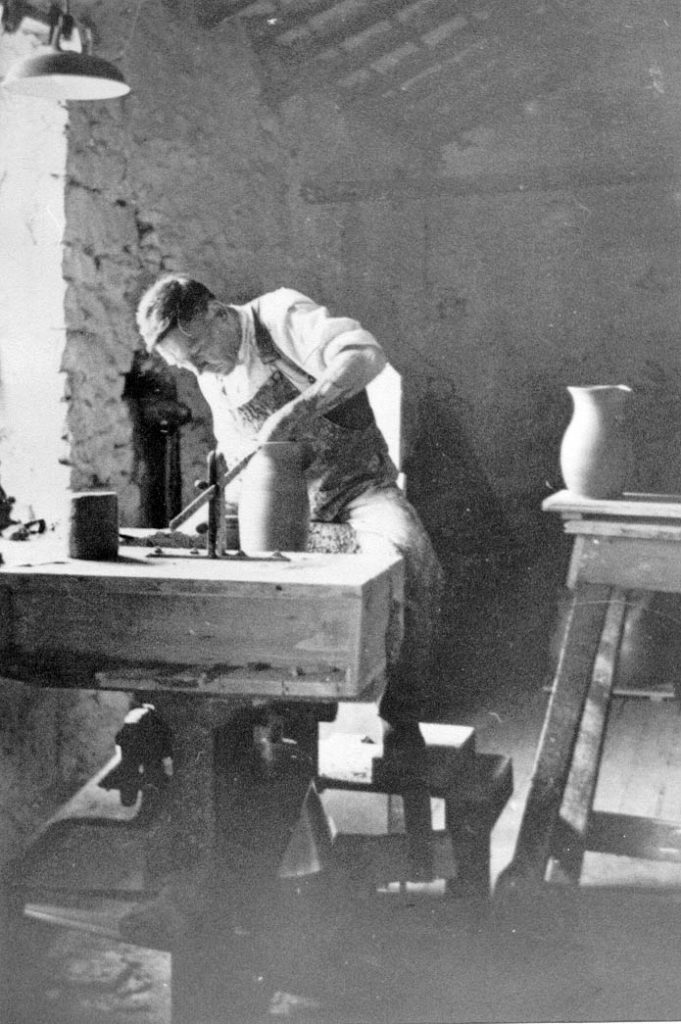
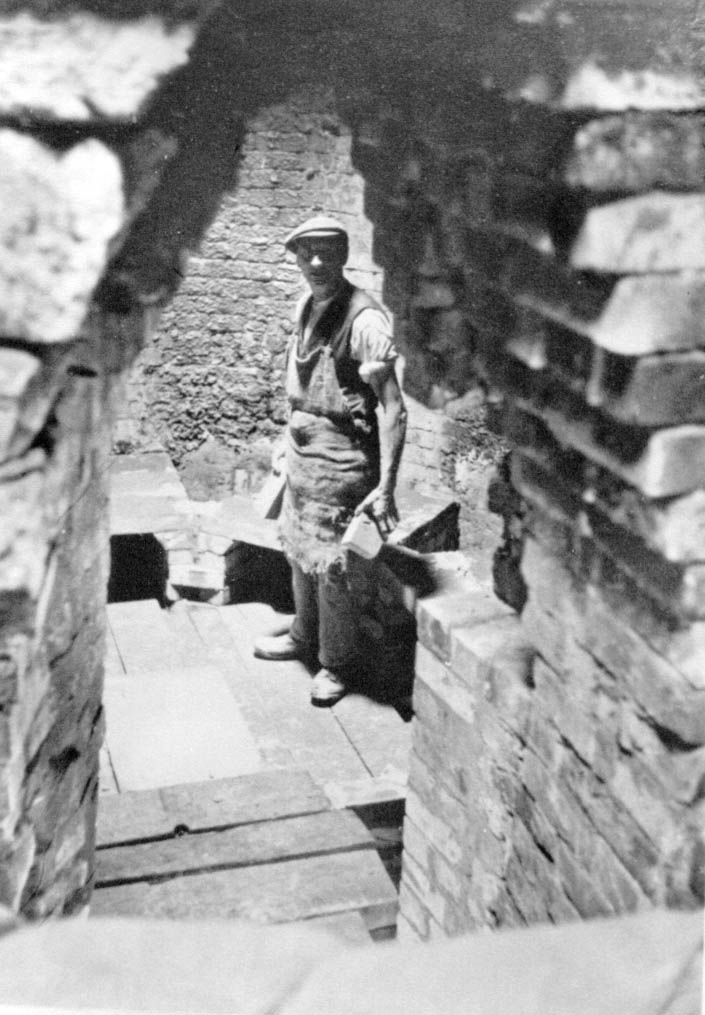
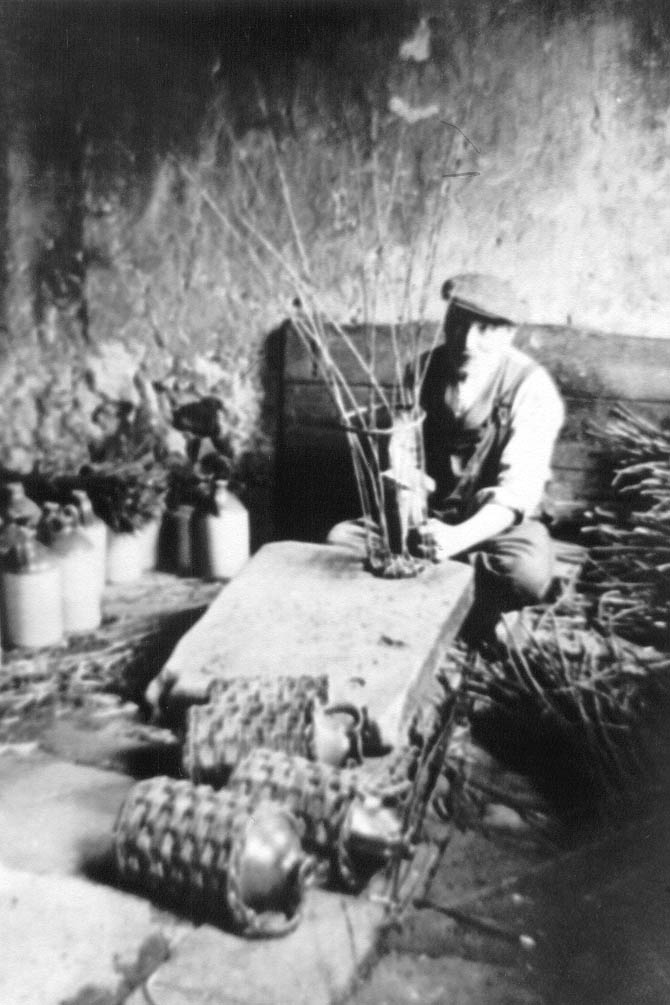
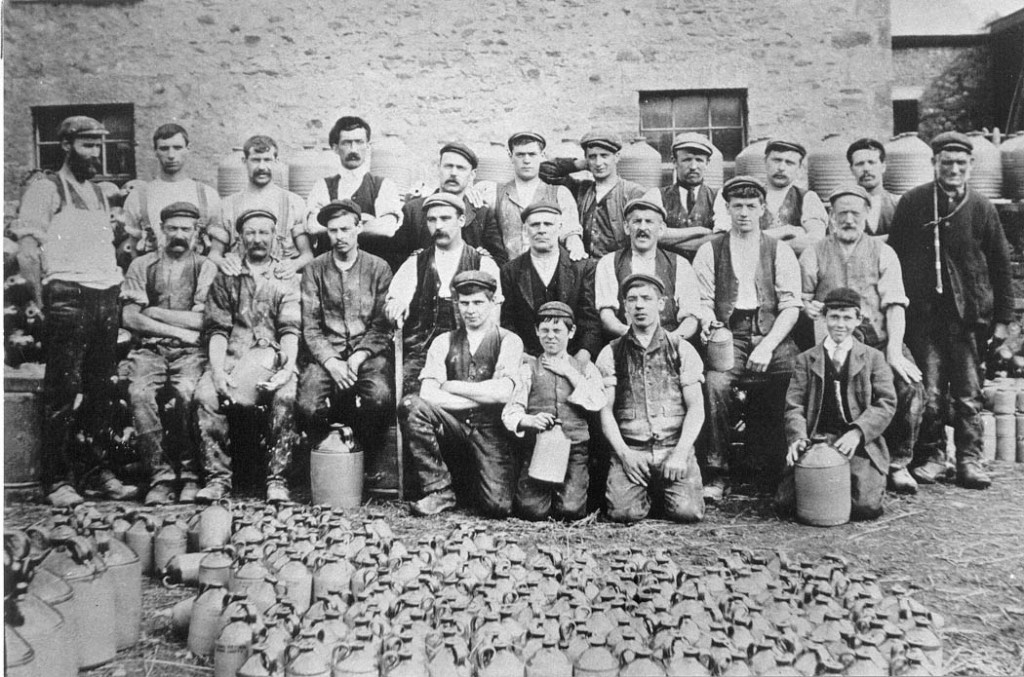
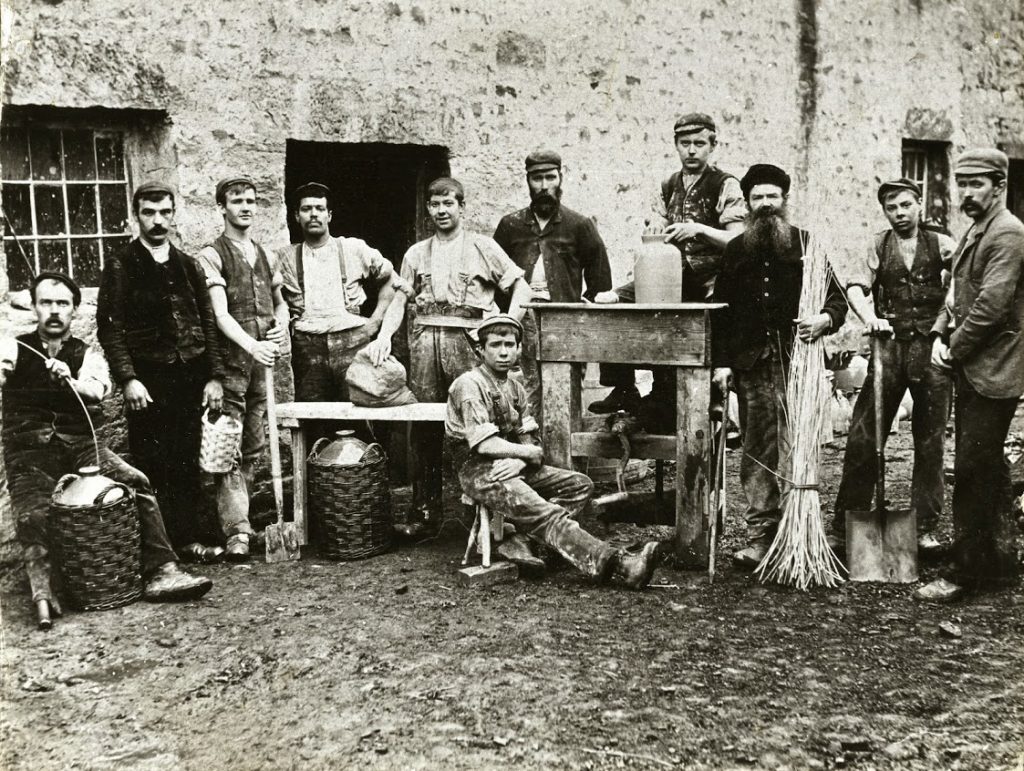
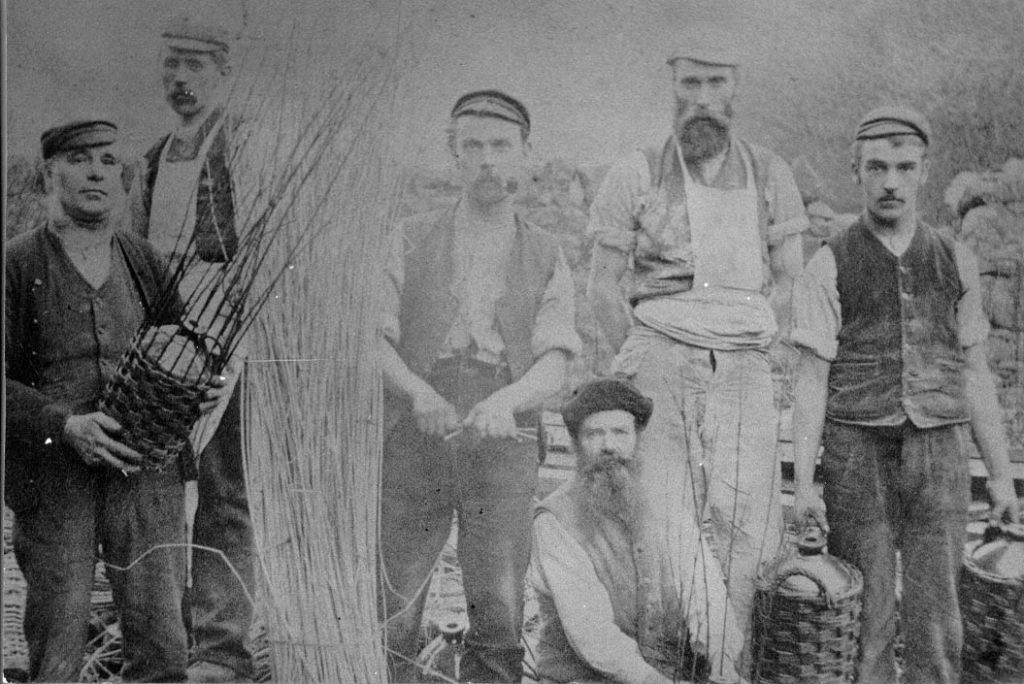
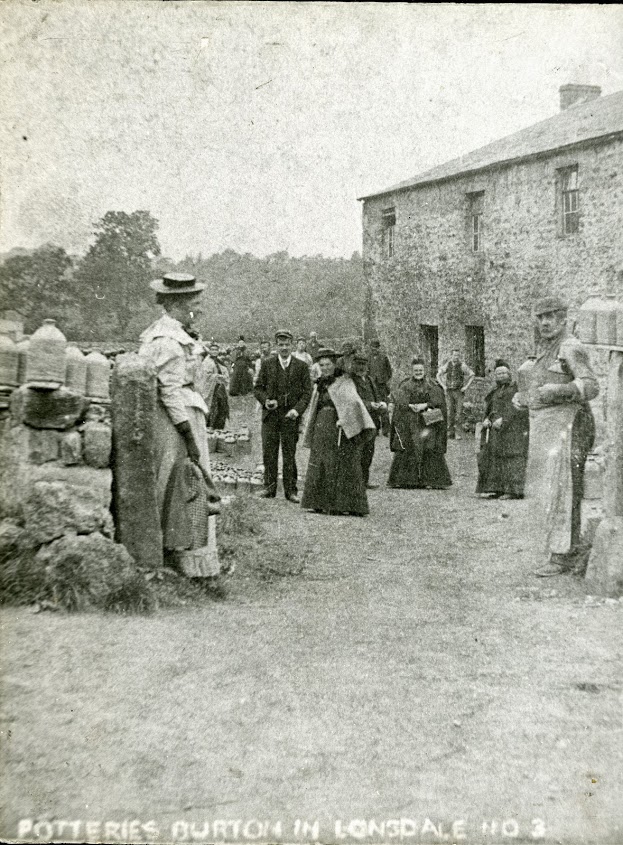
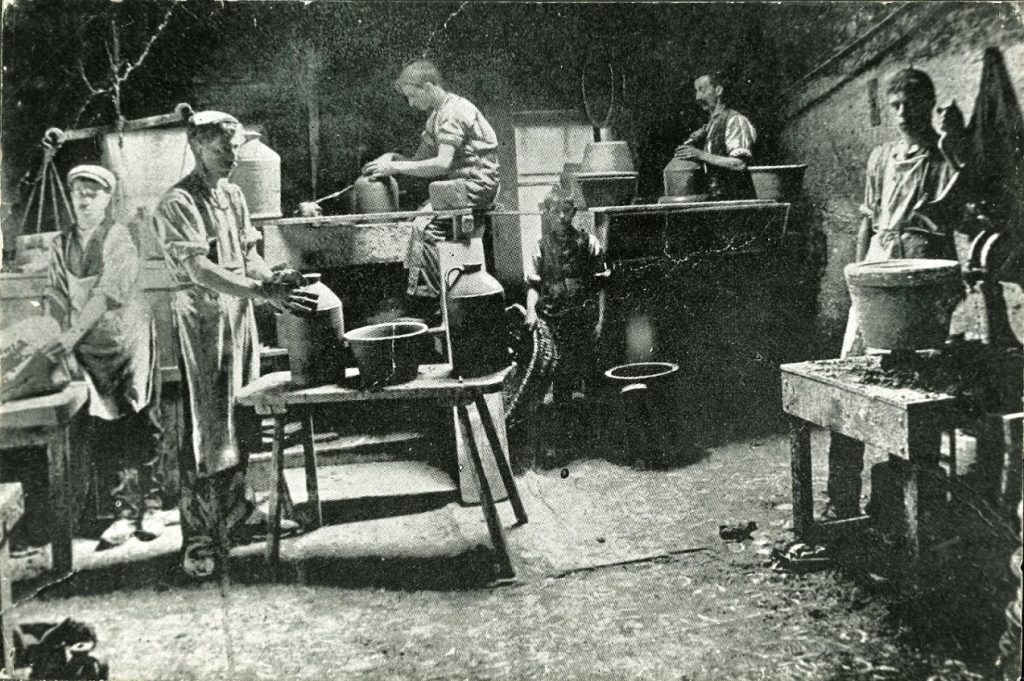
Waterside Pottery in the 1940s. Note the high crown on the third kiln built up to form a blackout during the War.Waterside Pottery 1940. Jack Wilson pushing a barrow of clay from the Stoneware drift mineJames Singleton in the Waterside Pottery clay mine in 1940Jack Telford operating the blunger at Waterside Pottery in 1940Clay drying on the walls of a clay pan at Waterside pottery around 1912. (Left to right) Harry Bateson, Dixon Bateson, unknownCharlie Armer pugging clay at Waterside pottery in 1940.Richard Bateson throwing at Waterside Pottery in 1940Charlie Armer inside one of the kilns at Waterside Pottery in 1940.Harry Capstick firing the kiln at Waterside pottery in 1940.Squire Taylor “wand weaving” at Waterside Pottery in 1940The workers of Waterside Pottery in 1906. Back row: (left to right) Harry Bateson (thrower and owner), Charlie Armer (general worker, night fireman), Jack Fisher (bench hand, day fireman), Bill Fletcher (carter), Jack Lee (wand weaver), Isaac Briscoe (general worker), Arthur Baines (packer), Ted Jones (miner), Sep Lee (thrower), John B Brayshaw (namer and kiln loader), Jack Fletcher (carter). Middle row: (left to right) Bill Standing (fettler and kiln loader), Sam Skeats (engine driver), Jim Brayshaw (jnr) (turner, day fireman), Squire Taylor (wand weaver mainly, but could do any job in the pottery), Jim Brayshaw (snr) (wand weaver), Teddy Tomlinson (miner), Christopher Isaac Briscoe (naming, kiln loader, night fireman), Dixon Bateson (general worker). Front row: (left to right) Charlie Brayshaw (bench hand, taker off), Richard T Bateson (this was the year before Richard began work), Gordon Taylor (general worker), Harold Bateson (jam jar maker). Richard Bateson is in the front row with his hand covering his neck. Apparently he’d broken his top button and didn’t want his Mum to see it in this Lancaster Guardian photograph. Where was Frank Bateson on this day?Workers at Waterside Pottery sometime around 1900. Notice the hand crank on the wheel, which allowed pots to be made when the steam engine wasn’t running. Jack Lee’s peg leg is visible on the far left. (Left to Right) Jack Lee, Squire Taylor, Unknown, Unknown, Unknown, Harry Bateson, Unknown, William Taylor, Unknown, Frank Bateson. Seated Unknown.Photo taken around 1890. (left to right) James Brayshaw, Frank Bateson, Jack Lee, William Taylor (Squire’s father), Harry Bateson (Richard’s father) and Squire Taylor.Visitors to the Pottery around 1900
Before you leave the driveway, here is a tale from Richard’s memoir which took place very close to where you are now standing: We had four horses – two Clydesdales and two Shires: Prince, a dappled grey; Polly, a large light brown; Star, a dark one with a white patch on its forehead; and the other whose name I can’t remember. One of them was always being rested while the other three were working. Prince must have been in the family for many years. Before the enlargement of the pottery in 1900, only one horse had been needed. After that, trade seemed to be on the increase. Whenever Prince, the dappled grey, was mentioned by the carters or by one of the bosses, one could always sense a note of respect and reverence. I have previously mentioned the settling-pens at the entrance to the Pottery road, at the Skipton Gate end. There was an old engine – which I fancy that I can remember one upon a time working. The enlarged pottery with its new additions was fitted up-to-date with a modern, more powerful engine – one would call it a two-stroke. The old stable engine had to be scrapped for old iron. I was then about seven years old. Billy Kirkbride, the joiner, had the job of moving it. There was only room for one horse to move it from the place where it had lain for years – and that horse was Prince. Engines of the driving-power type in those days had large five-foot wheels attached to them. I can well remember the conversation between the men on the job. “It’ll nivver do it,” says one. “Thee hodd thy noise. Tha doesn’t know that horse,” said old Jack Fletcher the carter. There was a man at each wheel. “Now,” said Jack, “when I say ‘Go,’ push and push like buggery….” There I was with my eyes popping – and probably using the same swear-words. I watched the great horse straining, and slowly one foot began to move, and then the other. “She’s moving!” shouts Billy Kirkbride. “Push and push like hell! – and gradually the engine and boiler came out of its resting-place. Today, after almost eighty years, the spot still shows – and some of the clay pans are still to be seen.
Bridge End Pottery (Baggaley’s Pottery) Again, retrace your steps to return to Burton Bridge and this time cross the bridge. Immediately after, you will see the following cul-de-sac on your right:
Former site of Bridge End Pottery (Baggaley Pottery)
This is where Bridge End Pottery once stood. Bridge End Pottery was also known, at various times, as the Baggaley Pottery and the Coates Pottery. Here are a few photos of it:
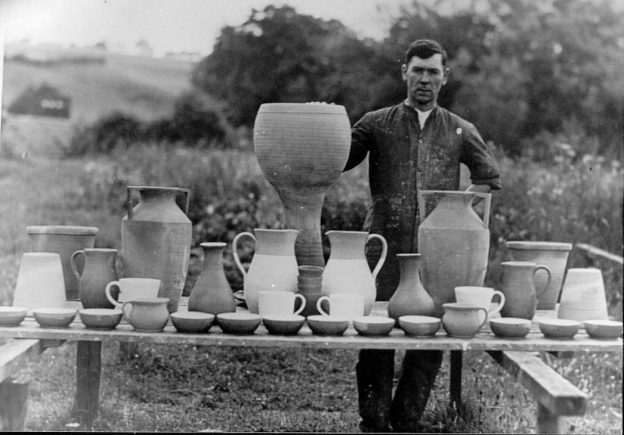
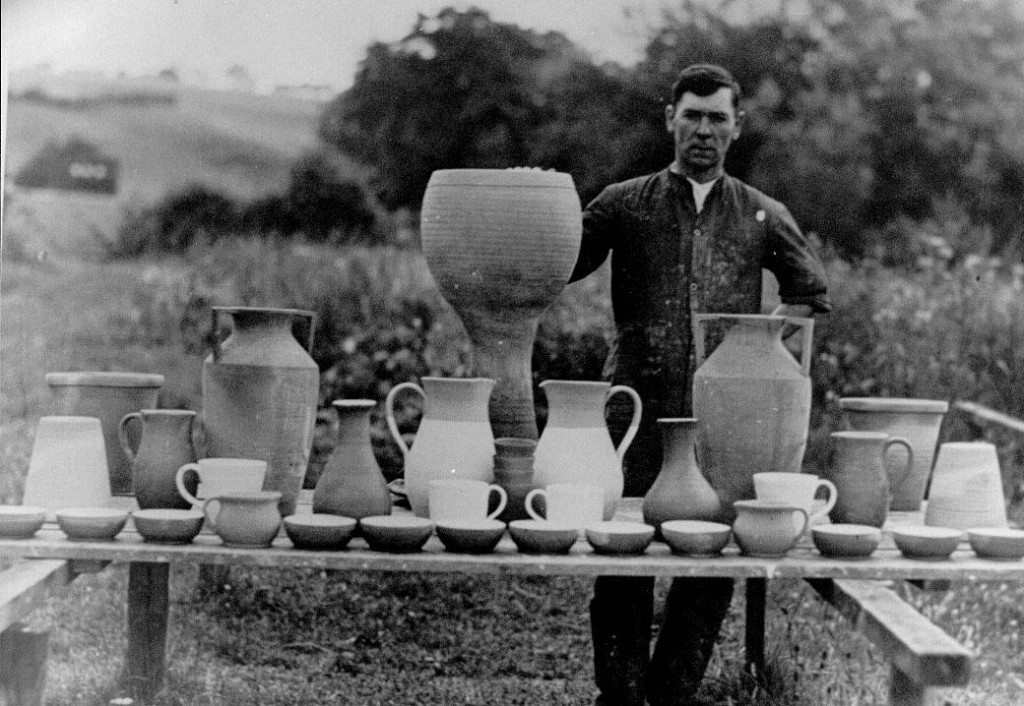
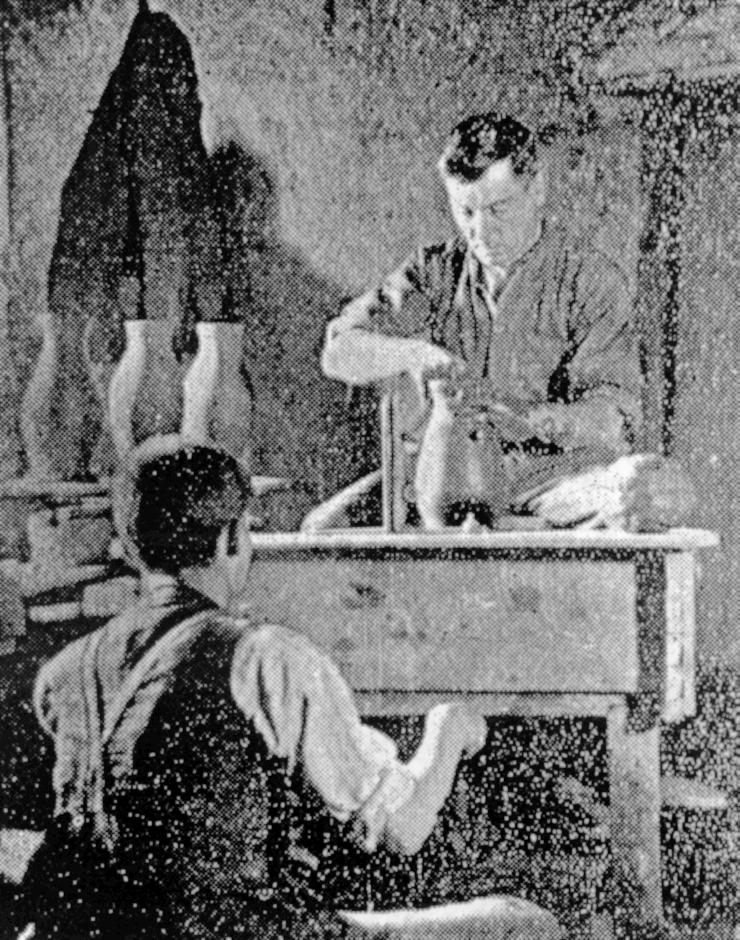
Bridge End Pottery in 1920. Jack Coates throwing.Bridge End Pottery around 1910. Glazing, or applying white slip, to milk pans. Thomas Coates (left) and Jack Coates.Bridge End Pottery in 1919. (Left to right) unknown, Jack Coates, Cliff Priestley, Thomas Coates, Bob Saul, Bill Saul, Jack Bradshaw.Bridge End Pottery in the 1930s. Richard Bateson with wares produced at Bridge End pottery in the 1930s. (Courtesy of Lancaster Guardian)Richard Bateson throwing pots. The wheel is powered by the boy rotating a crank!
Greta Pottery If you look on the left hand side of the road. You will see the following building:
Former site of Greta Pottery
This is where Greta Pottery used to be. Here is a photo of the workers inside Greta Pottery:
Greta Pottery about 1905. (Left to right) Bert Williams, William Bateson (son of Robert Bateson), Bob Law, Bob Saul the boy (he is hard to see), John Atkinson, Richard Bateson (son of Robert Bateson).
Town End Pottery and Greta Bank Pottery Now go up the steep hill into Burton and turn right onto High Street. It might be worth calling into the community shop for a quick sandwich and coffee (on the left hand side), because you’re going to need some sustenance for the next section! Carry on along High Street pass the entrance of Duke Street after which the road bears left. Soon after this, if you have a close look at the wall you may well see the following:
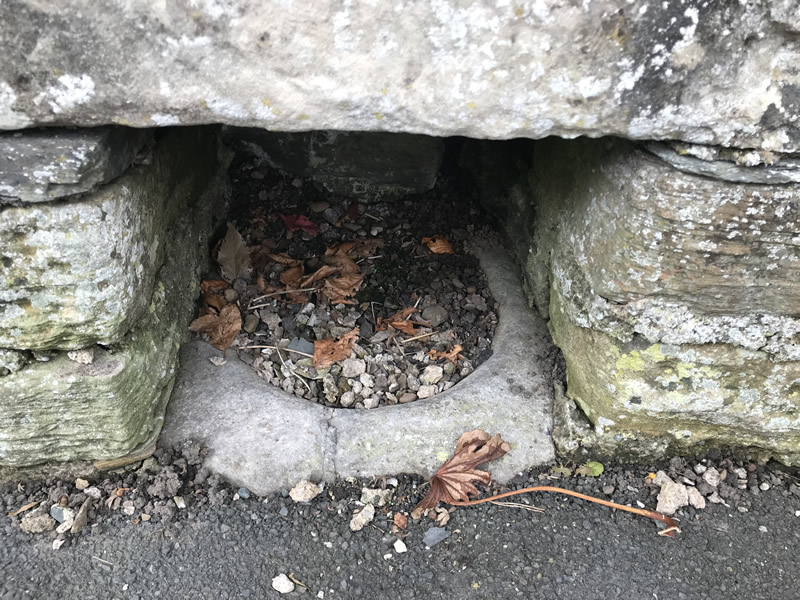
Pottery Mortar or Plague bowl?
I’ve heard people say that this is a plague bowl, for washing money in. However another theory (put to me by Henry Bateson, Richard’s son) is that it was more likely to be the mortar of a pestle and mortar set , that may well have been used at Town End Pottery for grinding glaze ingredients.
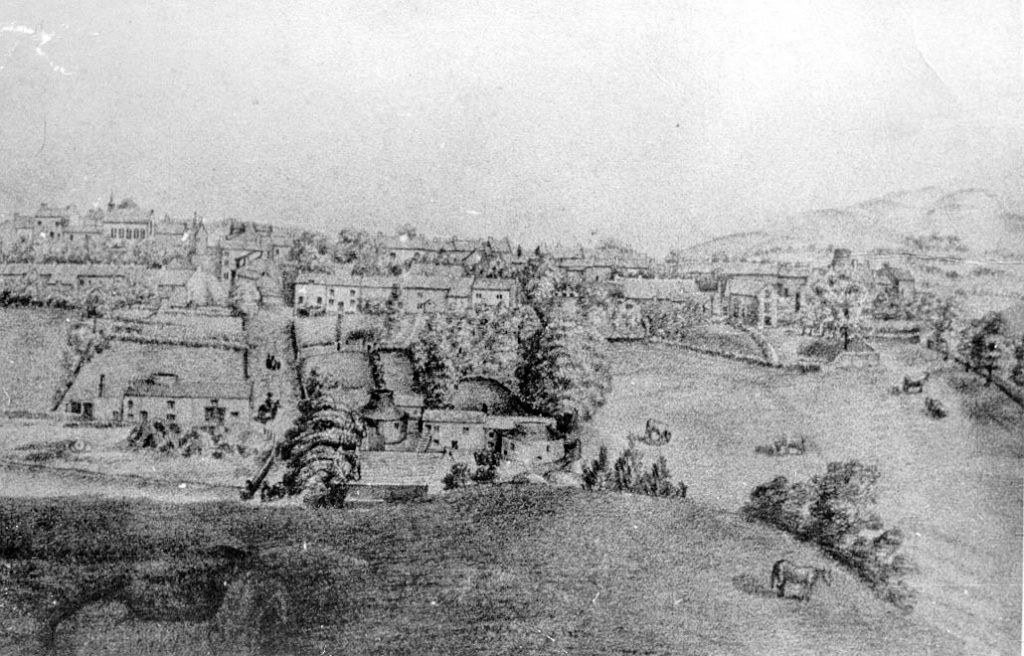
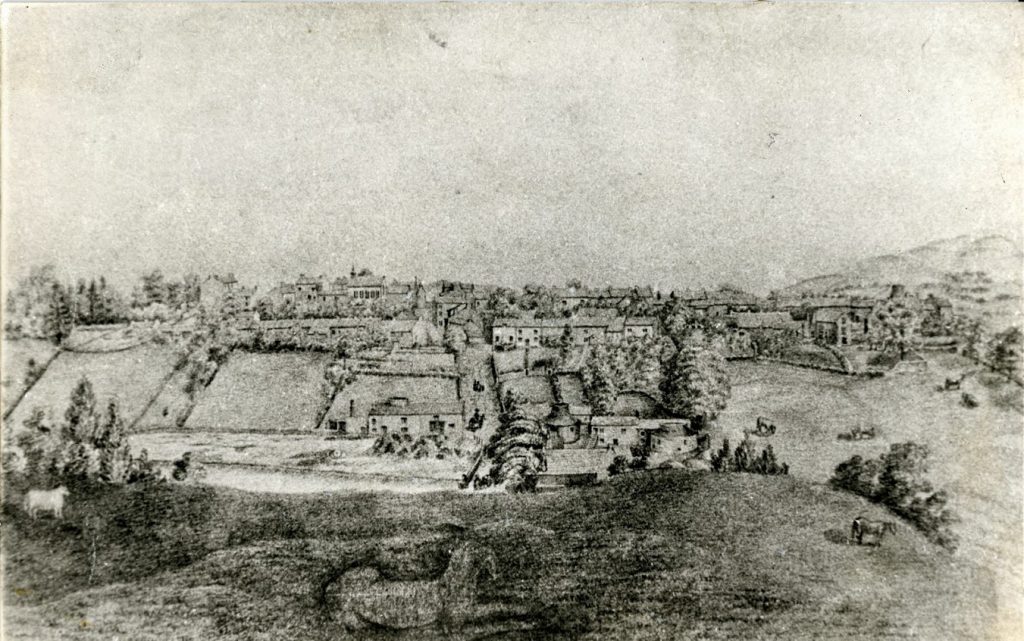
Now look out for “The Croft” street sign on the left hand side, shortly after this bend in the road.This is roughly where Town End Pottery used to be. Regretably I have yet to find a photo of Town End Pottery, which is frustrating, as it was still in business up to the First World War. Somebody out there must have a photo of it? The only image I have of Town End Pottery is on the following drawing, where you can see the bottle kiln at the top right of the picture:
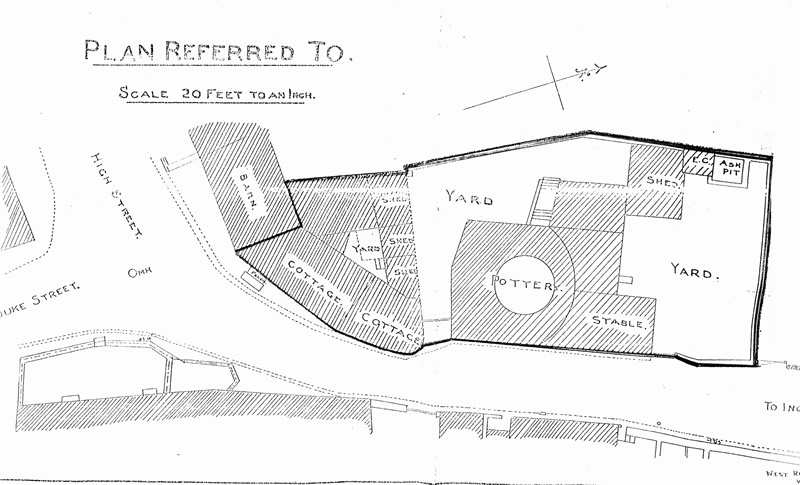
Bottle kiln of Town End Pottery visible in top right
I have a plan of Town End Pottery, but its not as good as seeing an actual photo of it. Although it does give you a good idea of where it was.
Greta Bank Pottery
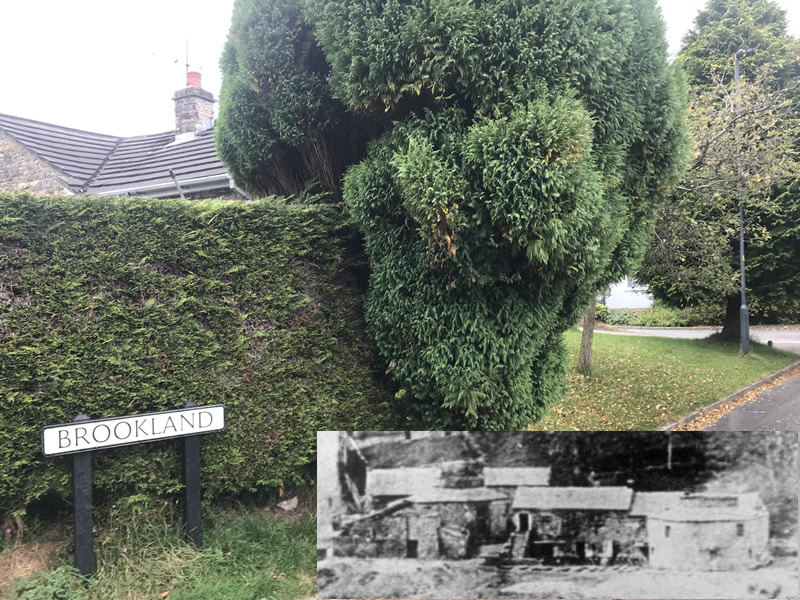
You’ve got two options for the next part, you can take the footpath on the right next to the bus stop (opposite where the stone mortar/plague bowl is), or if the weather has been wet (the footpath involves walking through fields), you can carry on down the road (heading towards Ingleton) and take the next right down a single track lane (Barnoldswick Lane). If you take the footpath option, the path starts off very well defined, but it suddenely deposits you through a small metal gate into an open field with a derelict barn in front of you and no obvious way on. Basically head to the left of the barn towards a gate in the field. Keep going through another 4 fields until you encounter a footpath sign and stile in the wall on the left. Cross the stile and turn right and you will be in Barnoldswick Lane. Turn right here. Walk to the very end of Barnoldswick Lane, turning right around the bend to avoid a drive way on your left named Brentwood Farm.. This brings you very close to the River Greta. After a few houses, the furthest house on your left, Lower Greta Bank House, is where Greta Bank Pottery used to be. Here is a photo of it in its prime, with a smoking kiln:
Greta Bank Pottery, sometime around 1900. Notice the smoking kiln, the vague outline of Ingleborough and Greta Bank Bridge (Penny Bridge)
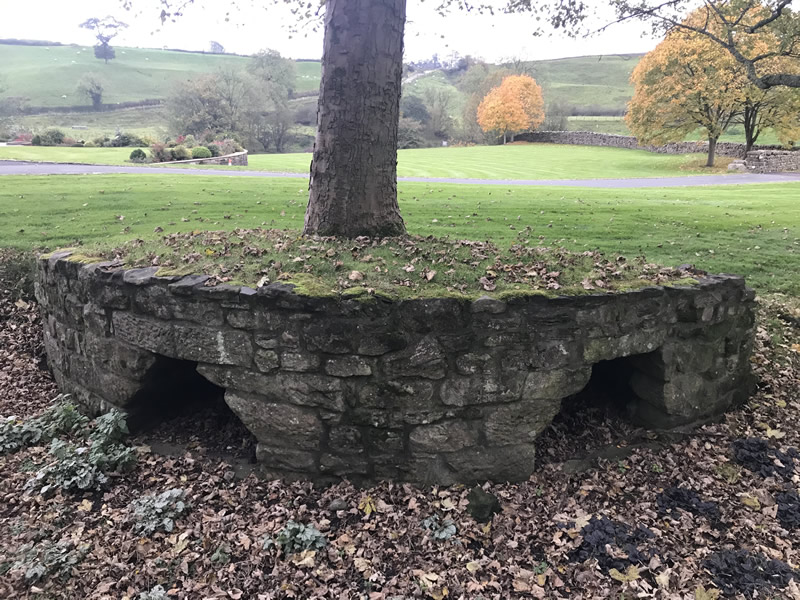
If you look up the first drive of Lower Greta Bank House there is a low curved wall with two openings just to the right of the drive. This is a small section of what was the outside wall of the kiln. It really is the last physical remnant of the Burton potteries past (in terms of buildings anyway). Please be aware that this is in a private garden, so only view it from the road.
Section of Kiln wall, Photo taken with permission of the owner
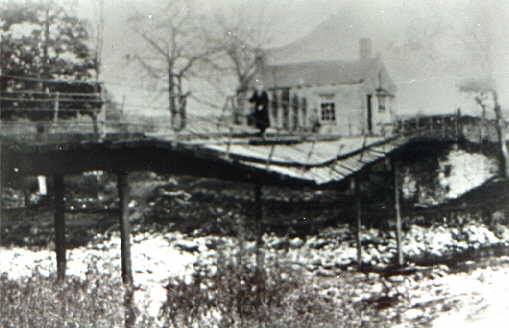
Up to the 1930s you would have been able to continue along Barnoldswick Lane over the River Greta via Greta Bank Bridge, or Penny Bridge as it was known. Squire Taylor, the basket maker from Waterside Pottery, lived at the toll house for Penny Bridge. Apparently he wisely invested all the takings from people crossing in Guinness bought over the bar at the Joiners Arms in Burton. During the 1930s great depression, the good folks of Burton discovered a source of free coal in the river bed around the bridge. Removal of large quantities of this coal resulted in the bridge and banking being undermined and the river took the bridge foundations. It eventually also took Squire’s house. The bridge was never rebuilt.
Penny Bridge, or Greta Bank Bridge around the 1930s in a state of semi collapse. The Toll House can be seen behind the Bridge.
Now returns to the mortar/plague bowl location on the High Street, either by the road or by the footpath through the fields.
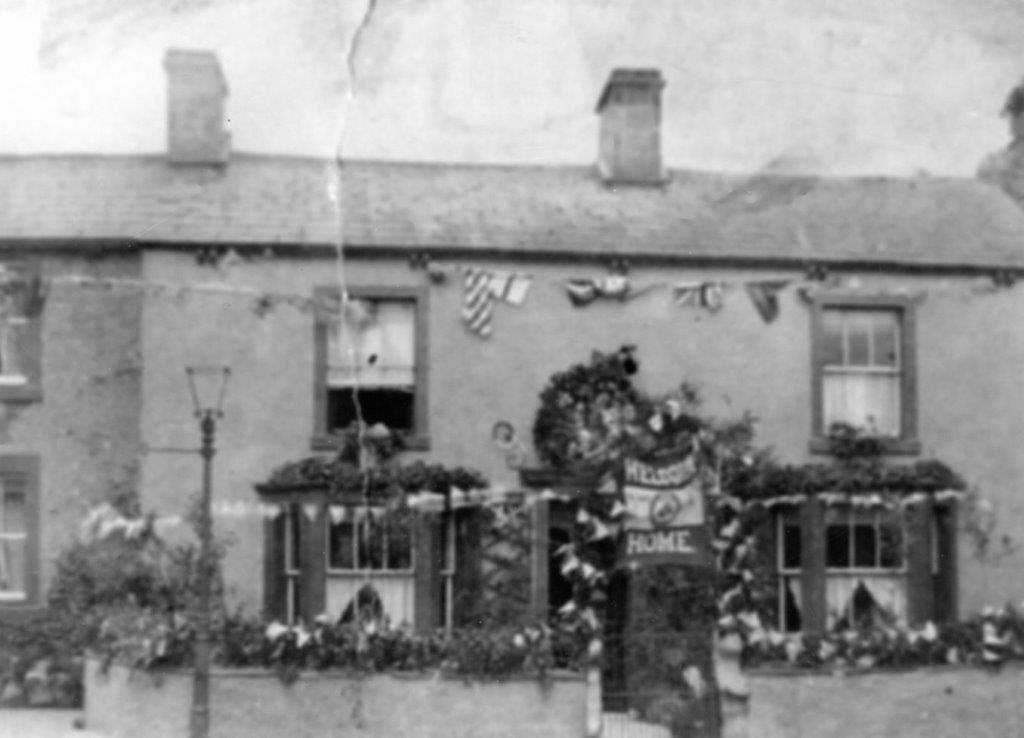
The Punch Bowl and the Graveyard Challenge Turn left down Duke Street then sharp right to arrive at Low Street. On the corner of Duke Street and Low Street you will find Bleaberry House on the left hand side. This is where Harry Bateson of Waterside Pottery lived and it is where Richard Bateson grew up and ran away to the First World War from.
Bleaberry House in 1918. Welcoming Richard Bateson back from the First World War
Half way down Low Street the Punch Bowl Inn is on your left. It would be foolish not to go inside and have a swift drink. You’re definitely going to need some fortification for the next bit. Whilst enjoying your chosen beverage (spirits might be the best choice), mull over the fact that The Punch Bowl Inn used to be owned by the Baggaley family from Bridge End Pottery and they used to craftily pay the pottery workers over the bar on a Friday night. And so on to the last part of the tour, the Graveyard Challenge. Turn left outside the Punchbowl, go straight across the road onto Leeming lane and follow the lane around to the right. This leads to the church. Head into the graveyard and see how many potters you can spot on the gravestones. Good pottery surnames to look for are Bateson, Baggaley, Bradshaw, Brayshaw, Briscoe, basically anything beginning with B. Actually that’s not really true, here are a few more: Kilburn, Coates, Parker and Taylor. Some of the main characters from my book can be found buried here; these include Henry (Harry) Bateson, Richard Bateson, Frank Bateson and Robert Bateson. Two gravestones mention actual potteries. I came to the sad realisation whilst researching this that I knew more dead people in Burton than live ones! This walking tour has looked at the five potteries that were still in production up to the First World War; namely: Waterside Pottery, Bridge End Pottery, Greta Pottery, Greta Bank Pottery and Town End Pottery. There were at least 10 other potteries operating at different times in the past. The following map will give you some idea of their location:
Map of Burton potteries c. 1850 design and production by Andrew Lathwell and Burton Heritage Group
Please feel free to contact me and let me know how you got on with this walking tour. I’d be interested to know if you think I should add anything else, or even omit anything. I’d be absolutely delighted if anybody can show me any photos of Town End Pottery, or any other Burton pottery for that matter. All that now remains is a short car journey to Bentham Pottery (head towards Low Bentham from Burton and you’ll find us on the right after the cross roads), where you can purchase “The Last Potter of Black Burton”. I’ll sign it and even give you a tour of the pottery. We’re open Monday to Friday, some Saturday afternoons, but not Sundays.
Burton-in-Lonsdale used to be known as Black Burton. Most people think this was due to the amount of smoke arising from the coal fired kilns of the local pottery industry. However Stoke had far more potteries than Burton and it was never referred to as Black Stoke.
A far more likely, though understandably less popular, reason for the “black” prefix was due to the morals of the people living there. The potteries would have employed a lot of men and it would have brought a concentration of young men into the area working in what were essentially small scale pottery factories. The potters were fiercely competitive with each other and with the other potteries. Is it possible that these men perhaps could have introduced “black” habits such as an over indulgence in alcohol, non-attendance at church, blasphemous language and cock fighting? There were certainly as many pubs as potteries in the village. Here are some extracts from the Lancaster Guardian of 21st August 1875 perhaps confirming this view, though diplomatically defending the morals of the then “present” potters.
“Without any intention to make the Burtonians of a past generation more vile than their neighbours, it may be said that rudeness and cruelty were mixed up with many of their amusements”
The article goes on:
“Cock fighting was the crowning sin and the most brutalising practise of the past generation.”…….”This love of cock fighting led to much drinking, quarrelling and dishonesty.”……..”There was such a demand for fighting cocks that the immediate neighbourhood could not meet it and consequently it was a risk for anybody to keep a game cock within a dozen miles of Burton. Some of the lovers of this inhuman diversion, when a “gam cock”, as it was called, had been sighted set at defiance locks and bars, law and parish constables. Some of these game cock stealers were known to travel as far away as Kellet, Sedbergh and Nook near Kendal, and as many as 17 cocks have been the fruits of one night’s plunder. The stolen cocks used to be kept in the potteries, and, for a time, covered under large pots.”
“Rudeness of speech and unmannerly conduct at Burton-in-Lonsdale are now, comparatively speaking, a thing of the past. There was a time when few persons, especially on a Sunday, could enter the village without being called some offensive name. “
“The potter’s song of the past would not apply to the present class of potter. “The Bull (inn) will break all the Burton pots and drink the Fountain (inn) dry. It will turn the Punch Bowl (inn) wrong side up and make the Hen and Chicken (inn) fly.”
A third possible reason for the name Black Burton and, I have to admit, that this is my own theory, is that the local terracotta clay, dug up at Mill Hill near Greta House and used by all the Burton potteries, is in its raw processed state black in colour. The Burton potters used to refer to it as “black ware”. When you dig it from Mill Hill (and I have done this numerous times) it is a grey colour. It only turns black when you process it by grinding it down, turning it into a thin liquid, passing it through a sieve and then drying it out again. The photo with this post is of freshly thrown Burton “black ware”. I am told that the reason the clay is black is because it has oil in it, which I’m guessing would contribute to fuel in the firing process. The clay throws really well and fires to a light red colour.
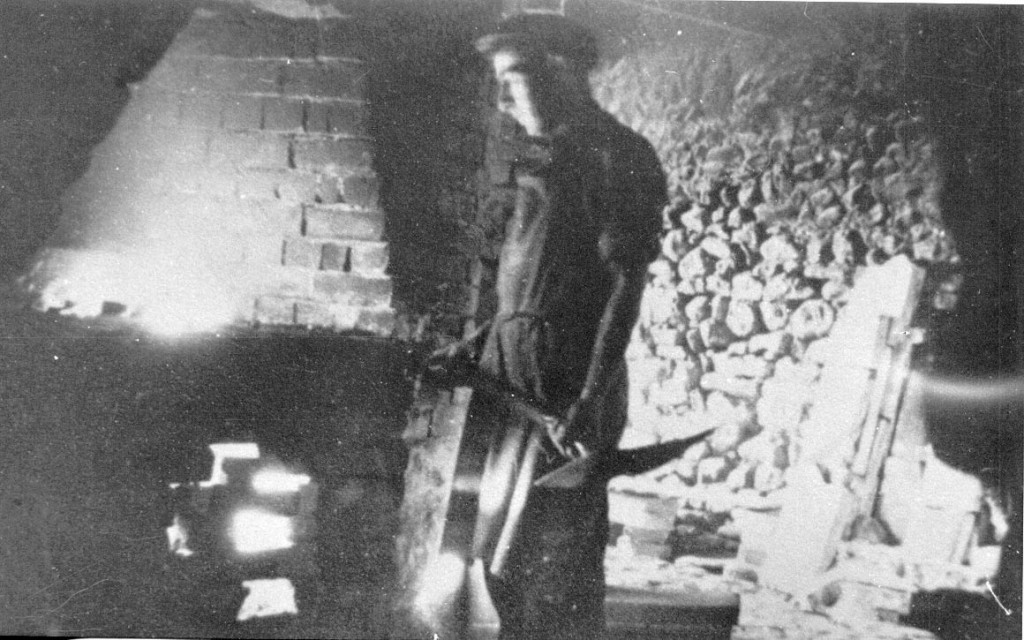
This photograph of James Singleton was taken in the stoneware clay mine at Waterside Pottery, Burton-in-Lonsdale in the late 1930s/early 1940s. Waterside Pottery was located up the driveway on the opposite side of the river from the cricket pitch in Burton.
Stoneware clay was originally dug opencast in the fields outside Waterside Pottery, but this unfortunately ran out around 1905, this forced the potters to open a drift mine to access a 4ft 6 inch seam of stoneware clay that ran into the hillside.
Law required that a qualified miner had to be employed to do this. Ted Tomlinson took this job. Ted had worked at Ingleton Colliery. Ted dug the clay in the mine whilst “Gunner” Jones carted the clay from the mine to the pottery. A railway line was built from the pottery into the mine to make this task easier.
I’m not sure how long Ted and Gunner worked at Waterside Pottery or if they were called up for the First World War and, if they were, whether they came back to the pottery after the war?
Waterside Pottery closed in 1933, but then reopened again in 1937, with Richard Bateson running it in partnership with Harold Parkinson from Hornby Castle.
James Singleton, another former Ingleton Colliery worker, was employed to dig the mine. James had reputedly spent time in the Klondike mining for gold in the 1890s Gold Rush. I’m guessing he can’t have made his fortune in the Klondike, otherwise he might have found more amenable work?
The original clay mine at Waterside had become very unstable, so a new drift mine was opened. After going into the hill for 50 yards the mine collapsed. Fortunately nobody was down at the time. The collapse was turned into an air vent, which was just as well, as when James was working down there one time, the mine collapsed badly near the entrance, sealing James into the mine. James was able to escape through the air vent. The railway line from the old mine was dismantled and installed in the new mine.
The photograph was given to me by Henry Bateson. Thinking about it, if James went out to the Klondike in the 1890s, then it would make him at youngest in his late 50s in 1937 when he went to mine the clay at Waterside Pottery. Does this seem a bit old? The trouble is that the people who told me a lot of the history of the potteries are no longer living, so you can’t go back to them to ask further questions.
The bottle kiln of Town End Pottery can be seen on the top right hand side of this drawing of Burton-in-Lonsdale (on the way out towards Ingleton). It is the only image of Town End Pottery I have ever seen, which is surprising, considering the pottery was still in business up to the First World War. Somebody out there must have some photos?
Town End pottery was an old established pottery in the village that can be traced back to the 1700’s. At the turn of the last century, it was run by John “Jacky” Parker. Jacky had inherited the business from his father William Parker who had bought the pottery in 1863. Jacky was a hardworking man and a good thrower. He produced traditional country wares all in terracotta (or “black ware” as the Burton potters called it) and sold his pots locally. He would have made such things as jugs, jars, bowls, butter pots, plant pots and basically any pot that was demanded by households or farms. The pots probably had a simple slip decoration. The clay would have all been taken from Mill Hill Close to Greta House.
The main throwers were Jacky and Freddie Slater. Freddie learnt how to throw at Town End Pottery and became one of the best throwers to emerge from Burton. Tom Park, a blind man was employed as a wheel turner, which would basically involve sitting on a seat and turning a hand crank to power a pottery wheel. George Kilshaw, Tom Skeates and Bill or John Saul were employed as general workers. Jacky’s son Jim Parker also worked at the pottery as a youngster, but to the disappointment of Jacky showed no interest in being a potter and got out of the business as soon as he could.
Jacky used a red lead glaze on his pots. He was very fond of chewing tobacco and is remembered glazing his pots with red lead covering his hands and waistcoat then dipping his red hands into his waist coat to grab some tobacco to chew. Nobody knew the dangers of eating raw lead at this time!
Town End Pottery had a shop where wares were on sale, so people could call in and buy and order pots. However Jacky’s main business was selling pots in Kendal, which was a regular trip. I’m guessing that he probably had a market stall in Kendal and possibly supplied some shops? He kept two horses both called Bob and a large cart for taking the pots to Kendal. Jim Brennand was one of a few people that would take the horse and cart up to Kendal. The fully laden cart would set of the night before and stay overnight at Aynams, which allowed the horses some rest before making the return journey the next day.
Sadly Jacky died at the age of 60 and on his 60th birthday in 1908. It is thought that he died of lead poisoning.
Freddie Slater borrowed money and bought the business. However despite Freddie being a brilliant thrower, he wasn’t great at business. According to Richard Bateson, He was “too busy advising other people how to run their businesses, instead of running his own”. Freddie only lasted 3 or 4 years before going bankrupt just before the First World War. Freddie then moved out of Burton and got a job at Portobello Pottery in Edinburgh, where he discovered lots of new pottery techniques, trade unions and health & safety regulations all of which he brought back to Burton-in Lonsdale when he eventually returned, causing all sorts of disruption within the Burton potteries, but that, as they say is, a story for another day.
Unlike the other potteries in Burton at this time, Town End Pottery did not produce stoneware bottles. This could have been because they had no access to digging the stoneware clay, or it could be that they had simply found a good market for the country wares that they produced?
I’ve often wondered whether if Jacky’s son Jim had shown more interest in the business, the pottery would have continued for longer. After all Wetheriggs Pottery, a family run pottery near Penrith produced similar wares to Town End Pottery and managed to keep going until 2008. The truth is pottery is a very fickle business and it requires at least one dedicated person willing to work long hours for sometimes little remuneration. It’s often easier to find other work. Interestingly, Jim Parker’s son, John Willy Parker ended up working at Waterside Pottery (after the war), so it would appear that the pottery gene seems to have skipped a generation. Jacky had daughters, who I guess could have continued the business, however, unfortunately, pottery in Burton was seen as an exclusively male activity. I have never heard of any women potters in Burton, although Richard Bateson’s sister and sister-in-law, Mable and Millie, did work briefly at Waterside Pottery during the First World War when the pottery lost a lot of its men to the war effort. Richard can remember being “rather horrified to think of women in the pottery” when he found out whilst he was in the army. Richard was concerned not just about the dirty conditions in the pottery, but also the foul language used by the potters. Stoke –on-Trent on the other hand employed thousands of women in the potteries, especially for painting and decorating pots. I feel not using women in the potteries of Burton was possibly a mistake, as from my own experience of selling pottery, it is usually the woman that chooses the pot, therefore it surely makes sense for them to be involved in the making and design process?
Town End Pottery was sadly demolished by the council in 1923 in order to widen the road. Did I mention I have no photos of it?
For years I have used the slip trailers available from the pottery supply companies and for years I have had issues with these trailers. The problems I have with these slip trailers are the following:
They are made with such thick rubber that it means they are uncomfortable to depress for any length of time, they suck air back inside meaning they occasionally burp, resulting in a sudden splodge of slip emerging (potentially ruining the pot) and the nozzles are usually too large, resulting in a very thick trail.
For many years I guess I thought that this was the only tool available for slip trailing and I had to accept it. I learnt a few tricks to improve these trailers (like pushing electrical wire with the copper removed into the nozzle to create a smaller opening and dipping the bulb of the trailer into hot water for 5 minutes to soften the rubber and make it easier to depress). And then one day I did a factory tour of Moorcroft pottery. Moorcroft make extensive use of slip trailing (they call it tube lining). The slip trailers being used at Moorcroft were very different to anything I had seen before. They consisted of a small easily compressible latex bag (a little bit like a large uninflated balloon) where the slip is contained linked to a nozzle. The nozzles looked removable and varied in diameter from very fine to thick. I noticed that the workers seemed to be using the trailers effortlessly without having to rest every few minutes due to aching hands. I also noticed that no splodging was happening with the slip, as the trailers were not sucking air back into them. In short I desperately wanted such a slip trailer for myself! I asked if I could buy one at Moorcroft. Unfortunately the answer was a resounding no! I started pestering the pottery suppliers to source some. My pleas fell on deaf ears! I have spent years thinking about attempting to make my own version (and doing nothing about it). Then one day whilst browsing through Claycraft magazine I noticed an article about slip trailing by Mark Dally. I noticed that Mark was using a very similar slip trailer to what I had seen at Moorcroft. I was delighted to see that at the end of the article Mark advertised that he actually sold such slip trailers from his website. A few mouse clicks later and a Mark Dally slip trailer was on its way to me.
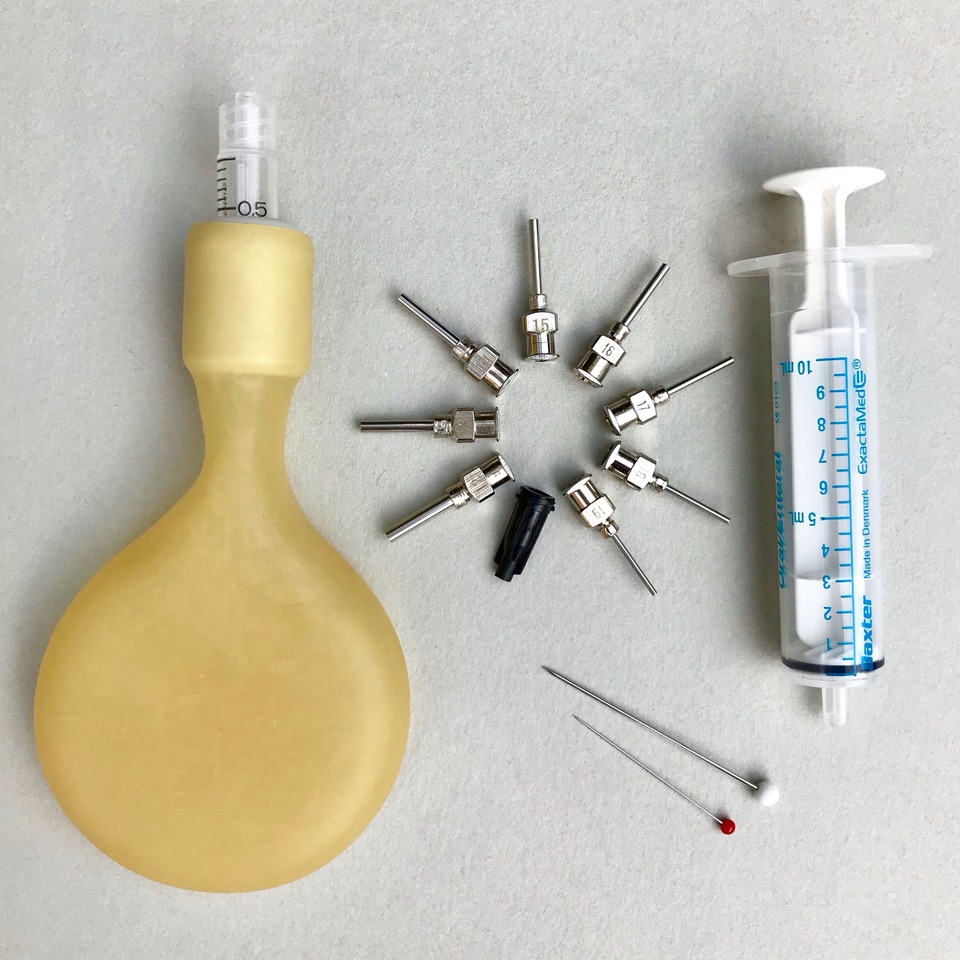
The slip trailer consists of the latex balloon/bag with a plastic tube which can take any of the 12 nozzles supplied. The 12 nozzles are really well engineered and can screw easily into the plastic tube. The 12 nozzles vary from very small (less than 1mm) all the way up to about 2mm, which means that you can alter the thickness of the line you trail, just by changing the nozzle. I would say that 12 nozzles are slightly overkill, as the difference between them is very slight. Four different nozzles would have sufficed for my needs. There are three pins varying in thickness, to put in the nozzle to prevent slip drying out if the trailer is left unused (and thus blocking the trailer). There is also a plastic end cap that screws onto the pipe (in the same way as the nozzle), which completely seals the trailer, which would be handy if say you want to continue using the slip trailer the next day without having to clean and refill it. There are no instructions included, but there are some on Mark’s website.
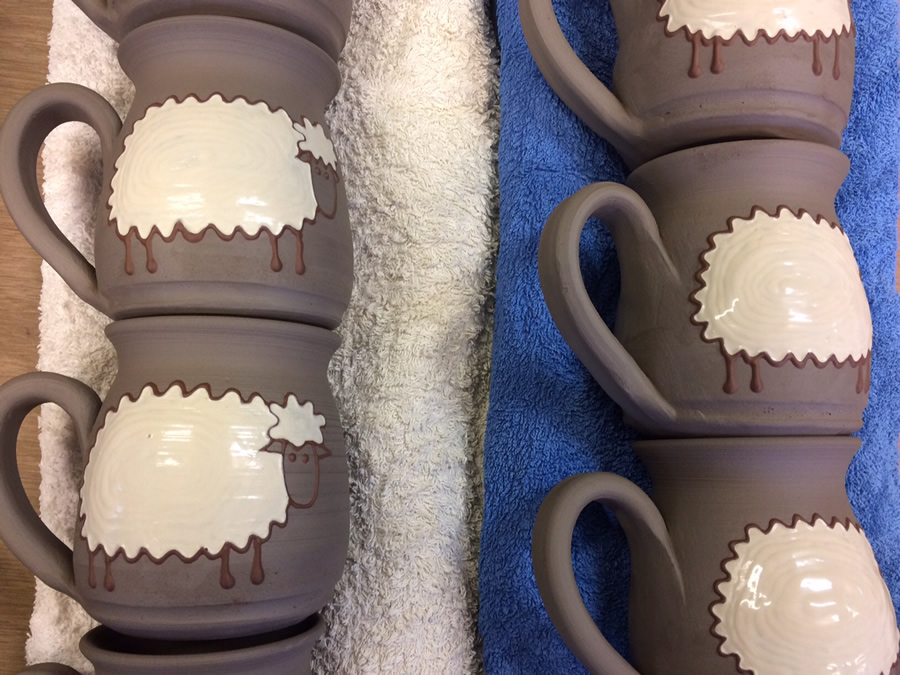
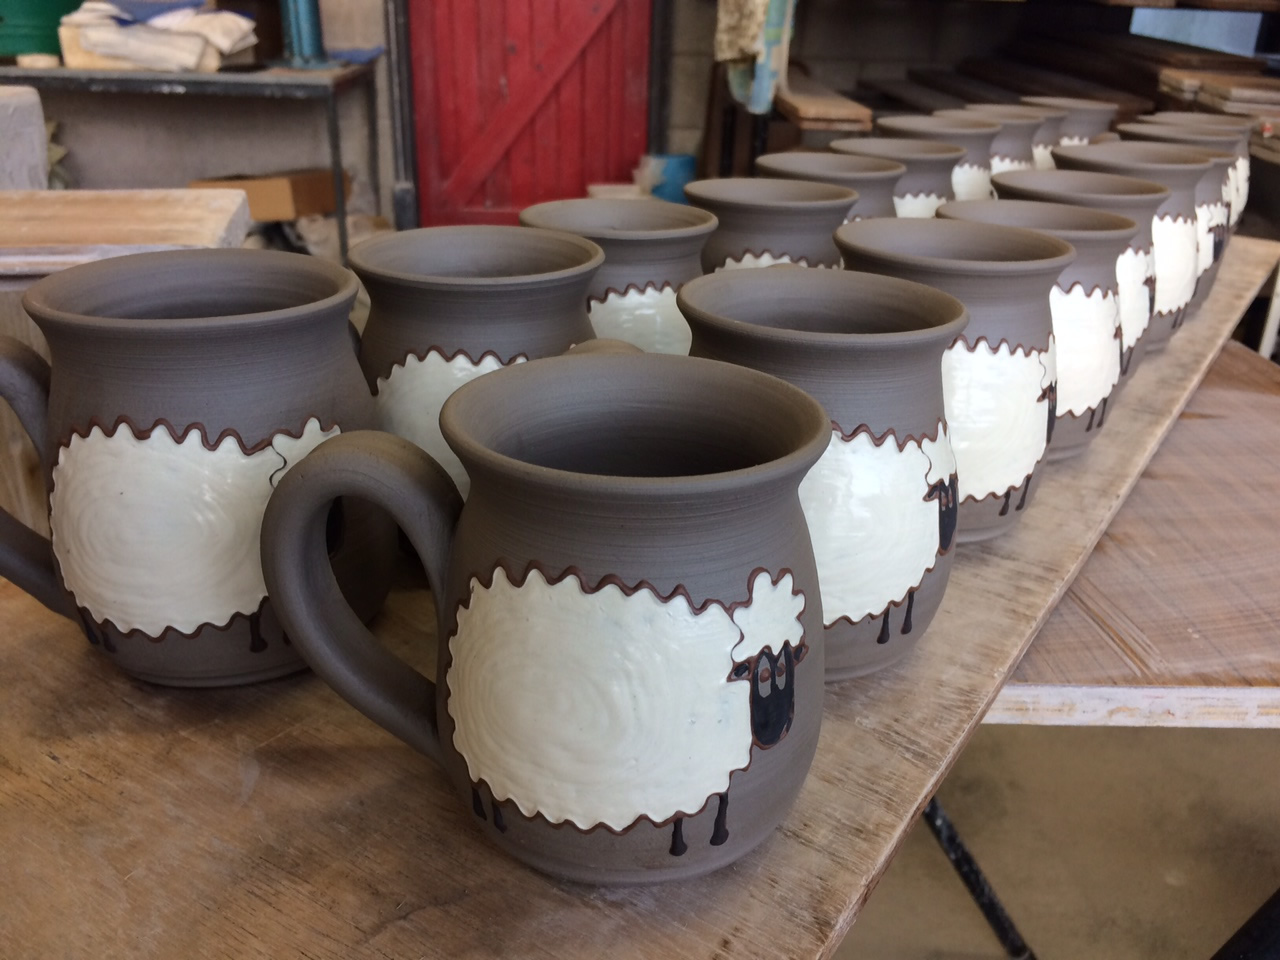
All I now needed were some pots to trail on. Luckily I had thrown 40 mugs that needed decorating with sheep for a local shop, so this was the ideal opportunity!
The first problem I had was how to get the slip into the latex bag. With all my other slip trailers you can simply depress them and suck the slip inside. However this slip trailer doesn’t suck. I quickly learnt the best way to fill it is to fill one of my old slip trailers with the slip and then squirt the slip into the latex bag. Hey presto my old slip trailers still have a use!
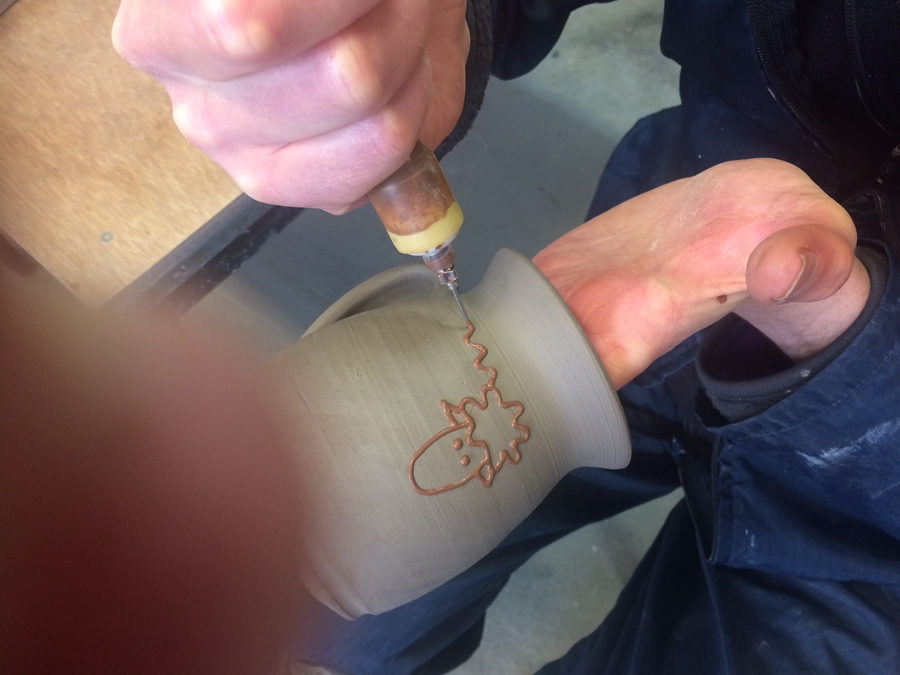
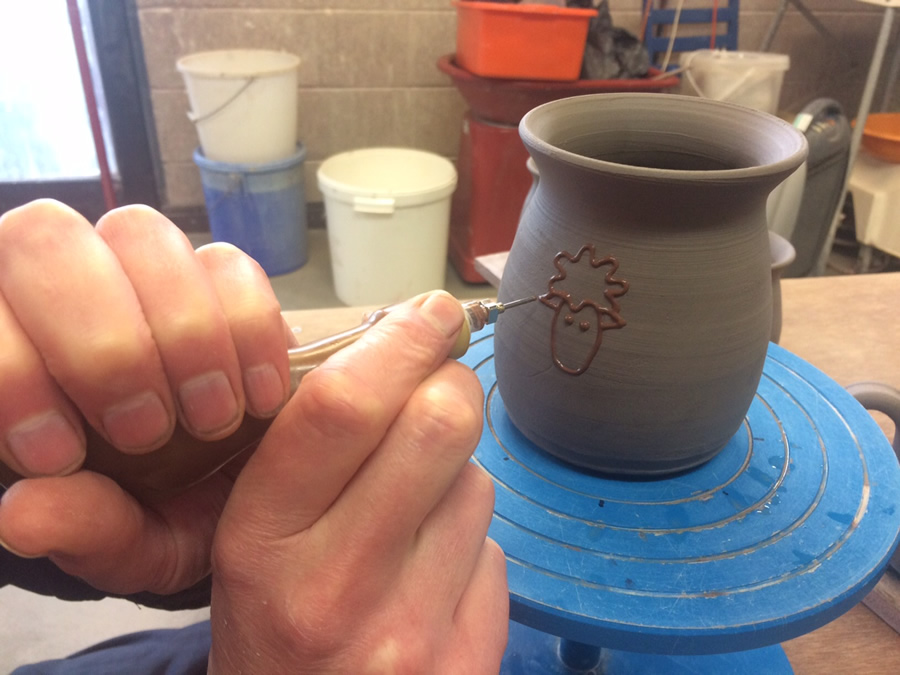
I started trailing the detail of the sheep onto the mug. To begin with it felt odd, mainly because I’m just not used to the shape of it. I feel the neck of the bag is a bit long and would probably consider cutting it shorter at some stage? I hardly had to exert any pressure to release the slip. I found once the trailer was filled and all the air expelled, air was never sucked back into the trailer, which meant absolutely no splodging of slip and no having to prime the trailer by squeezing out any air before going onto the pot. I ended up using two methods of holding the slip trailer whilst decorating these mugs. The first was to leave the mug on a Whirler wheel and hold the nib of the trailer with my right hand like a pen, whilst squeezing the bag with my left hand. This method was particularly good for fine detail, like the faces of the sheep. The second method was to hold the pot in my left hand and squeeze the trailer with my right hand. This allowed me to direct the trail with my right hand at the same time as moving the pot with my left hand. This worked best on larger areas, like the body of the sheep. The capacity of the bag is much larger than I thought it would be. I filled it twice to trail the outlines of 40 sheep. At the end of the job there was absolutely no ache in my hands, which is a first.
When it came to flooding much thinner white slip between the lines to create the sheep’s fleece, I discovered that the lack of resistance of the latex bag became a problem, as the slip just comes out too quickly. I had to resort back to my original slip trailer to do this, as it allows a higher degree of control with a thinner slip. However when it comes to trailing lines (with thicker slip) the Mark Dally slip trailer is head and shoulders above every other slip trailer I have used. One thing I discovered is that the nozzles from the Mark Dally slip trailer are interchangeable with the ones on my other slip trailer (xiem tools), which is an added bonus.
Once I was used to using the slip trailer it became a delight to operate. You can get a high degree of accuracy with it, as you can hold it like a pen and it solves my gripes with previous slip trailers I have bought, in that it doesn’t splodge and doesn’t cause your hands to ache. In short it is the best slip trailer I have used and I suspect the best slip trailer that you can purchase today. At £39 a shot this may seem expensive, but it’s cheap compared to the price of developing an RSI injury from using a thick walled rubber slip trailer for any length of time! I’m not sure about the longevity of the latex bag and plastic pipe? I’m hoping that Mark would sell the bag and plastic pipe separately (you’ll never need to replace the nozzles). I would be happy to buy a couple more bags and pipes if this were possible, as it would mean I could use more than one coloured slip without having to clean out the bag (this would be really handy for commemorative plates).
To purchase the Mark Dally Slip Trailer visit Mark’s site here:
This course begins Wednesday 9th Sept for ten weeks, 7.30pm until 9.30pm. The total cost, including materials and firing of 6 mugs, is £85 (additional mugs are charged at £3.00 per mug). The course is suitable for complete beginners to more advanced students. There will be tea and biscuits at half time.
The idea of this class comes from me asking my wife what sort of a pottery course would appeal to people and she said that a course which resulted in making a set of mugs would be a winner!
The more I thought about this concept for a class the more I liked it, as It means you can learn a variety of ways of assembling mugs and handles as well as different decoration techniques to apply to mugs.
It also fits my requirements of teaching pottery in a slightly different way and giving you a chance to get away from the typical pottery workshop class.
Why learn how to make a set of mugs
• You will learn a variety of different clay assembling skills, including throwing, coiling and slabbing.
• You will learn multiple decorating techniques.
• Making a set of mugs will increase your overall skills with pottery.
How I’m going to teach it
I’m going to start off with slab assembling a mug, followed by coil assembling a mug. I will then move onto throwing mugs on a pottery wheel.
In order to teach throwing mugs on a pottery wheel, I’m going to take you through the basics of centring clay, opening out clay, making basic bowls, making basic cylinders and finally making mug shapes.
In between making mugs, I am going to teach a variety of decorating techniques such as inlay, slip resist, slip trailing, wax resist and general glazing techniques.
I will also teach how to make handles. I will teach how to pull handles (on and off the pot), and how to extrude handles and how to use wire loops to make handles.
What you need to bring with you
Basically just wear old warm clothes that you don’t mind getting clay on. Also it’s a good idea to have short nails.
Cost of the course and materials
The cost of the course is £85 per person. This price includes firing 6 mugs per person. If you want additional mugs then I will charge £3.00 per mug
How do I get on the courses?
Just send me a deposit of £20 and I’ll book you on, the remaining £65 should be paid at the first class. You can either post me a cheque, bacs it through or call round with the money.
I need a minimum of 8 people for this course to run. In the unlikely event of me not getting enough people then I will run the first class for free and give you your deposits back.
This ten week course begins Wednesday 17th Sept 2014 for ten weeks, 7.30pm until 9.30pm. The total cost including materials and firing is £85. The course is suitable for complete beginners to more advanced students. There will be tea and biscuits at half time.
Why learn how to make a teapot over ten weeks
I’ve spent a lot of time teaching workshop classes where everybody can work on their own thing but I thought it would make a change and be fun to learn pure throwing techniques together as a group of students over a few weeks. A teapot is one of the most challenging things you can make on a pottery wheel, as it encompasses just about every wheel technique including making internal galleries, fitting lids, collaring the clay in to make a spout. If you can master the teapot, then you should be able to throw just about any other shape. Don’t worry if you are new to ceramics/throwing, I’ll give you all the help you need.
How I’m going to teach it
I’m going to start with the basics, learning centring, opening out and making basic bowl shapes over the first couple of weeks. Then over the next few weeks I will teach how to make cylinders, how to make collar clay in order to make spouts, how to make an internal gallery, how to make lids, how to pull handles from the teapot body and finally how to assemble a teapot.
Here’s a video of me making a teapot from scratch to give you some idea of what’s involved.
What you need to bring with you
Basically just wear old warm clothes that you don’t mind getting clay on. Also it’s a good idea to have short nails!
How do I get on the course
Just send me a deposit of £20 and I’ll book you on, The remaining £65 should be paid at the first class.
I need 8 people for this course to run, no more, no less! (8 people would give us 2 to each wheel.) There are 6 people booked on already. In the unlikely event of me not getting enough people then I will run the first class for free and give you your deposits back.
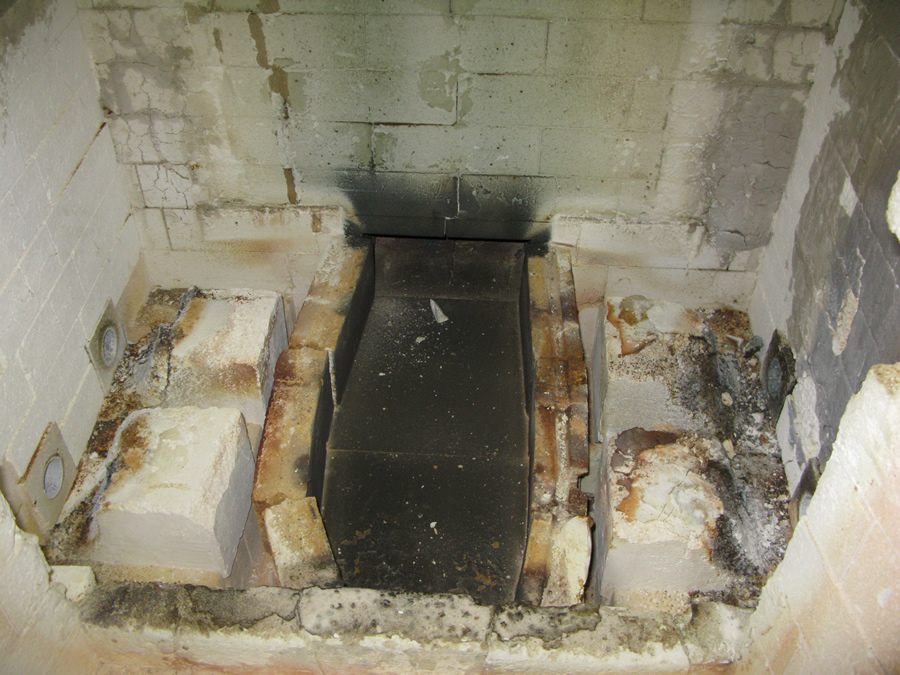
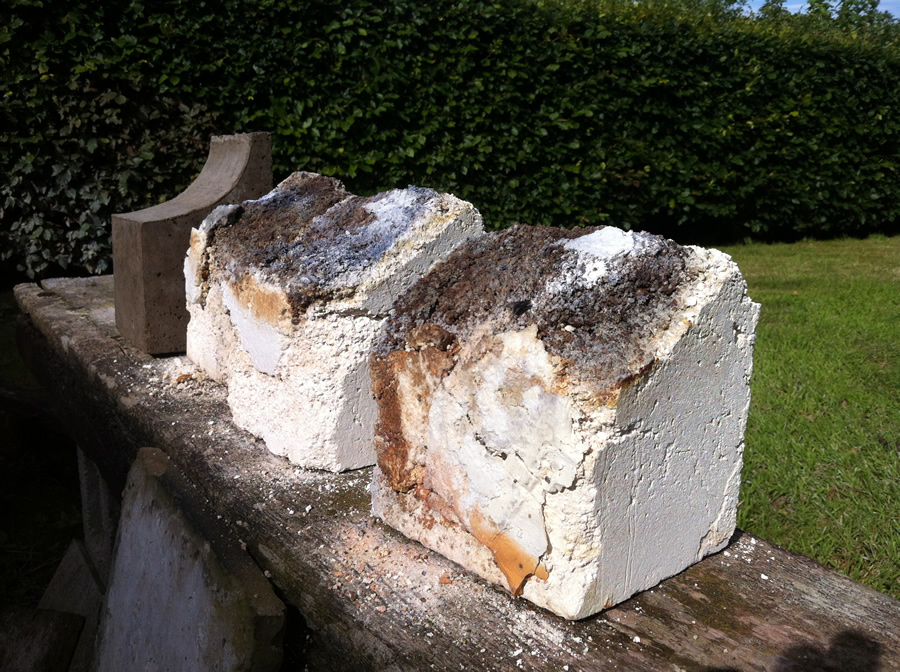
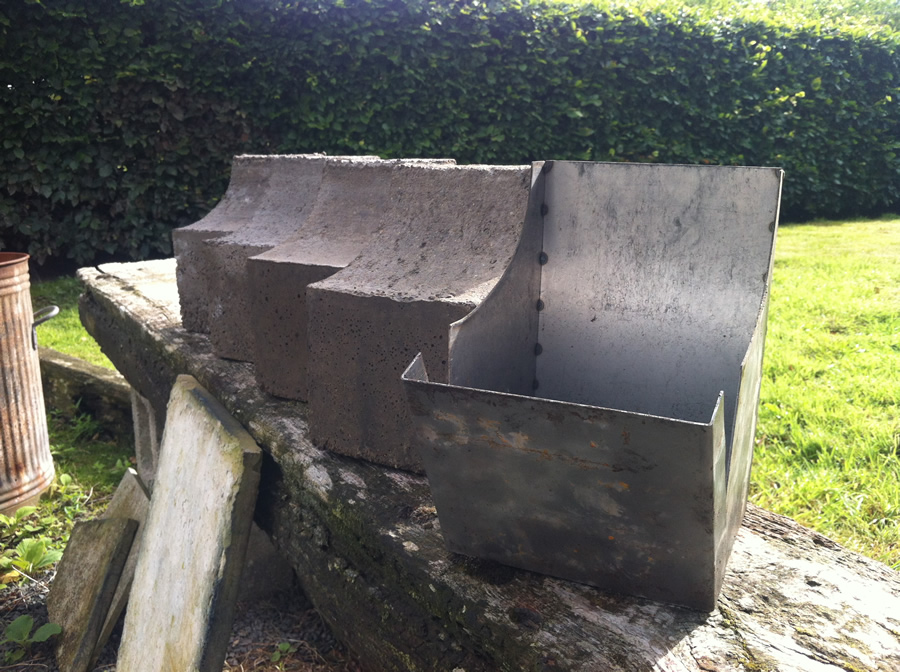
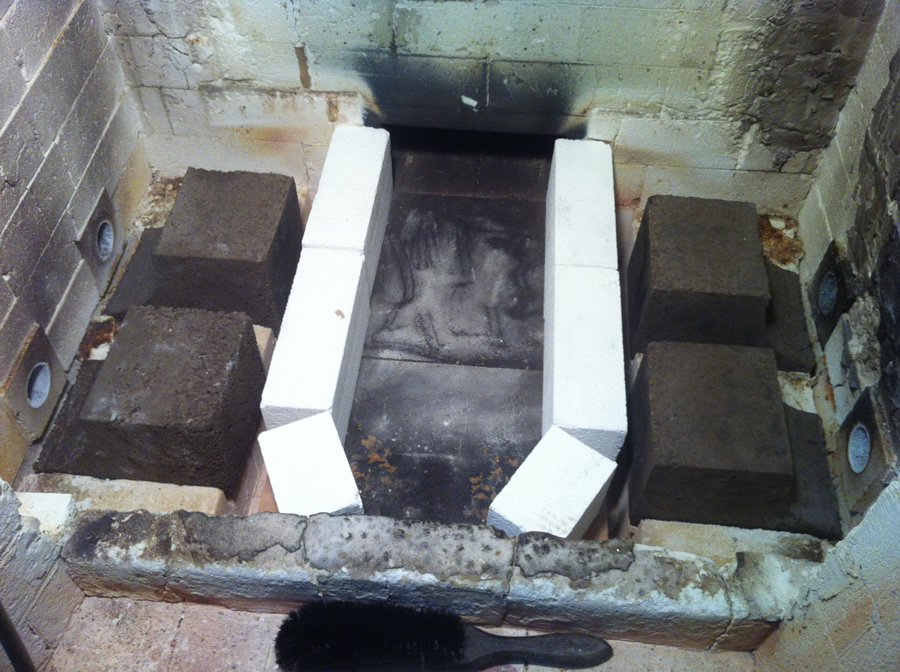
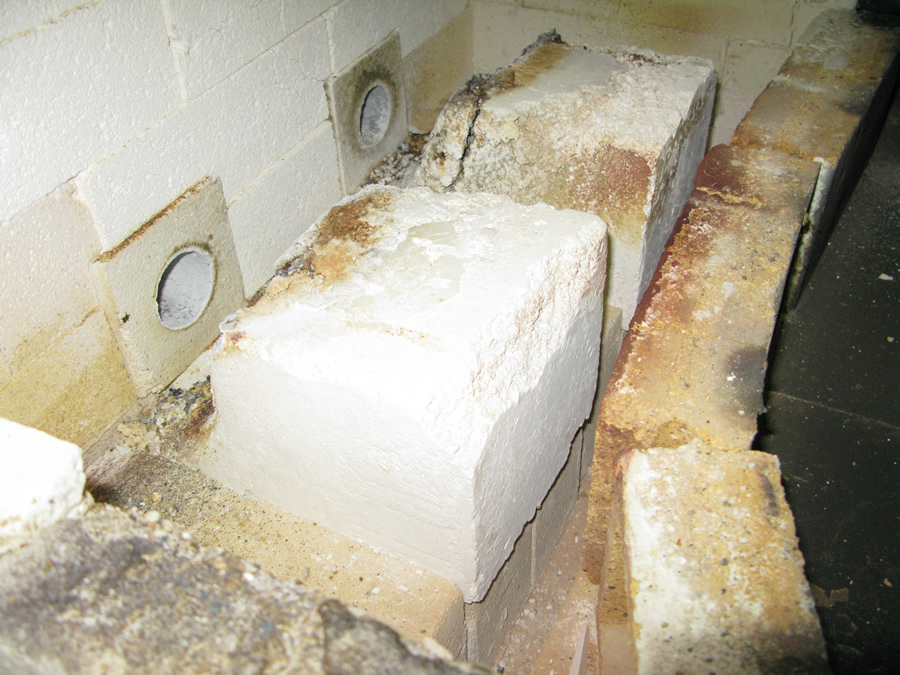
After over 40 years of use, the four quarls on our kiln are looking slightly worn. Here they are in the kiln:
Quarls are basically curved blocks that deflect the flame from the burners, so the flame shoots up the side of the bag wall.
Here they are taken out of the kiln:
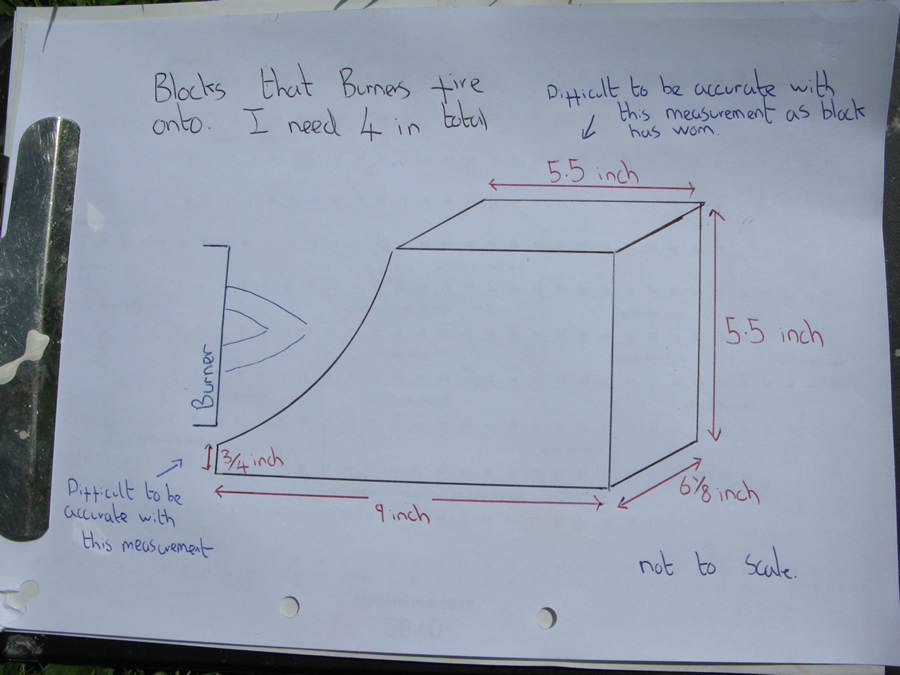
My first job was to try and get accurate measurements from the original quarls:
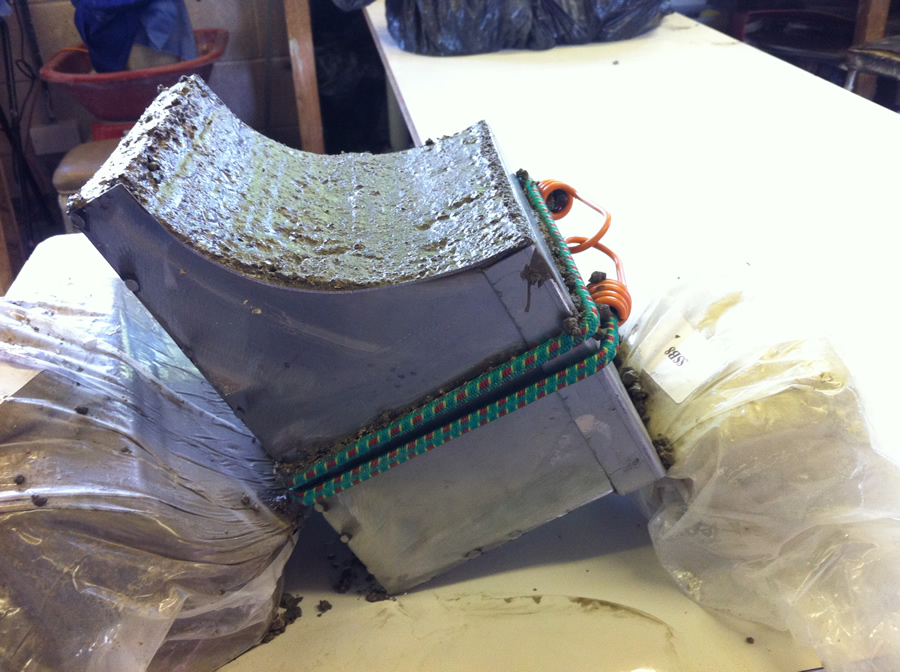
Next I had to produce a mould which replicates these dimensions. Fortunately my friends Adrian and Dylan Cross at Northern Kilns lent a hand with this by fabricating a metal mould for me. A wooden mould would have worked just as well though.
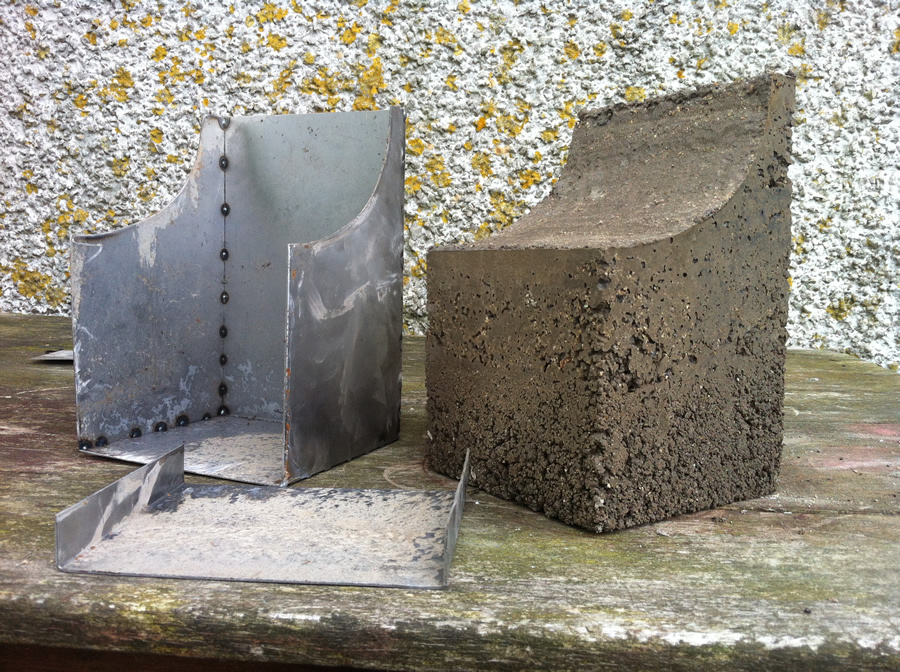
You need to paint a mould release agent (engine oil or Vaseline works well) onto the inside of the mould and then fill it with a coarse castable refractory. Castable refractory can be bought in 25 kilo bags and has a maximum firing temperature. Generally you should add a couple of hundred degrees to the temperature of your kiln, as things get a bit hotter close to the flame. We fire to 1280 degrees centigrade, so a 1500 degree- 1600 degree castable would make sense. The castable refractory is mixed like concrete with water. Avoid getting it too sloppy! It is then placed into the mould and forced down with a piece of wood. The curve can then be worked with a trowel.
It should then be left 24 hours to dry before being released from the mould.
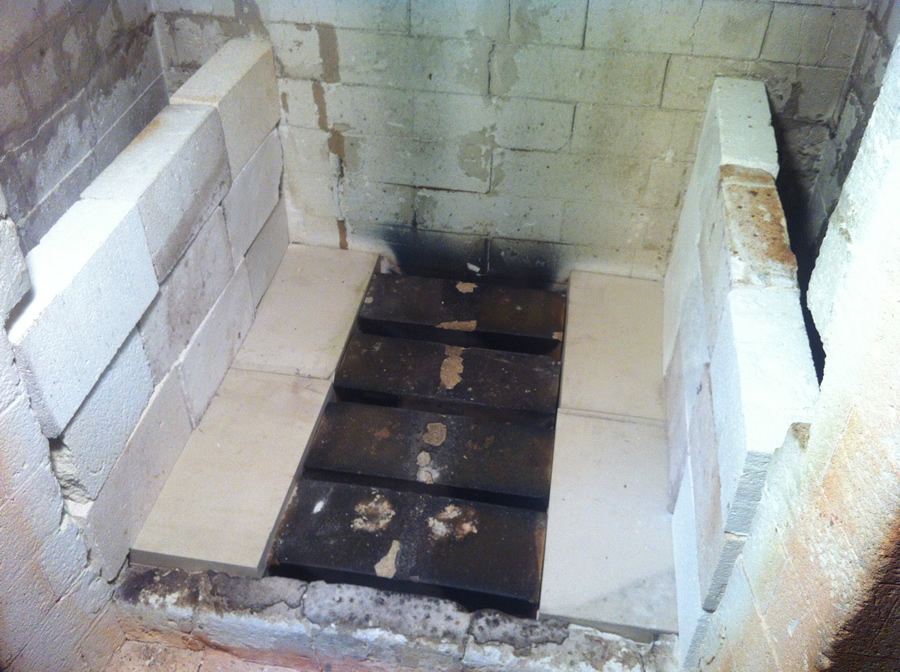
Next it is best leaving the quarls to dry for 48 hours or so and then placing them in the kiln.
I then turn the kiln on a low heat for an hour, to make sure they are totally dry, then rebuild the rest of the kiln.
And hopefully we’ll get another 40 years of use out of them!!
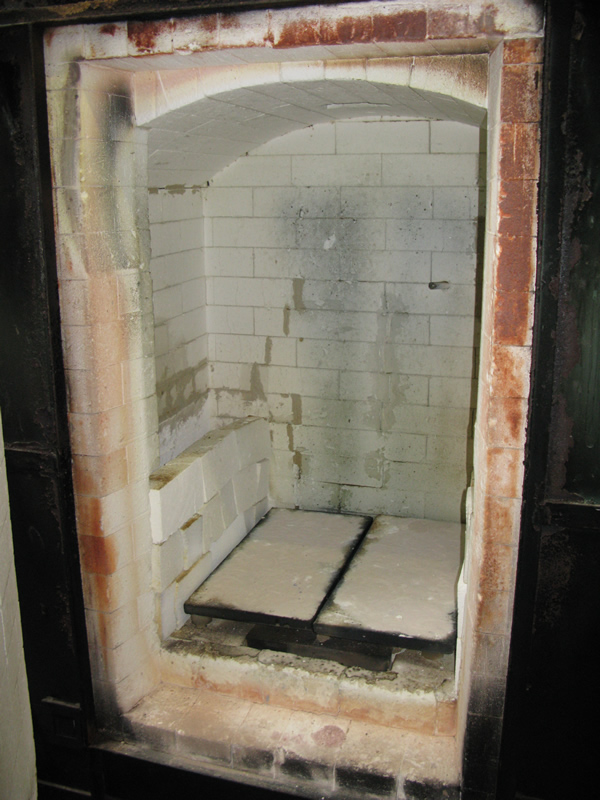
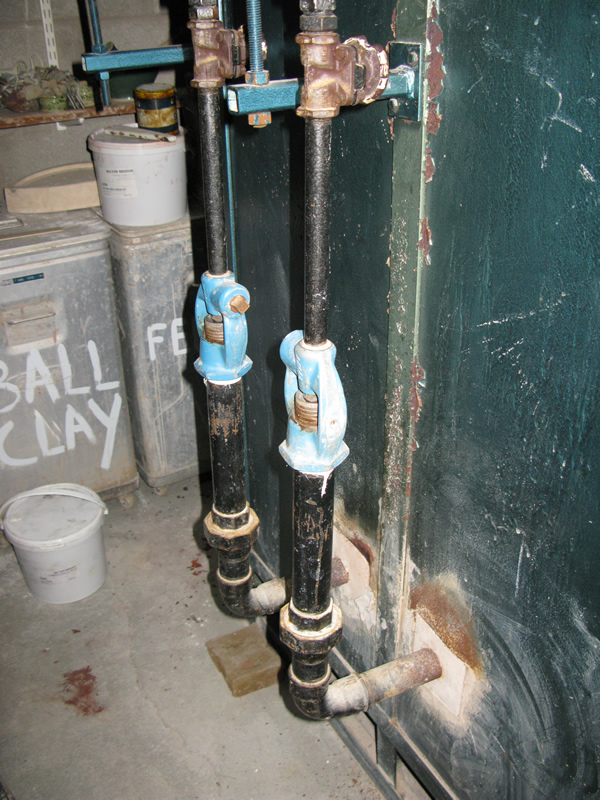
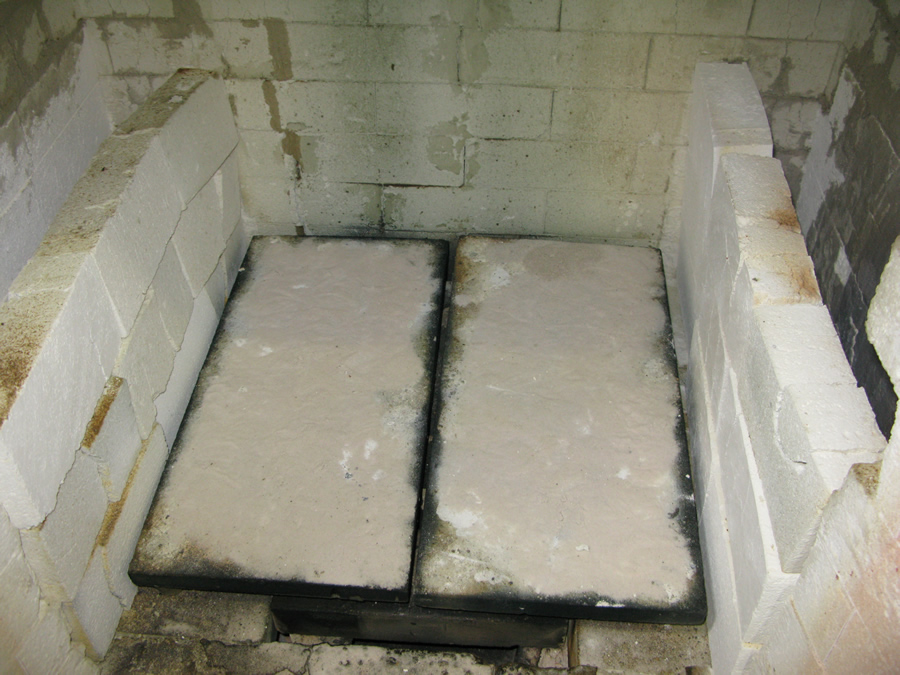
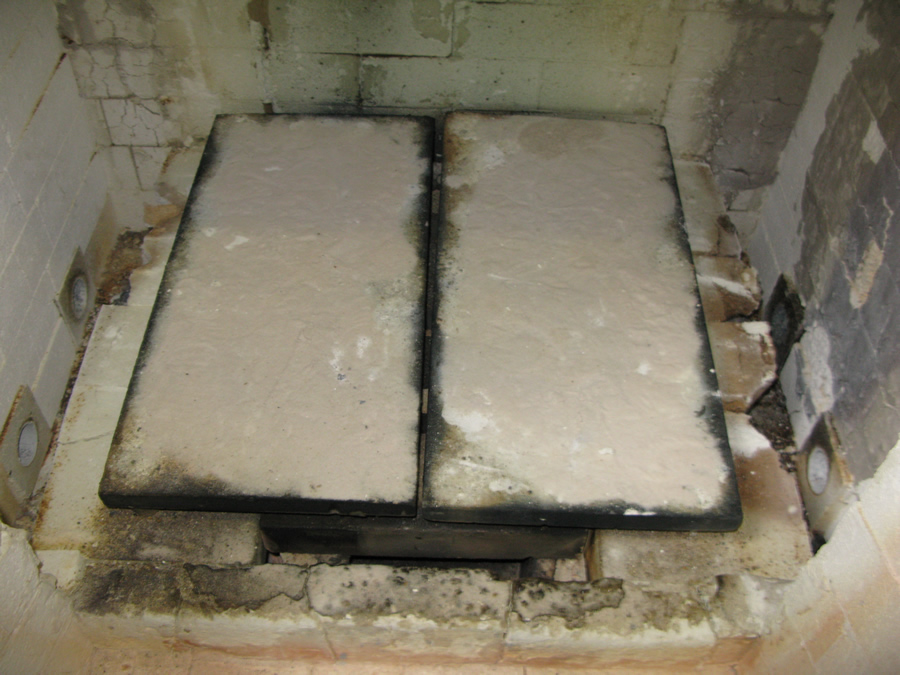
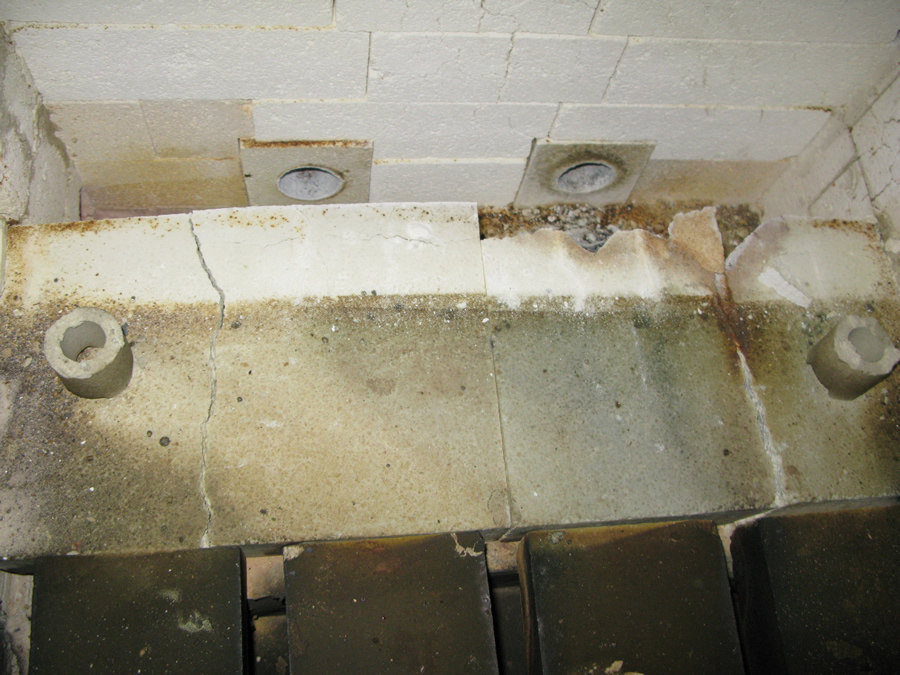
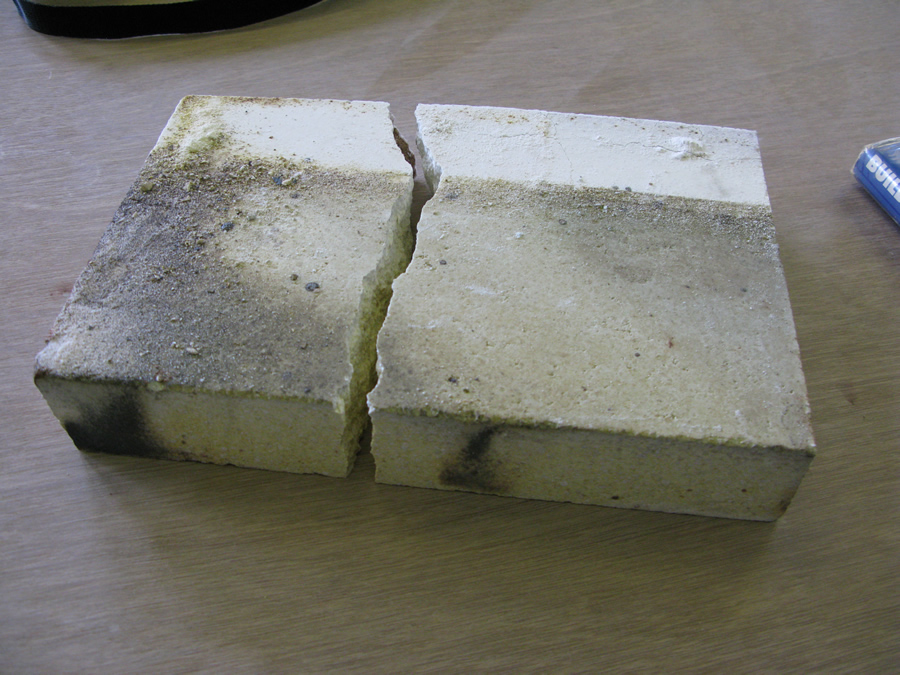
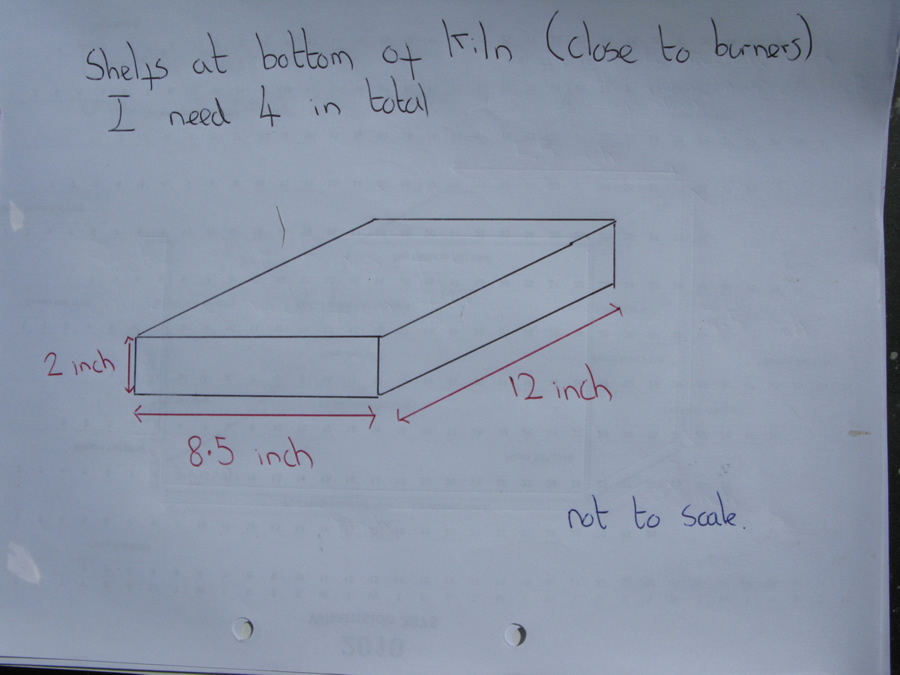
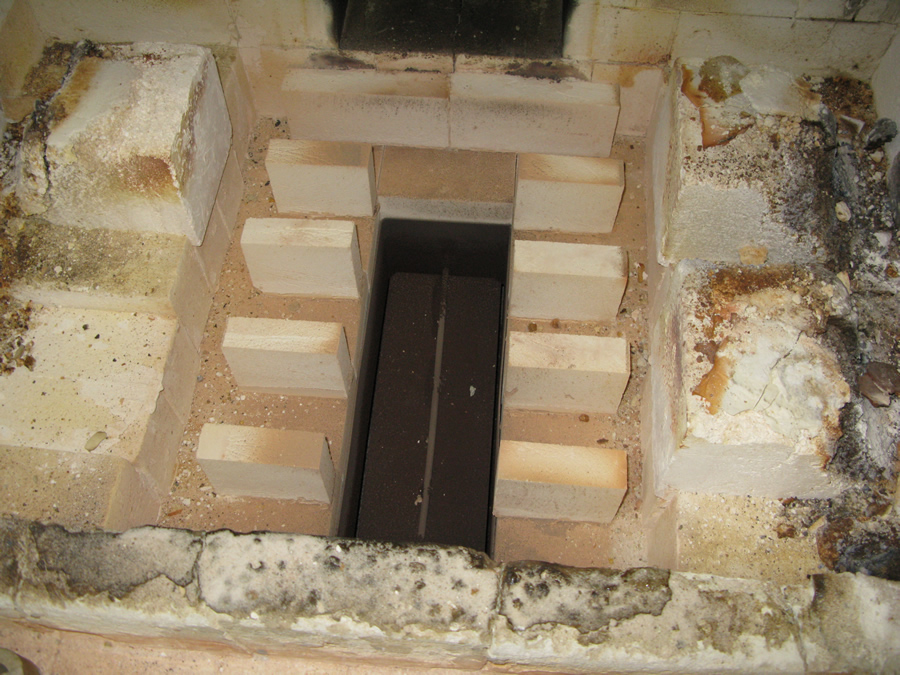
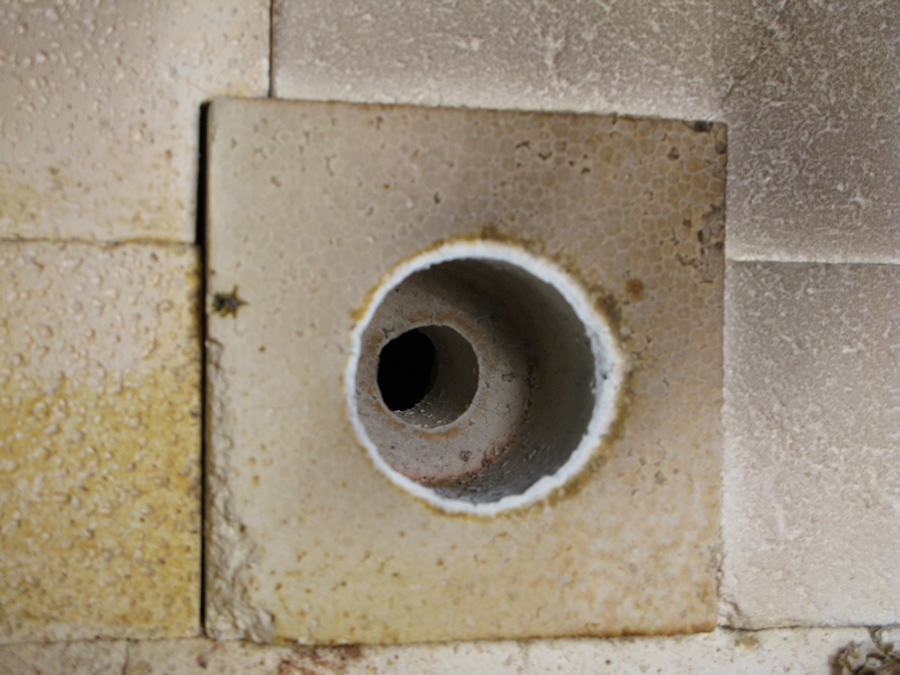
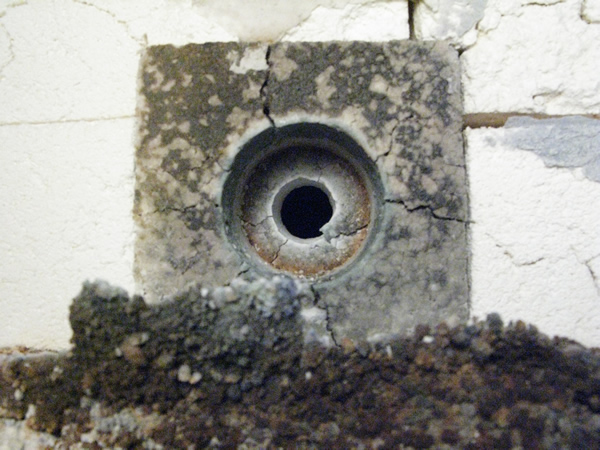
I’m doing some maintenance on our glaze kiln. The kiln is made by Kilns and furnaces and was bought by my mum sometime around 1975. We have fired it to 1260 degrees (cone 9-10) between 40 and 60 times a year since then. The cubic capacity of the kiln is 12 cubic foot. It can fire 161 mugs per firing. It has a serial number stamped on the door “02175” Here it is; And with the door open: It is powered by calor gas. It has 4 venturi burners. Two on each side of the kiln. They look like this: Here are the bag walls: Okay. I’m going to start to take it to bits now and work out what i need to replace. Here is the kiln without the bag walls: Here is the kiln without the bottom two kiln shelves: You can now start to see some of the problems. The 4 shelves in the middle are fine, but the 4 shelves on the outside are shot and need replacing. Here is a closer look: Here is one out of the kiln: The dimensions of this shelf are; 2 inch thick and 8.5 inch by 12 inch. Here is a sketch of it with the dimensions;
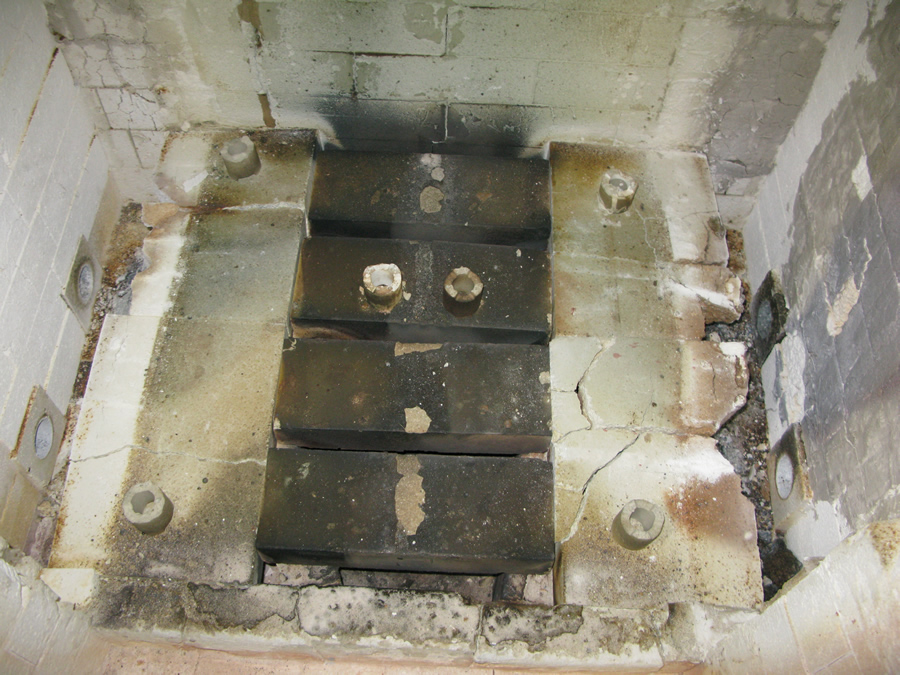
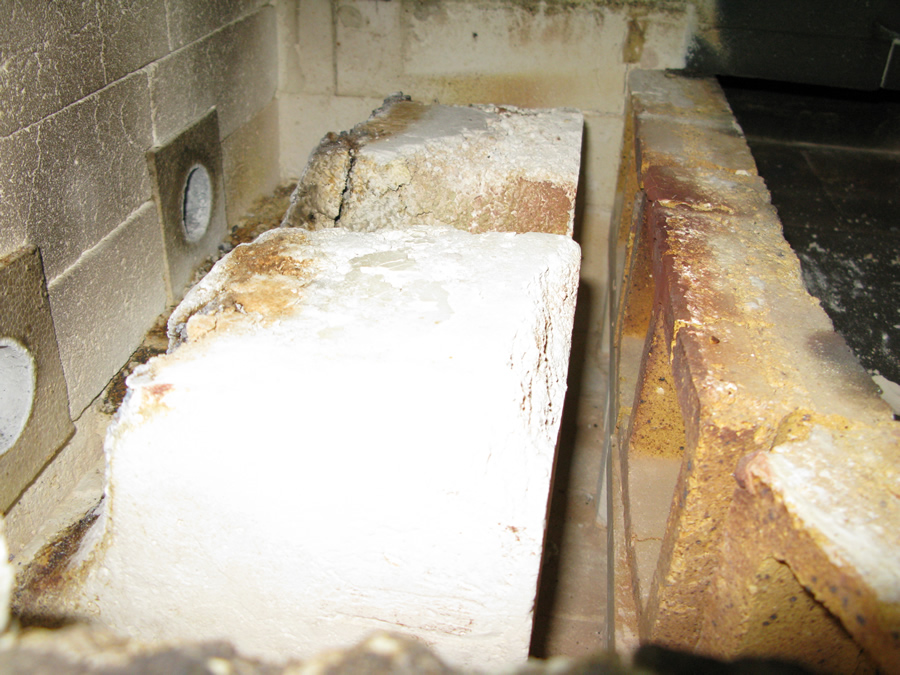
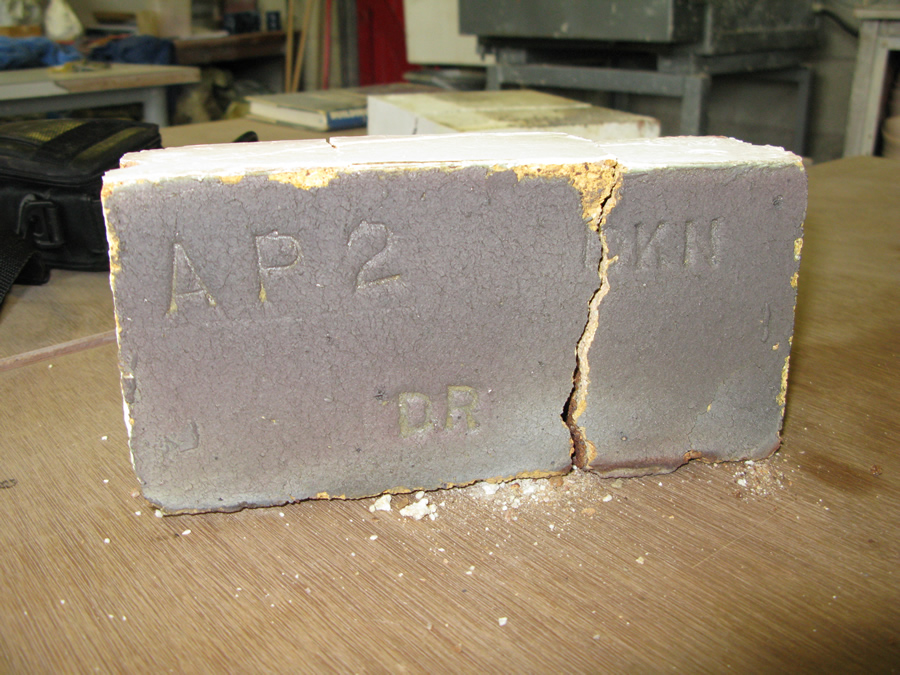
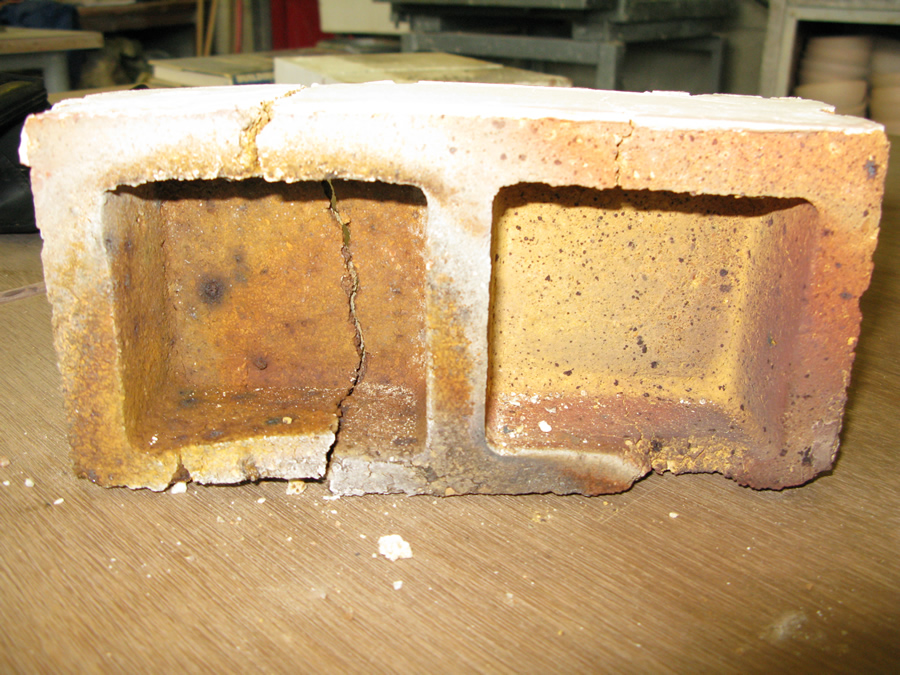
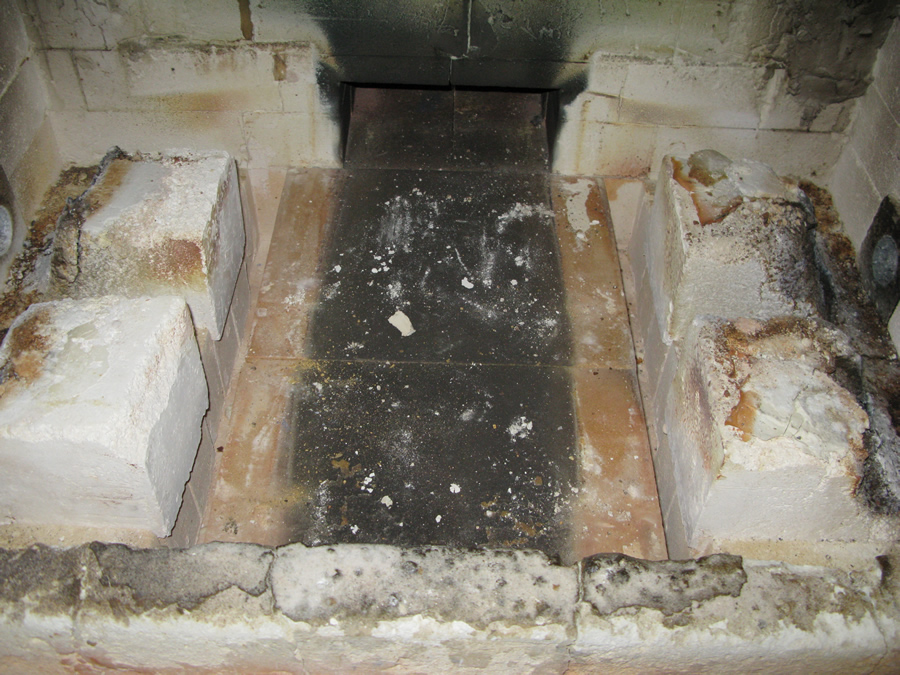
Taking the four shelves in the middle reveals this: There are 4 AP2 bricks and two half AP2 bricks stood on end on either side which supported the 4 shelves. Here is a picture of one of these bricks close up. Note the proximity to the burners!; And here is one of the AP2 bricks out of the kiln; And a view of the other side: I need four of these AP2 bricks to replace the broken ones! Once these bricks are out it looks like this: The two shelves underneath are fine. Here is what it looks like with these two shelves removed (I’ve also removed one of the burner deflection blocks on the front left): The brick work below these two shelves is fine. In fact the bricks look as though they were cut yesterday! Okay now onto the burner blocks; Three burner blocks look like this; Which look fine. However one burner block looks like this: I wonder if this needs replacing? the discolouration might be due to a lack of oxygen from the venturi burner. In which case I should just need to open the venturi burner more and allow more oxygen into the kiln? The burner deflection blocks look like this: Here is one out of the kiln: I cant decide whether to patch these up or get new ones? The block looks as though it is made out of cast-able refractory material. I guess I would have to make a wooden mould to make them? the dimensions are 9 inch by 6 1/8 inch base, 5.5 inch tall, 5.5 inch by 6 1/8 top, with curve. Here is a sketch of the block with the dimensions;
Here is a video of the 4 burners working;
Hope you have enjoyed this as much as me! If you have any opinions on the discoloured burner or on how to make the deflection blocks then please email me; lee@benthampottery.com